





Stripo Tutorial for Beginners: Create and Export Your First Email Template
- 1Stripo Tutorial for Beginners: Create and Export Your First Email TemplateThis article
This article contains affiliate links. If you sign up through these links, we may earn a commission at no extra cost to you.
Most email marketing platforms come with built-in editors, but they don’t always give you the design flexibility you want.
That’s where Stripo comes in. It lets you design responsive HTML emails using a drag-and-drop editor, then export them to a compatible email marketing platform.
But how much can you actually accomplish with Stripo’s free plan? And is the editor as beginner-friendly as it claims?
To find out, we created a free Stripo account, customized a welcome email template, and exported it as HTML to see how the process works in practice.
In this tutorial, we’ll walk you through the same process, share what worked and what didn’t, and highlight a few things worth knowing before you start.
What Is Stripo, and Who Is It For?
Stripo is an email design platform that offers ready-made templates, a visual editor, and reusable content modules.
Unlike email marketing platforms such as Omnisend, which manage subscribers and automate email campaigns, Stripo focuses on designing the emails themselves.
Once your template is ready, you can export it to a compatible email marketing platform for delivery.
Stripo is particularly useful for Shopify store owners, email marketers, and freelancers who want more flexibility over their email designs without writing HTML or CSS.
What Can You Actually Do with Stripo’s Free Plan?
Stripo offers a free plan with no credit card required and no fixed expiration date.
You can create and customize email templates without upgrading, although the free plan has limits on storage, exports, and certain features.
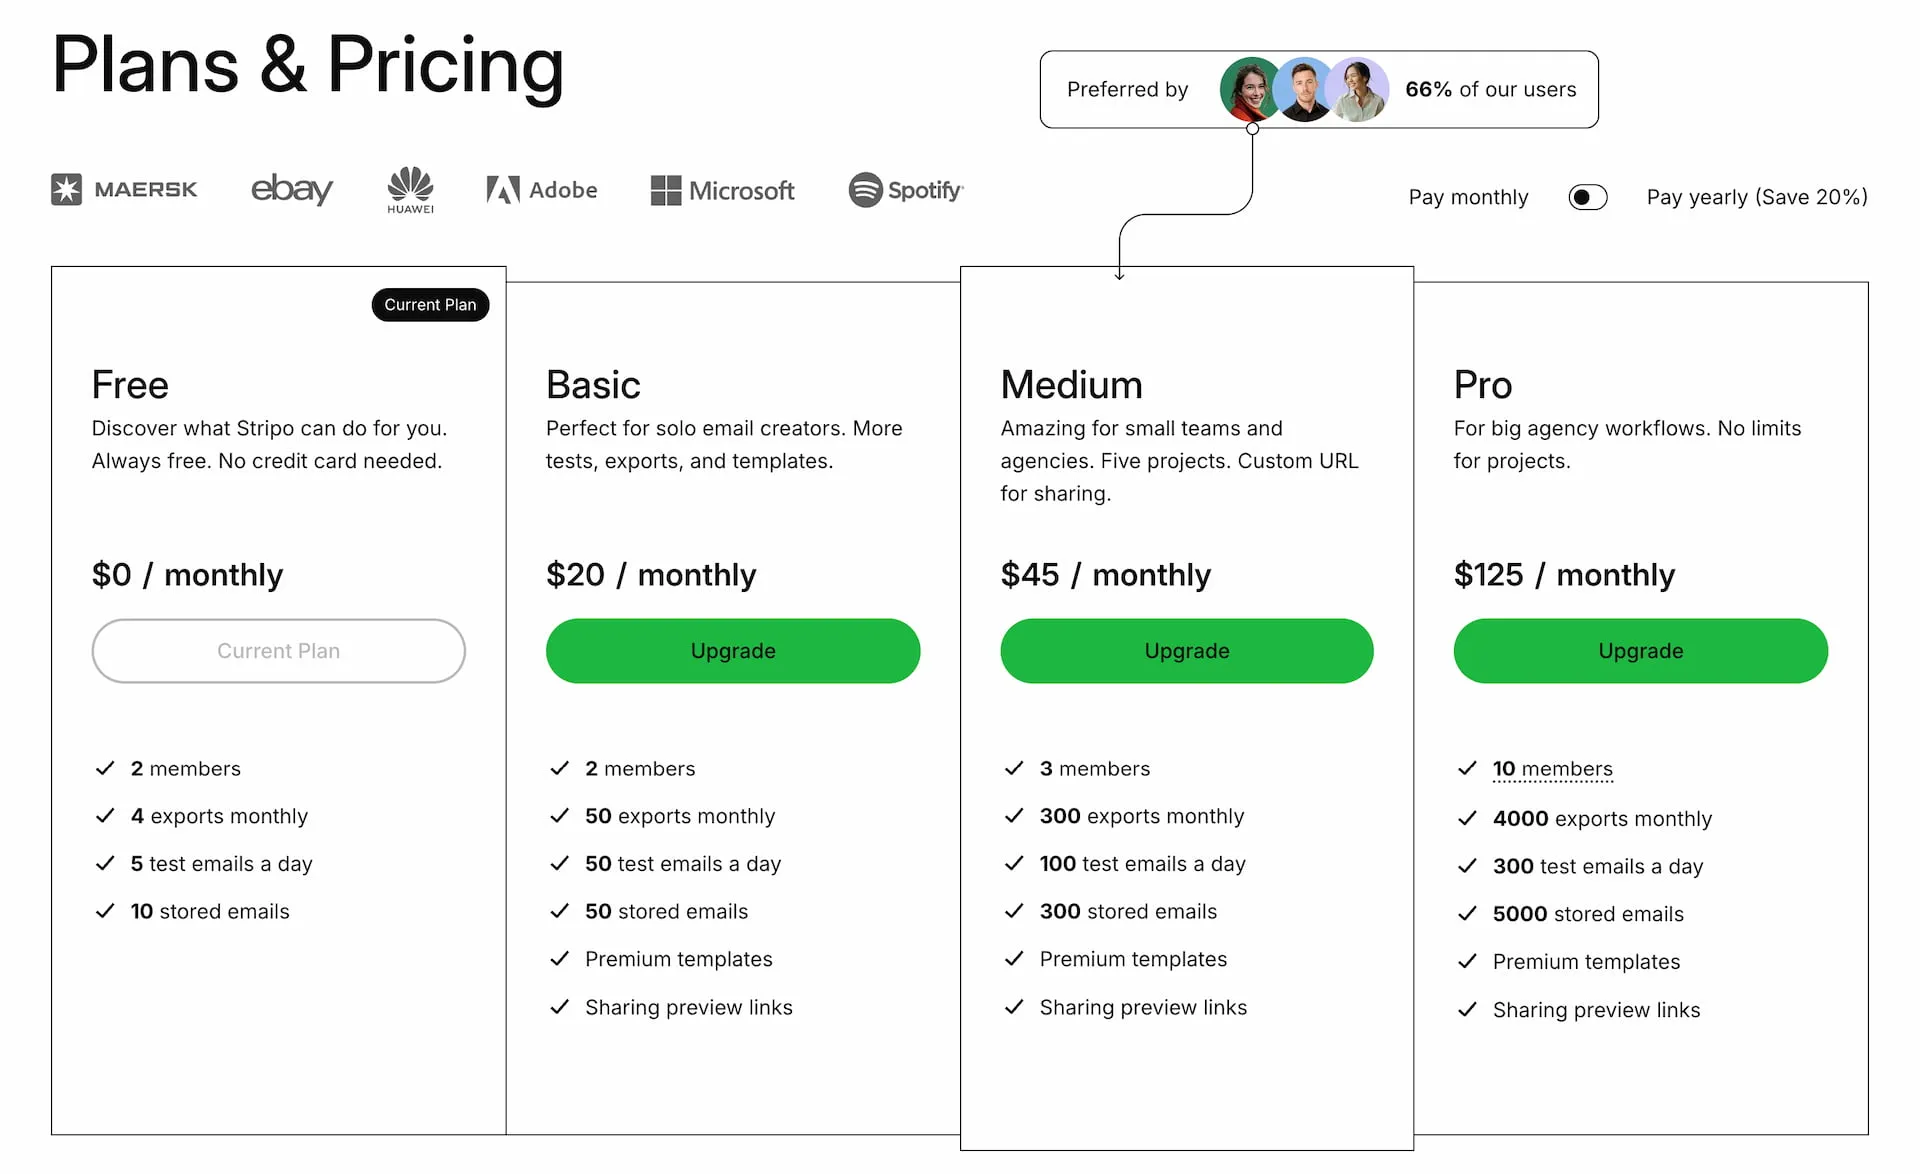
Here are the main limits worth knowing:
| Feature | Free Plan |
|---|---|
| Projects | 3 |
| Members | 2 |
| Stored emails and templates | 10 |
| Exports | 4 per month |
| Test emails | 5 per day |
The free plan is sufficient to follow this tutorial, but the four monthly exports are worth keeping in mind. Editing and saving templates doesn’t use your export allowance, while downloading HTML or copying the generated code does.
If you only export templates occasionally, this may be enough. However, the limit could become restrictive if you frequently export new or updated designs.
You can compare the available plans on the official Stripo pricing page.
Step 1: Create Your Free Stripo Account
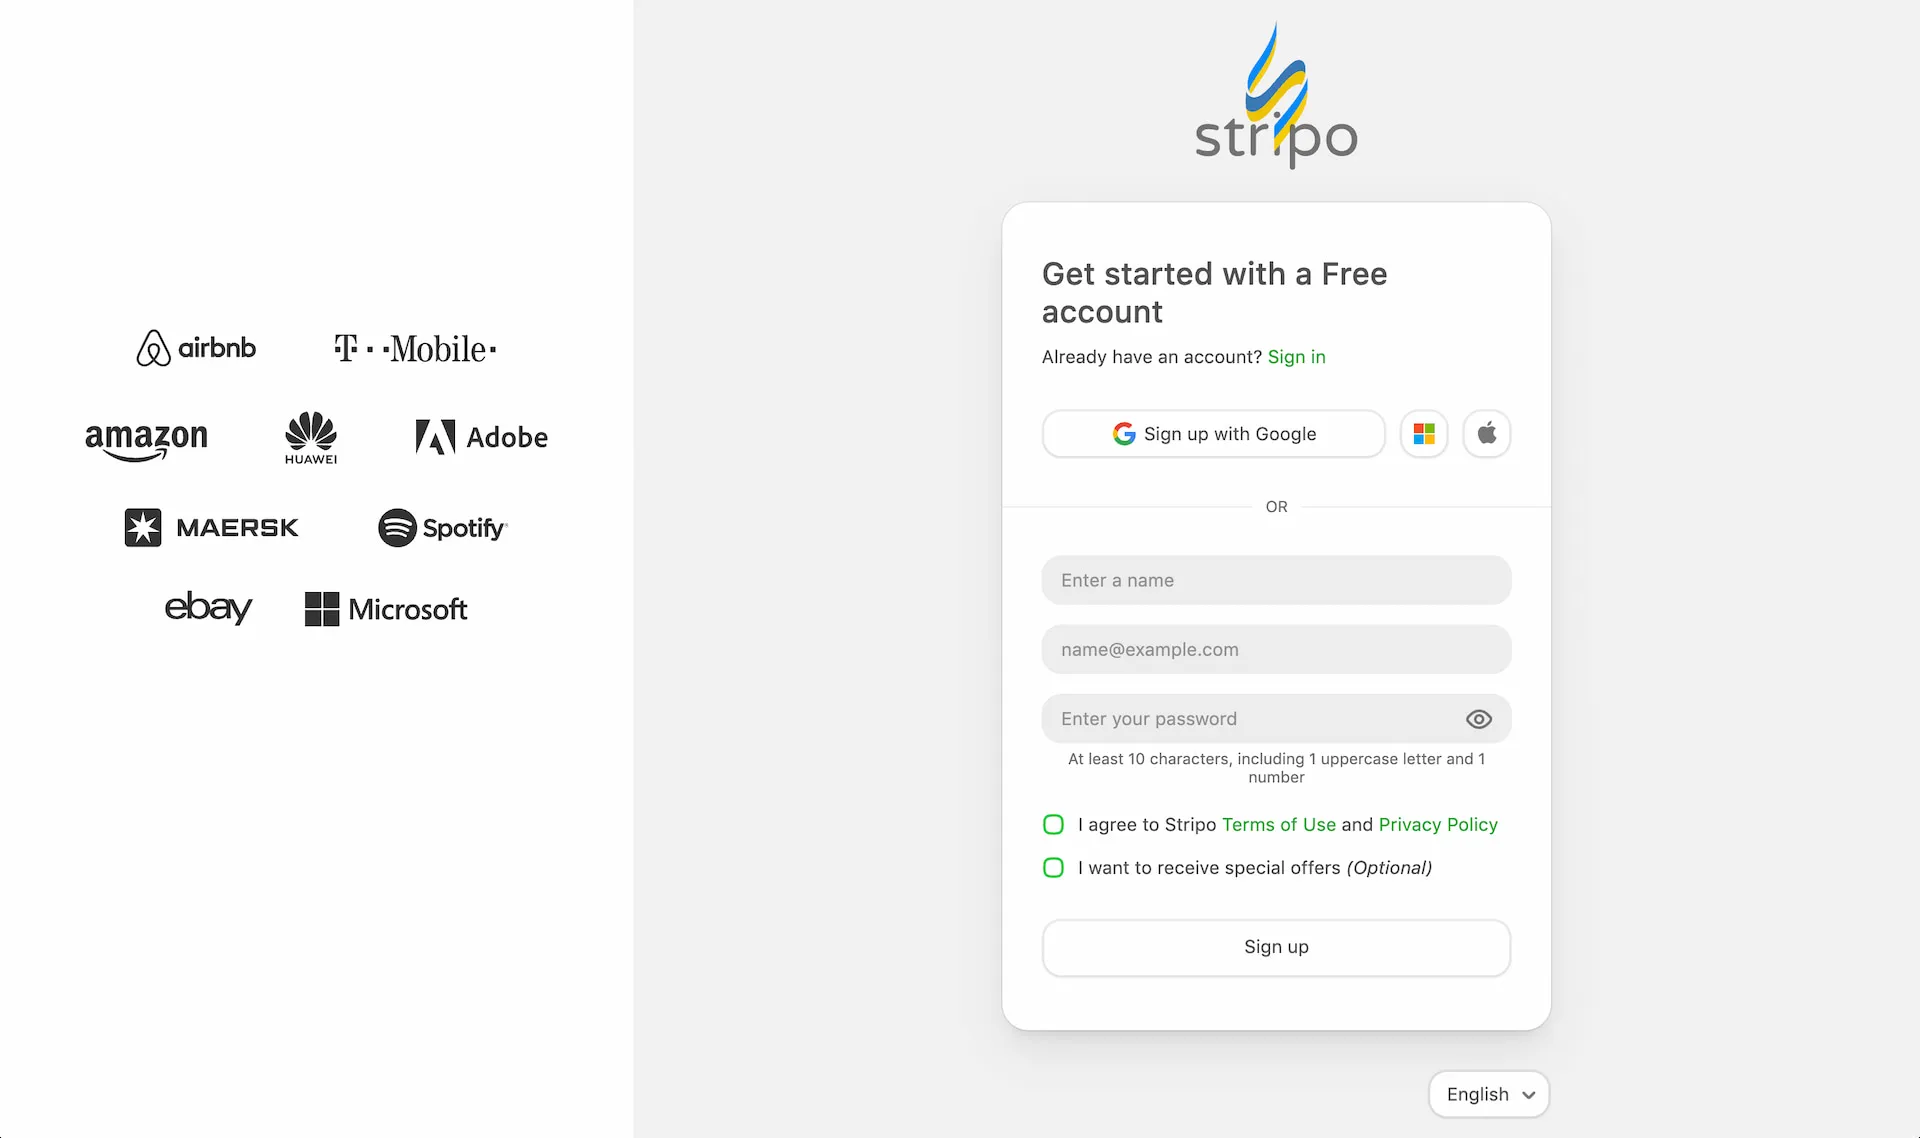
Visit the Stripo website and click Get started free.
You can sign up with Google, Microsoft, or Apple, or create an account using your name, email address, and password. If you register with an email address, complete the email verification to access your account.
Step 2: Choose a Free Email Template
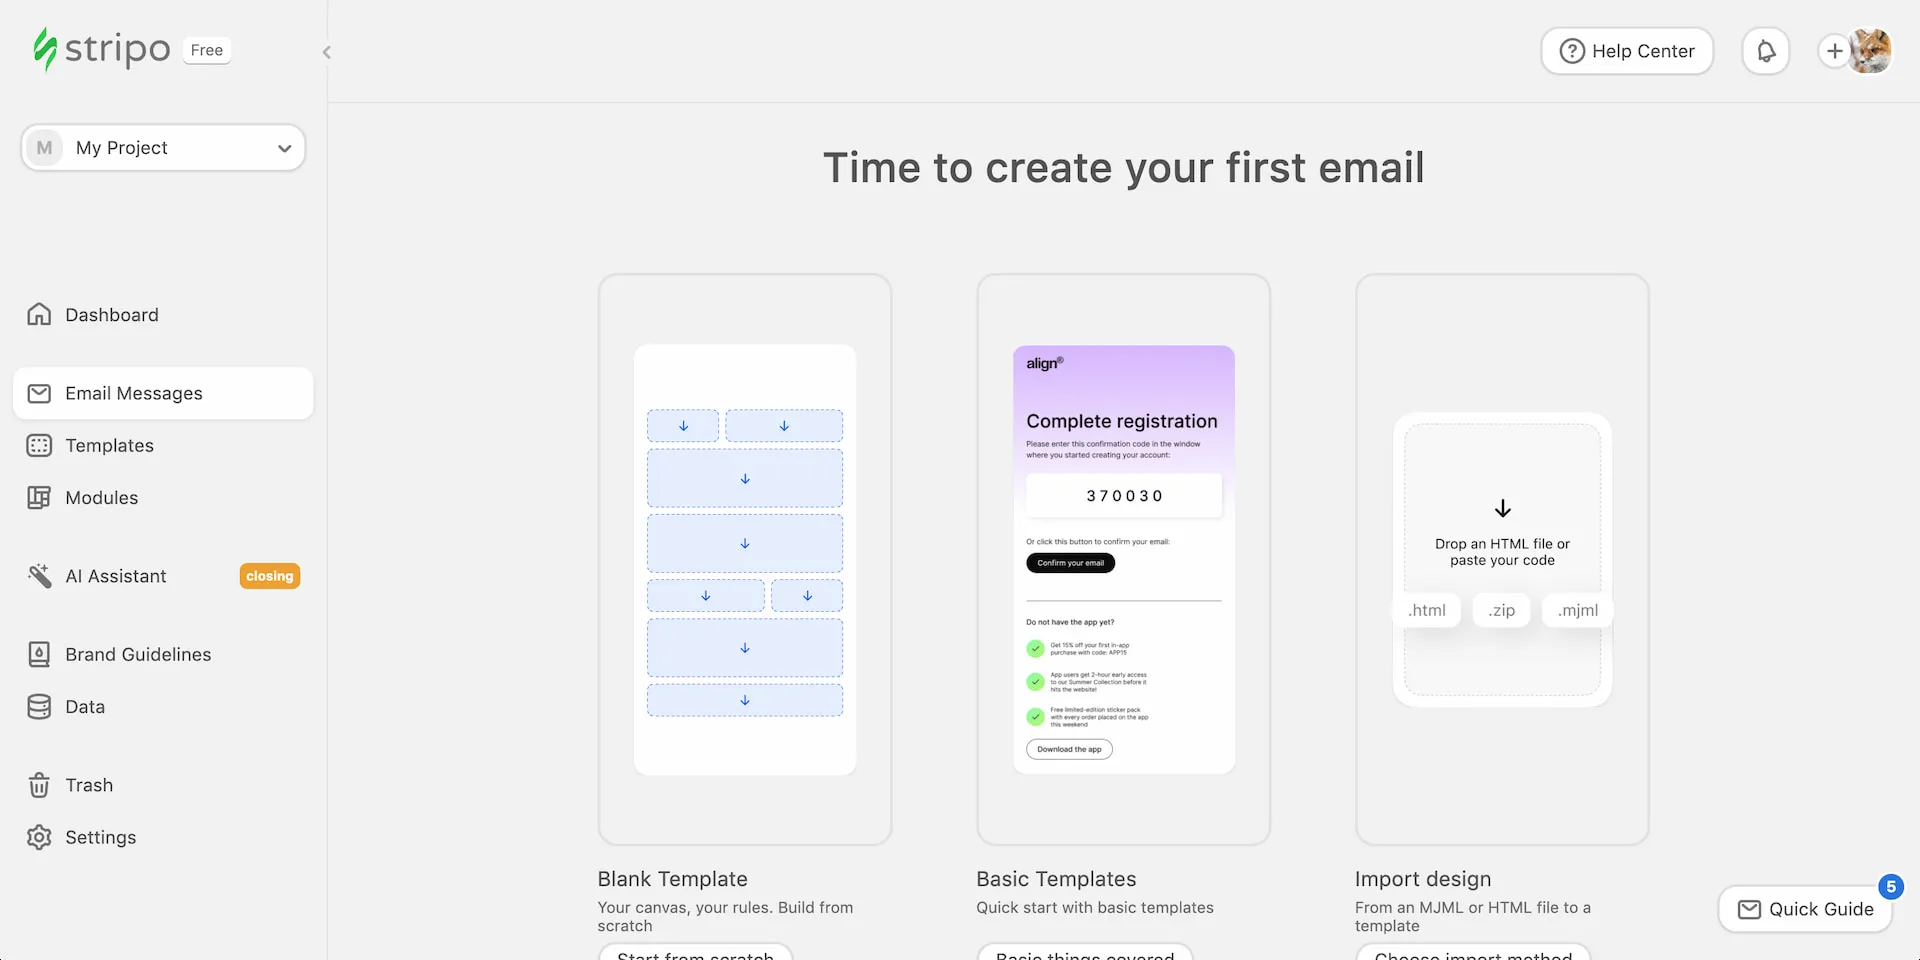
After signing up, Stripo takes you to the “Time to create your first email” page, where you can start from scratch, choose a basic template, or import an existing design. For this tutorial, we’ll use a pre-built template instead.
Click Templates in the left sidebar, select Pre-built, and then click Free at the top to show only free templates.
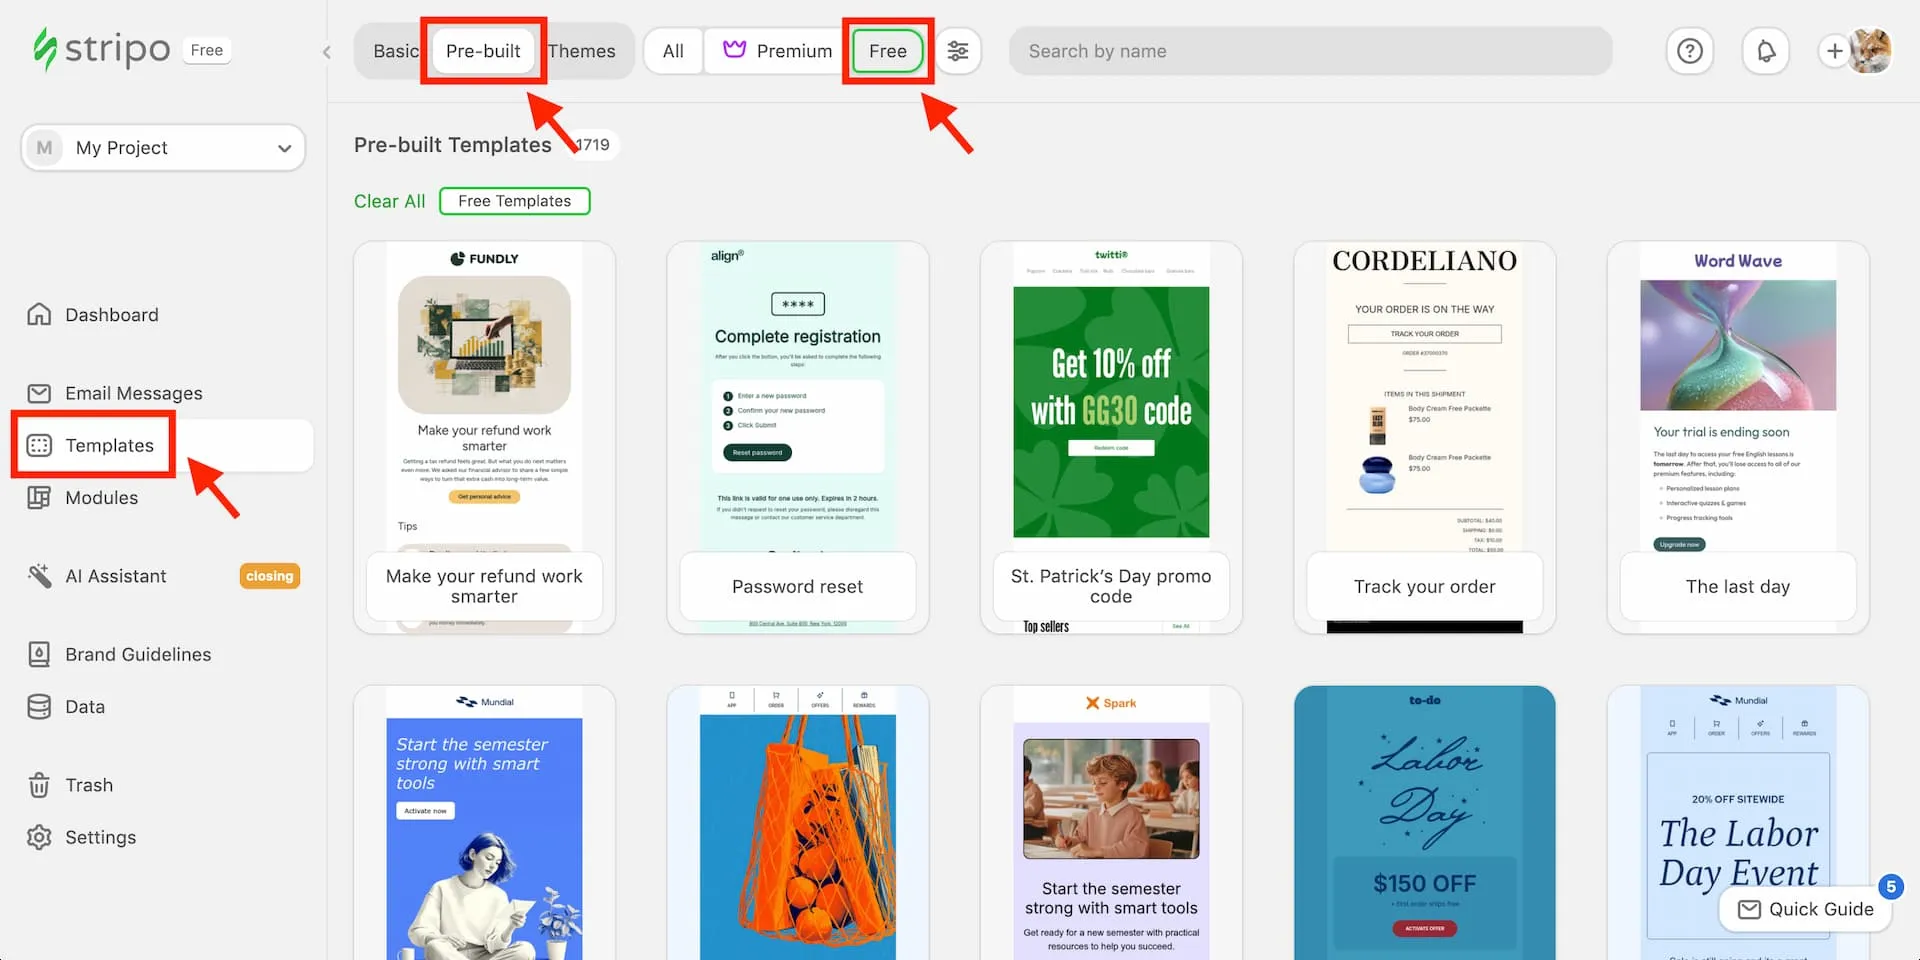
You can browse the available designs or use the search bar to find a specific type of email.
We searched for “Welcome” and selected the free “Quick-start guide” template.
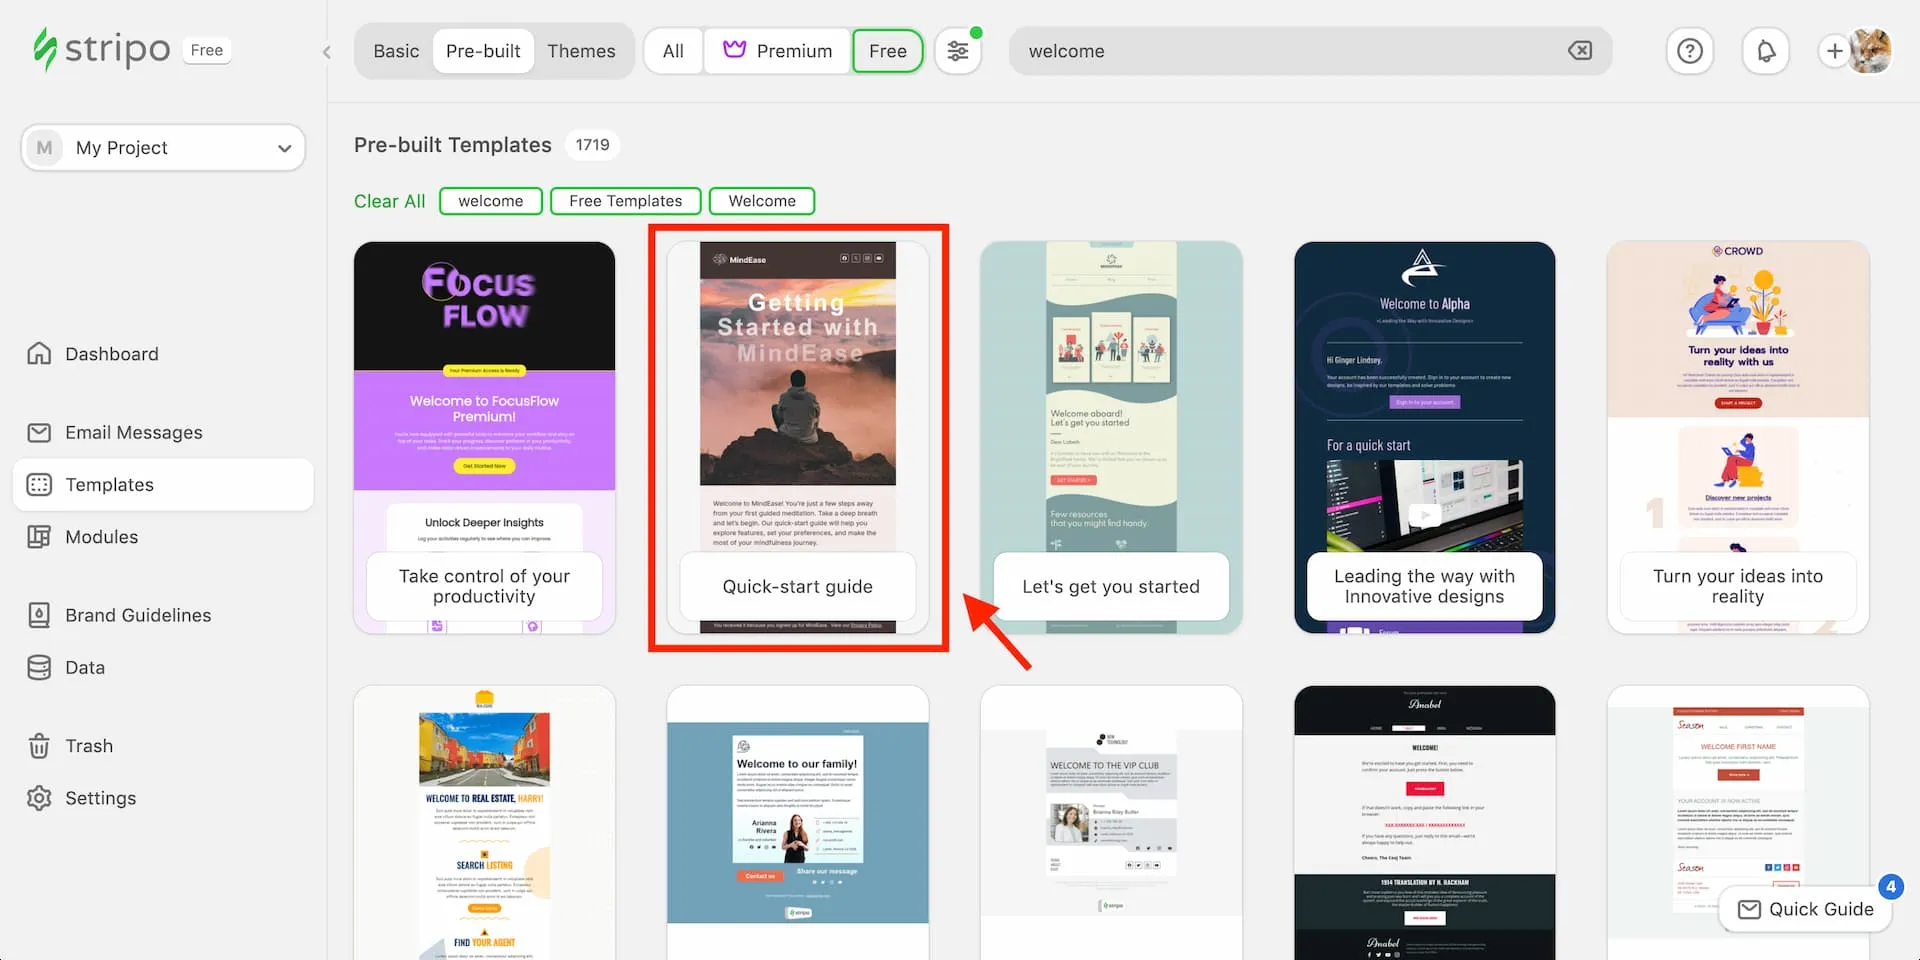
Click the “Quick-start guide” template to open it in the editor.
Step 3: Get Familiar with the Stripo Editor
After selecting the template, Stripo opens its drag-and-drop email editor.
The interface may look a little overwhelming at first, but most basic editing tasks are straightforward once you know where to look.
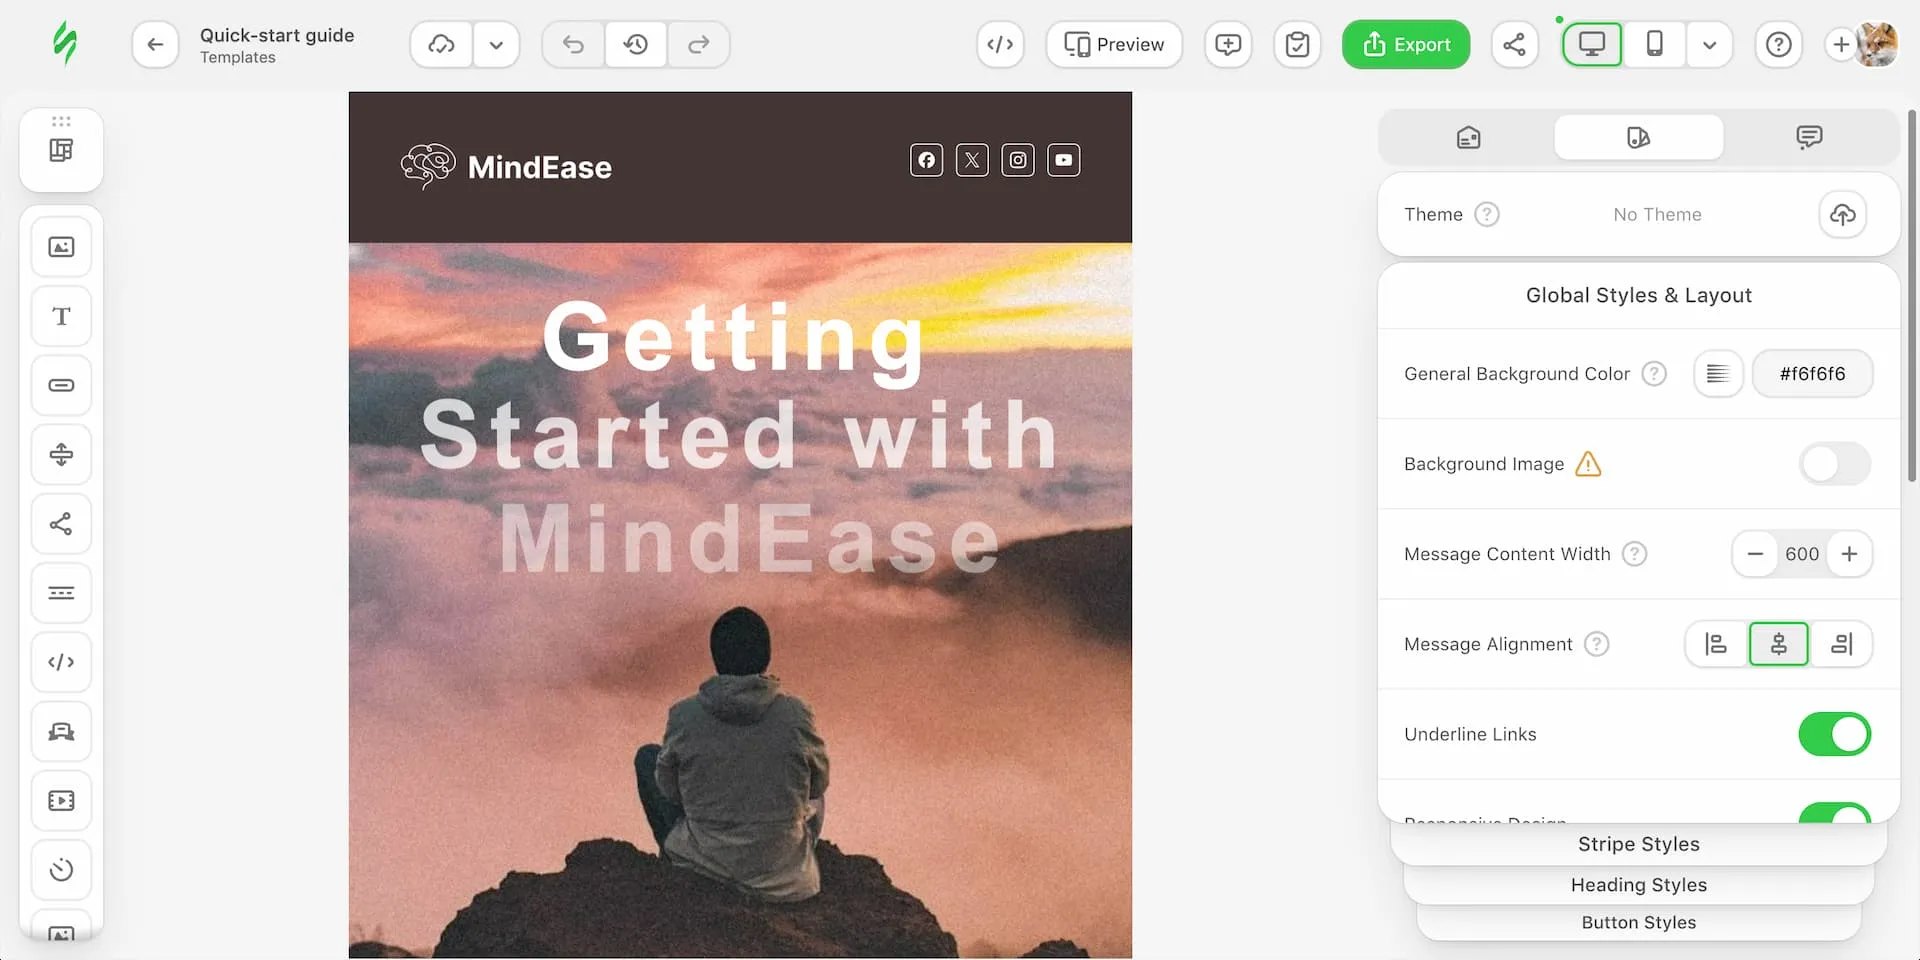
The editor has three main areas:
- Left toolbar: Provides content blocks and tools for adding or modifying elements such as images, text, buttons, and other email components.
- Editing canvas: Displays your email in the center, where you can click individual elements to edit them.
- Right settings panel: Shows design and layout options. The available settings change depending on what you select.
The top toolbar also includes controls for saving, undoing changes, previewing your email, switching between desktop and mobile views, and exporting the finished template.
Now, let’s take a look at the email template itself. It consists of three main sections: Header, Content, and Footer.
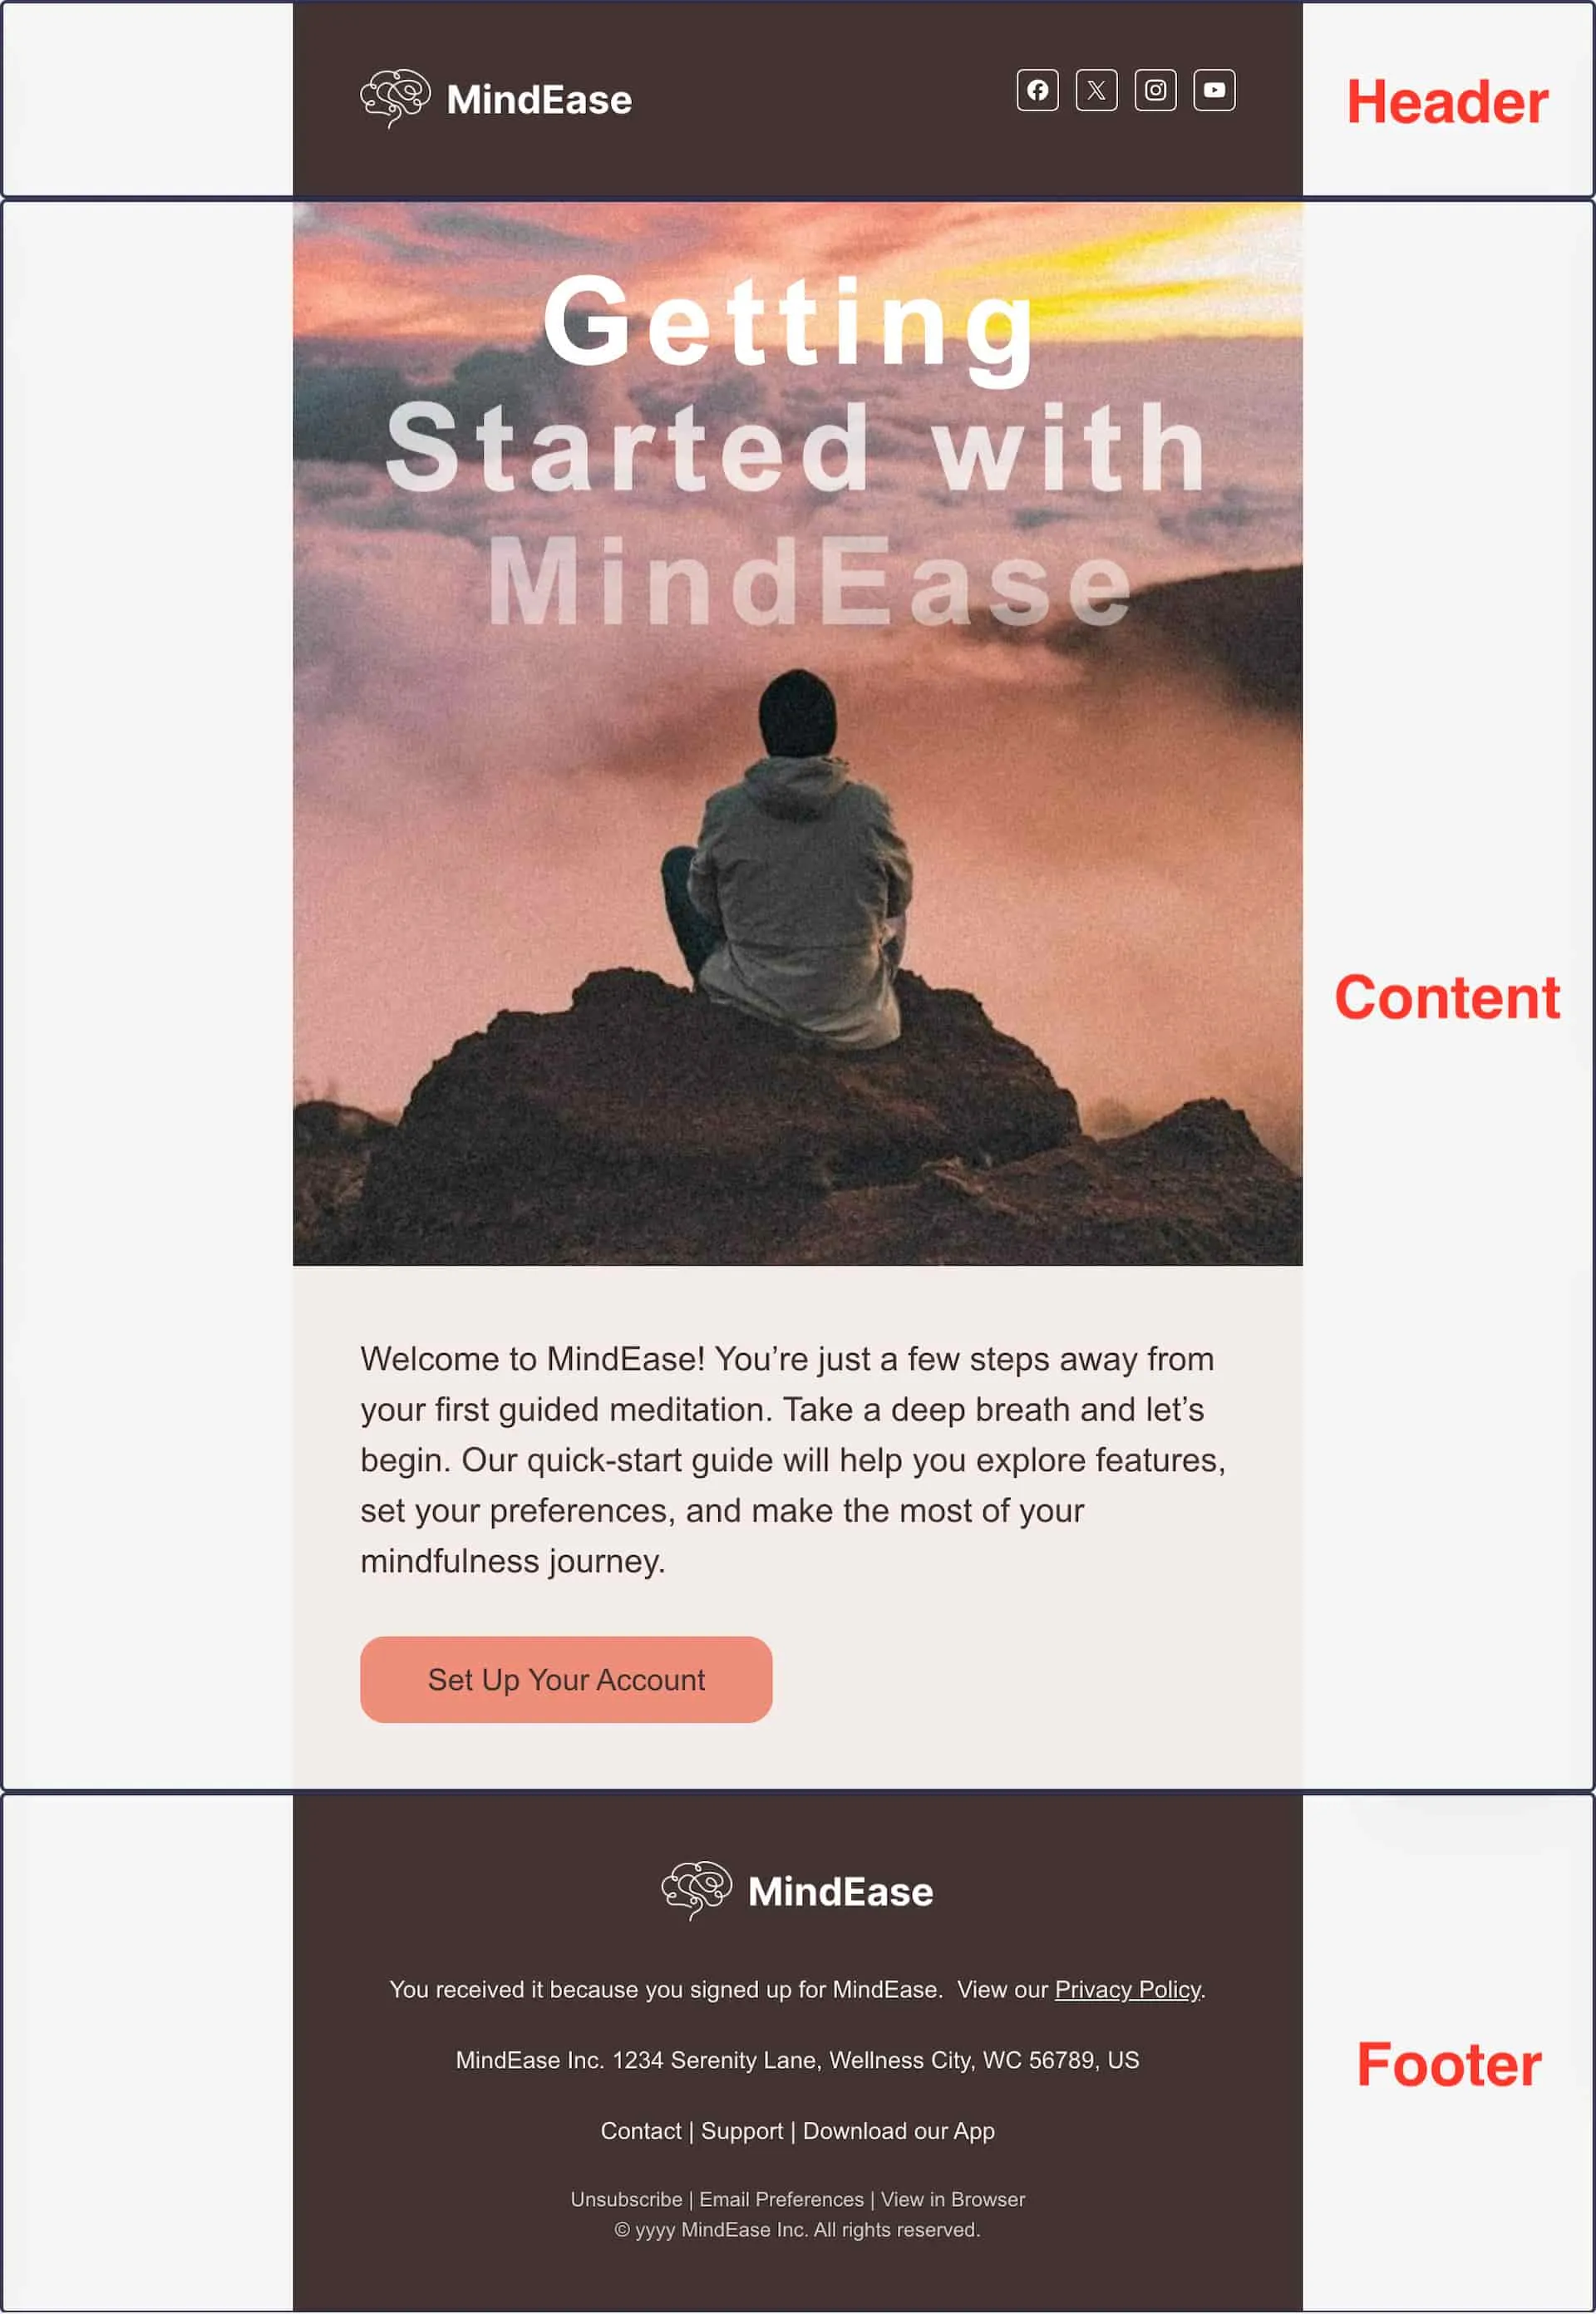
- Header: Usually contains your brand logo, navigation links, or social media icons. In this template, it displays the MindEase logo and social media links.
- Content: The main body of the email, where you can add images, headlines, text, and call-to-action buttons. This template includes a welcome message and a Set Up Your Account button.
- Footer: Contains company information, contact details, and important links such as Privacy Policy and Unsubscribe. Make sure to replace any placeholder information with your own business details before sending.
Step 4: Customize Your Email Template
Now that we’re familiar with the editor, let’s customize the template section by section, starting with the Header, followed by the Content and Footer.
Customize the Header
Let’s start by replacing the MindEase logo and reviewing the social media links in the Header.
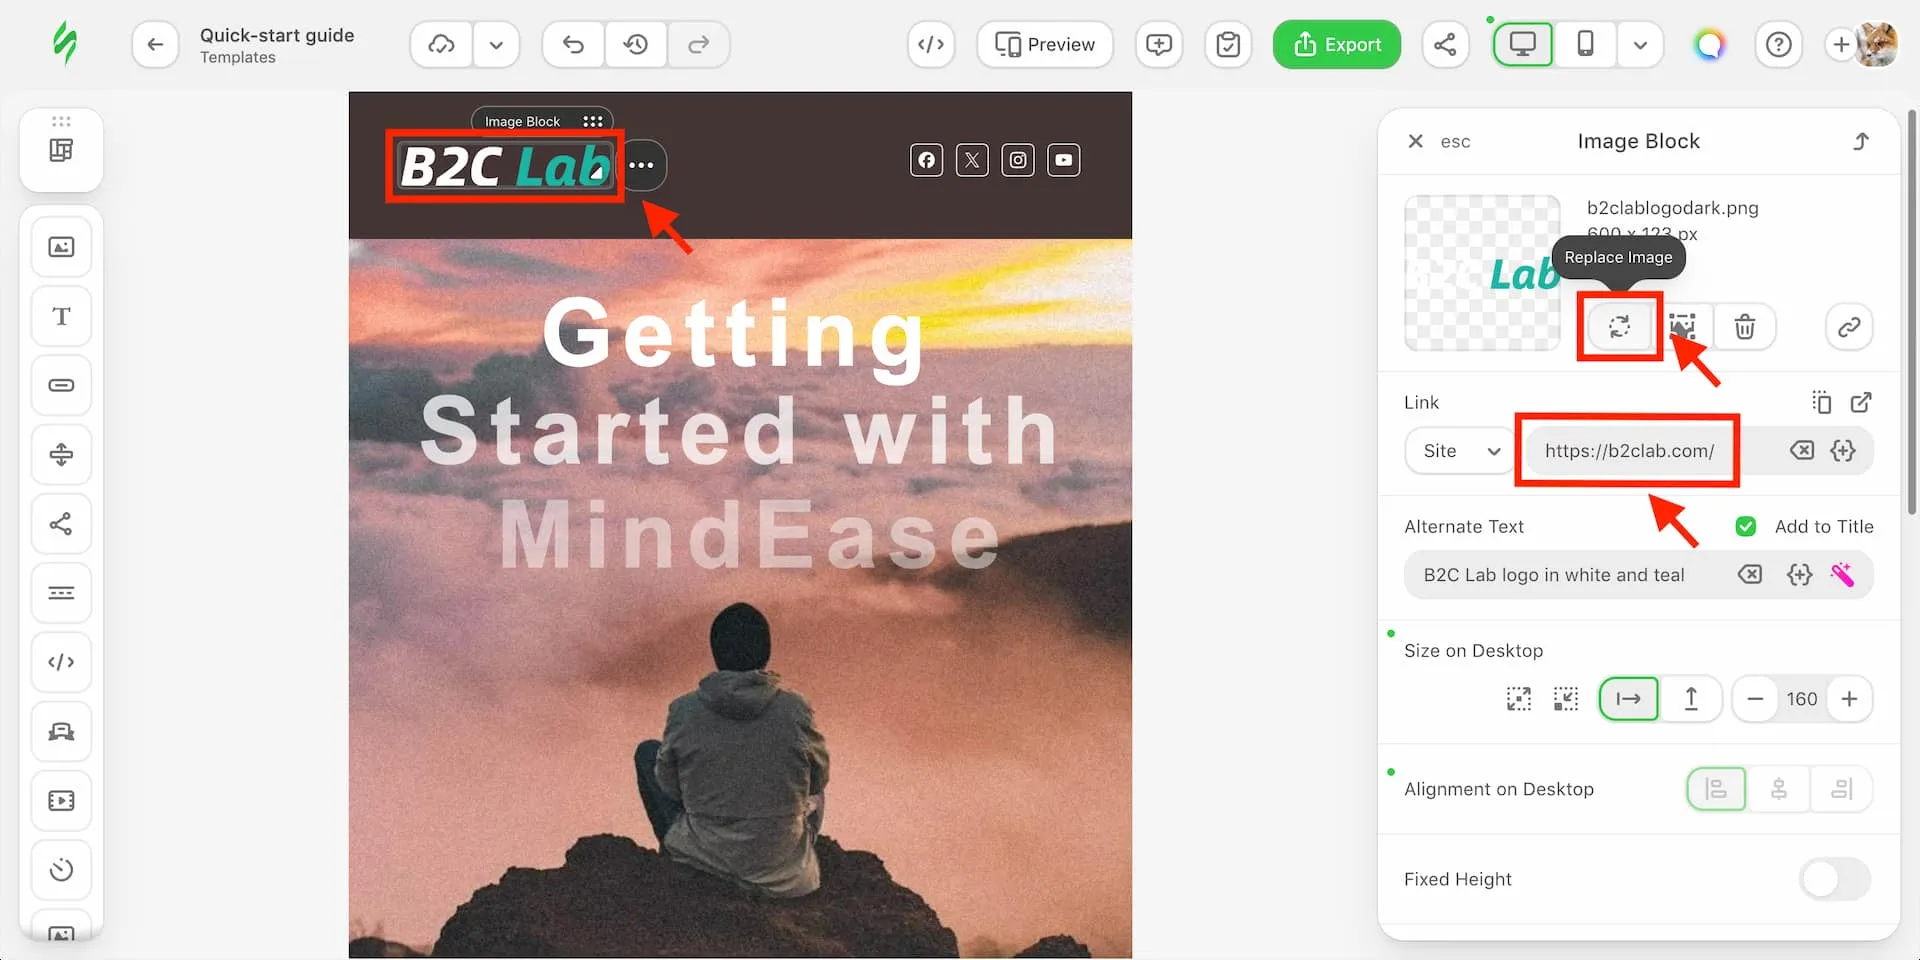
To replace the logo, click the existing image on the canvas. The corresponding Image Block settings will appear on the right.
Click Replace Image to open the Image Gallery.
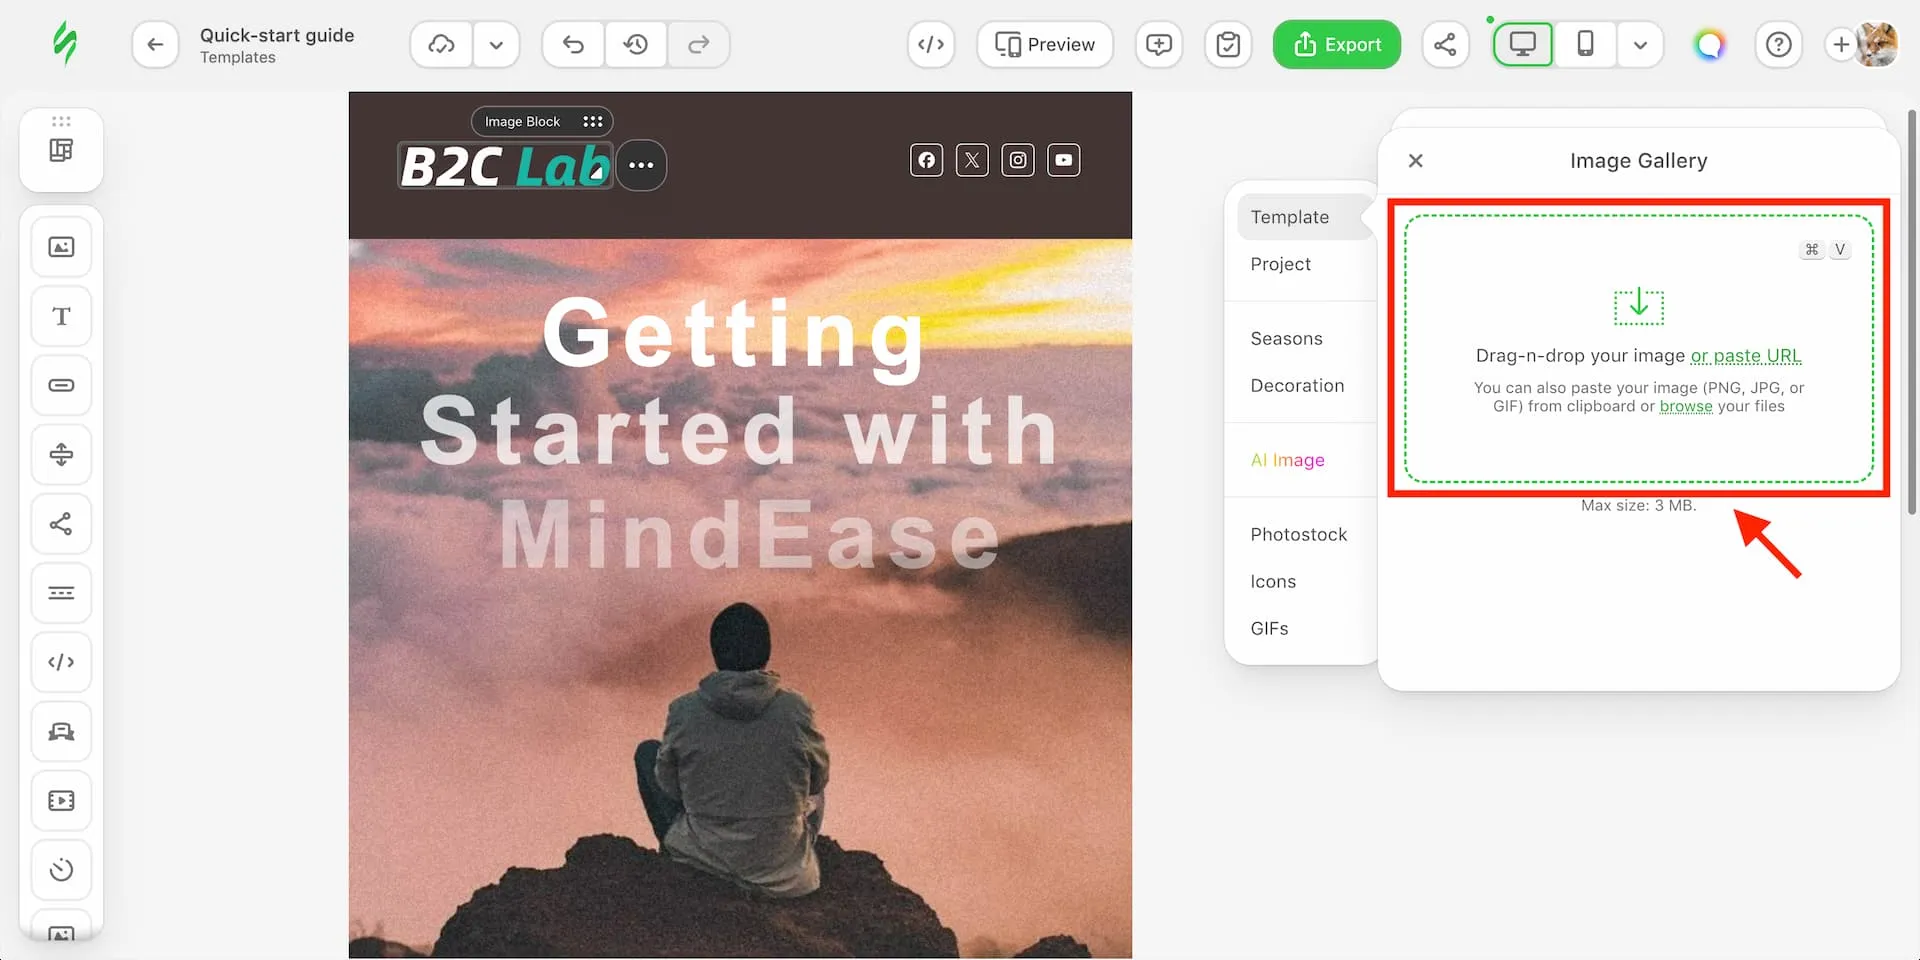
The Image Gallery may open with Photostock selected by default. To upload your own logo, switch to the Template tab in the left sidebar.
You can then drag and drop your logo into the upload area or click browse to select a file from your computer. Once uploaded, select the image to replace the original logo.
After replacing the logo, we configured the following settings:
- Link:
https://b2clab.com/— clicking the logo takes recipients to the B2C Lab website. - Alternate Text:
B2C Lab logo in white and teal
Since this template uses a dark header background, we chose the white-and-teal version of the B2C Lab logo for better contrast.
The Header also includes a Social Block with icons for Facebook, X, Instagram, and YouTube.
Click the social media icons in the Header to open the Social Block settings panel on the right.
Here, you can update the destination URL for each platform individually.
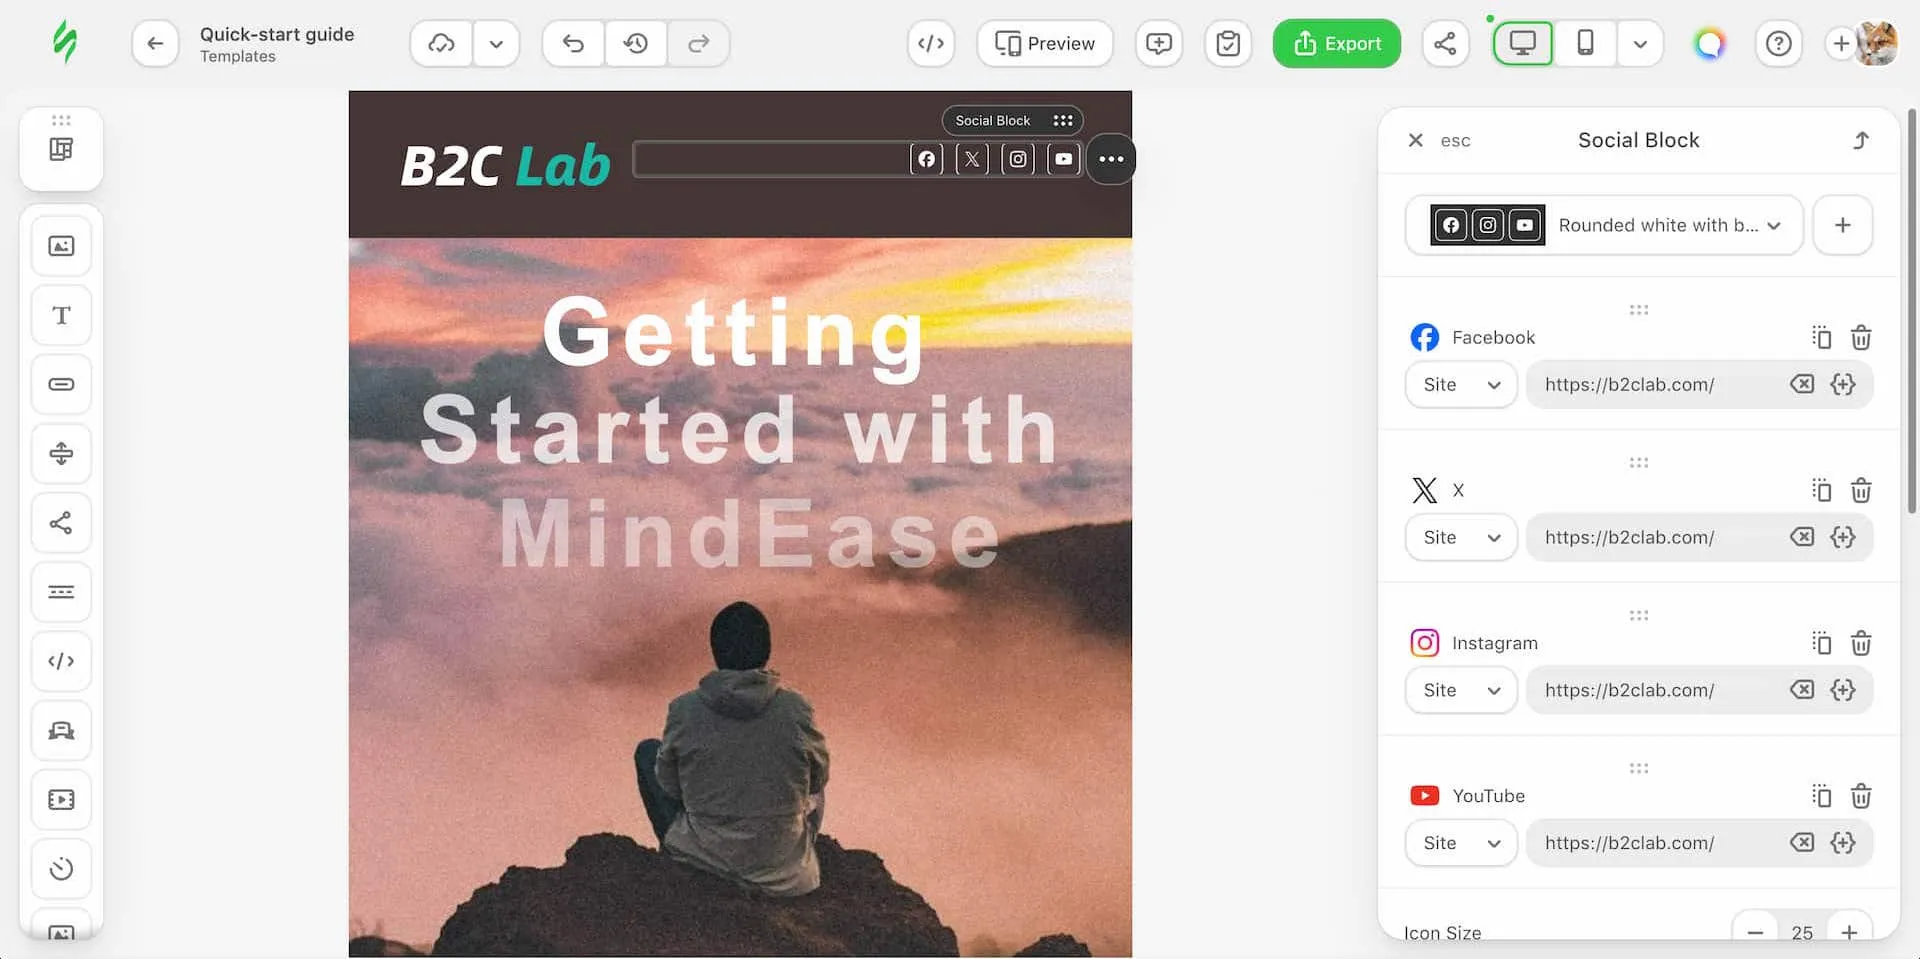
Each icon should link to its corresponding social media profile, not your website homepage or a placeholder URL. If you don’t use a particular platform, remove its icon using the delete button rather than leaving an incorrect link.
You can also add other social media platforms using the + button in the settings panel.
Customize the Content
The Content section is where you’ll make most of your changes. It contains the main headline, images, welcome message, and call-to-action (CTA) button.
Let’s go through each element in the order it appears in our selected template.
Edit the Headline
The selected template uses a Banner Block to display the main headline over a background image.
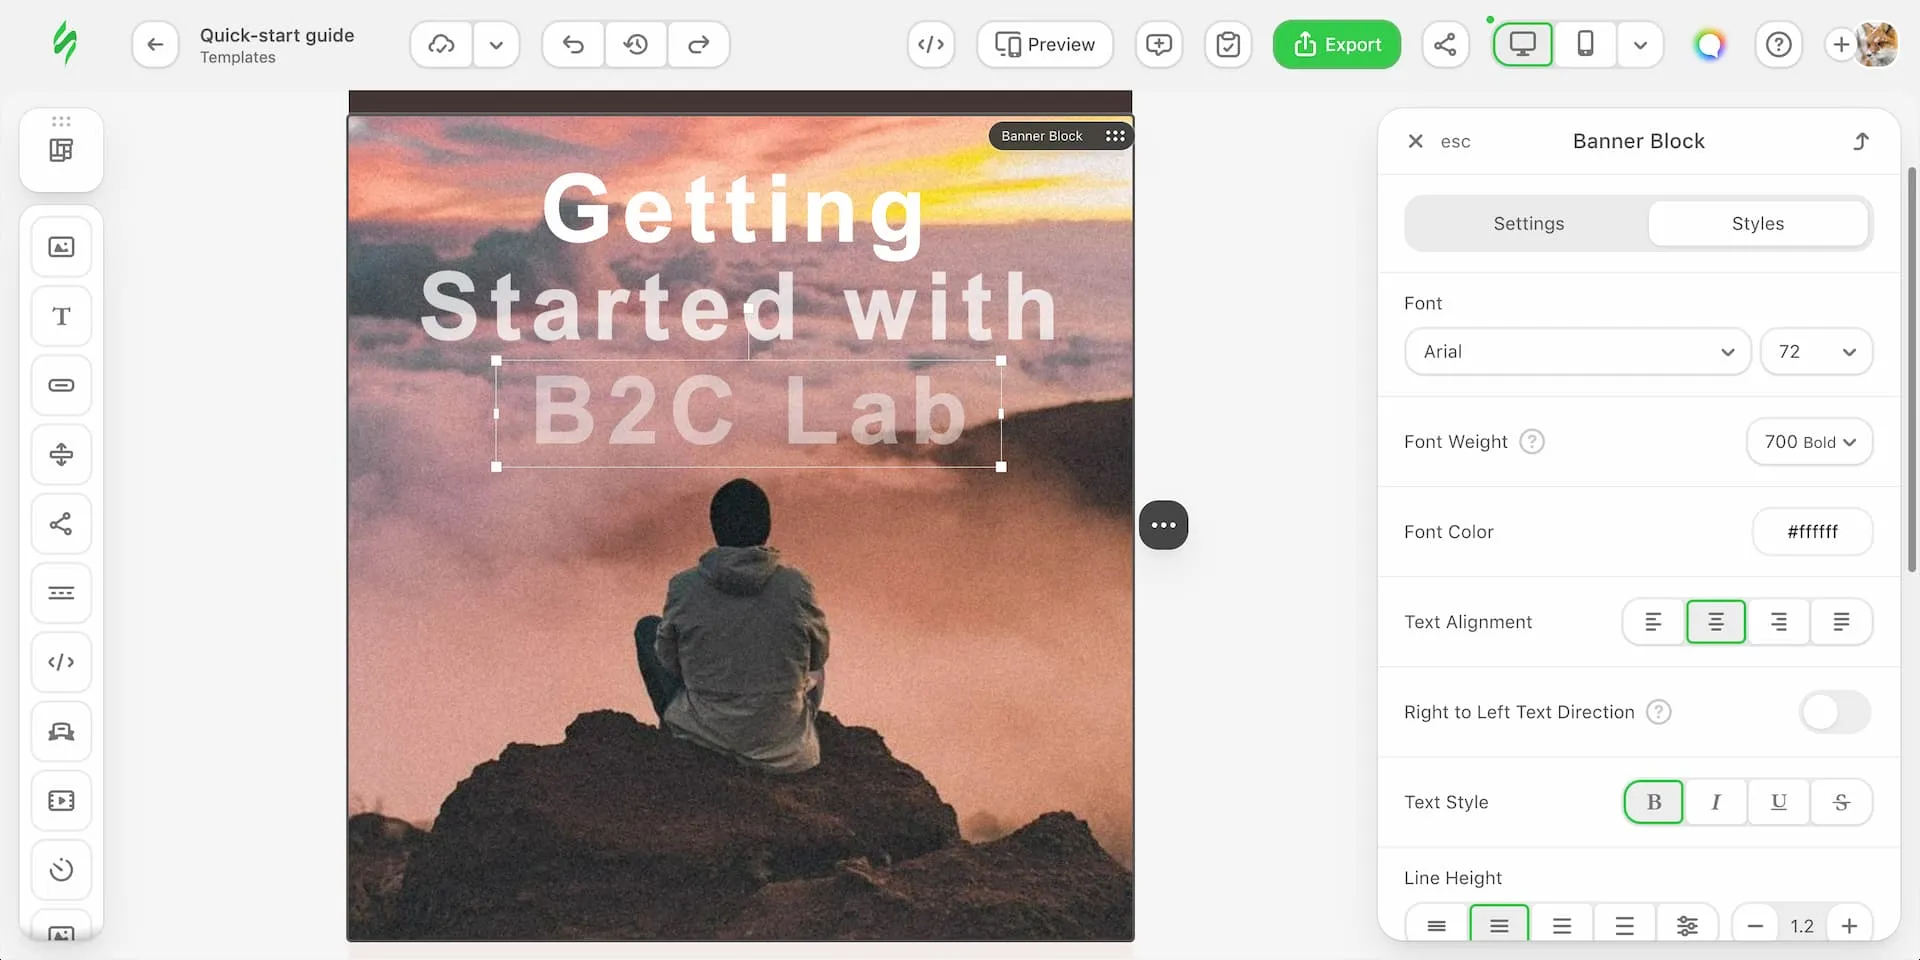
Click the existing headline on the canvas to select it. You can then edit the text directly while the Banner Block settings appear on the right.
For this example, we replaced MindEase with B2C Lab, keeping the rest of the headline unchanged:
Getting Started with B2C Lab
We kept the default font, size, color, and alignment, as they already worked well with the template.
Replace the Main Image
Next, let’s replace the original banner image with one that better reflects B2C Lab’s focus on eCommerce and digital marketing.
Click the banner on the canvas to open the Banner Block settings panel on the right, then switch to the Styles tab and click Replace Image.
The upload process is the same as when we replaced the Header logo. In the Image Gallery, switch to Template if necessary, then drag and drop your image into the upload area or click browse to select a file from your computer.
For this example, we replaced the original landscape photo with an image of someone working on a laptop displaying business analytics.
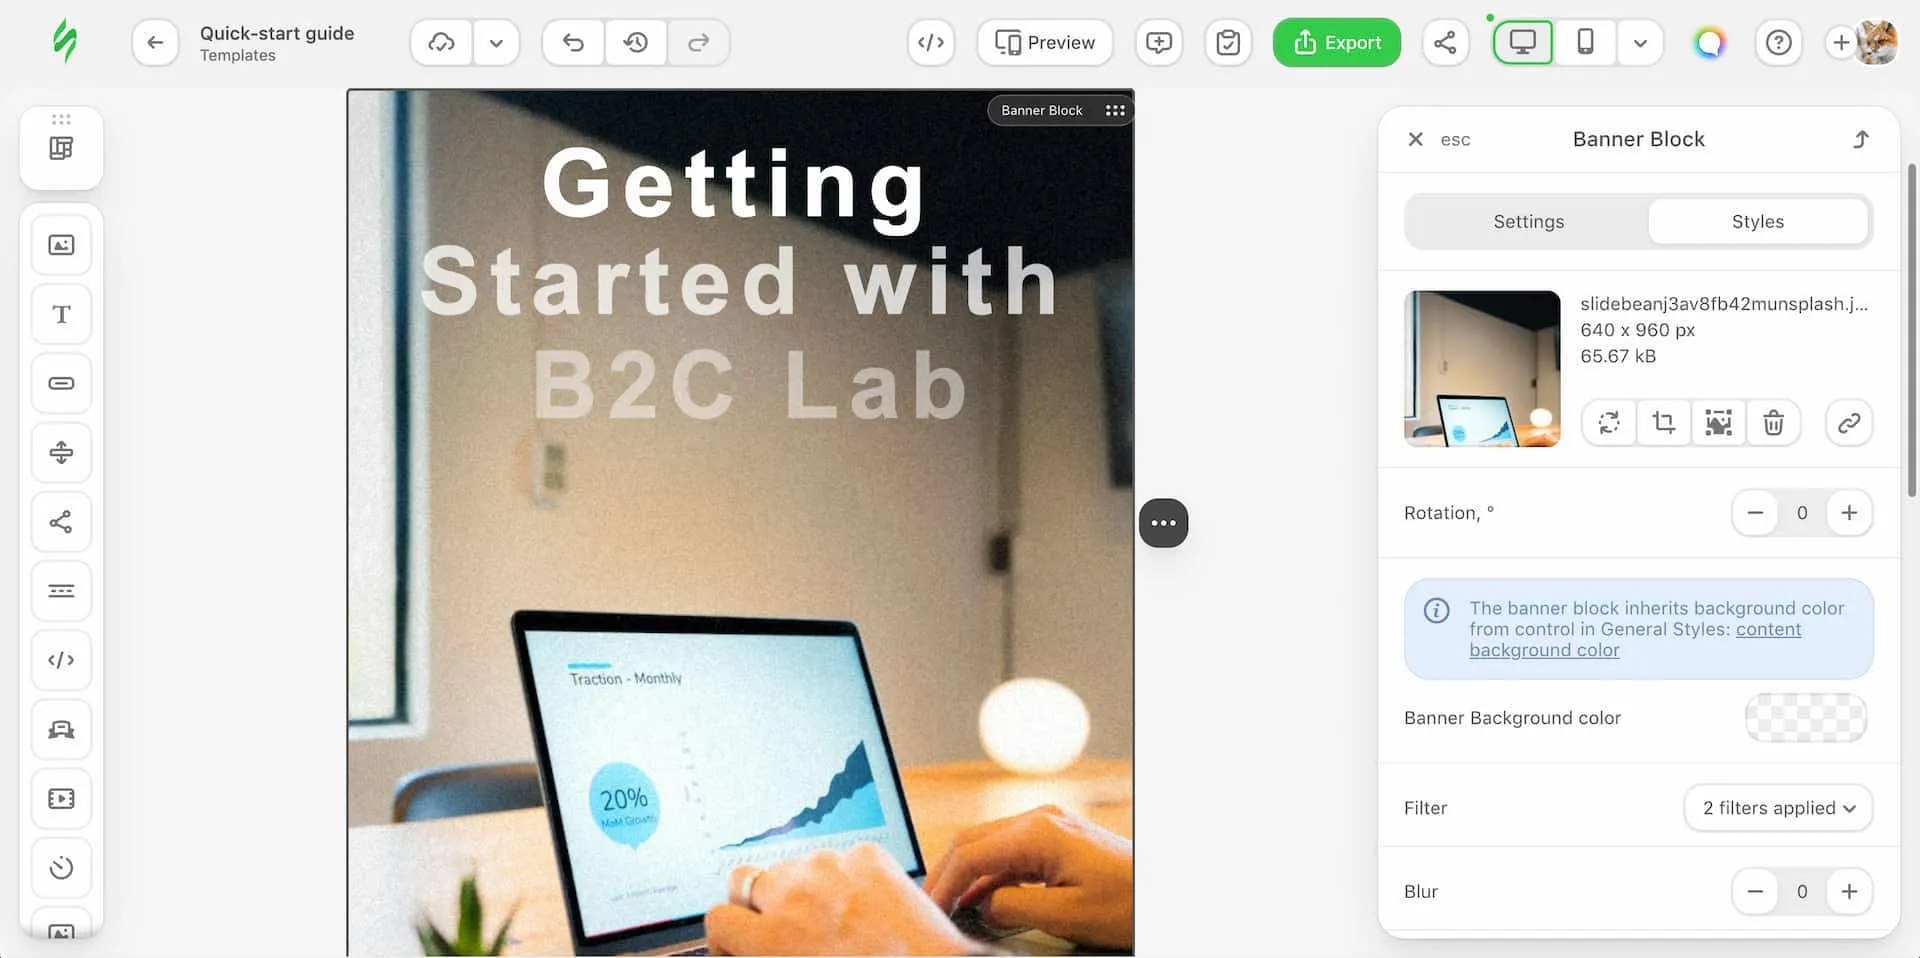
After replacing the image, check how it looks with the headline to make sure the text remains readable. The image may appear differently on smaller screens, so we’ll check both desktop and mobile layouts in the next step.
Large images can increase email loading times, so consider compressing them before uploading. For free tools, check out our guide to 4 Best Free Image Compression Tools for Shopify.
Edit the Welcome Message
Next, let’s customize the welcome message below the banner.
Click the existing text on the canvas to select the Text Block, then replace the original content with a message that introduces your brand and explains what subscribers can expect.
For our B2C Lab example, we used the following message:
Welcome to B2C Lab!
We’re glad you’re here! Discover practical Shopify tutorials, useful eCommerce tools, and actionable digital marketing tips to help you build and grow your online business.
Let’s get started!
Update the CTA Button
The template includes a Set Up Your Account button below the welcome message.
Click the button on the canvas to open the Button Block settings panel on the right.
For this example, we updated three settings:
- Button Text: Changed from
Set Up Your AccounttoExplore B2C Lab. - Link: Set to
https://b2clab.com/so recipients can visit the B2C Lab website. - Font Weight: Changed to bold to make the button text stand out.
We left the remaining button settings unchanged.
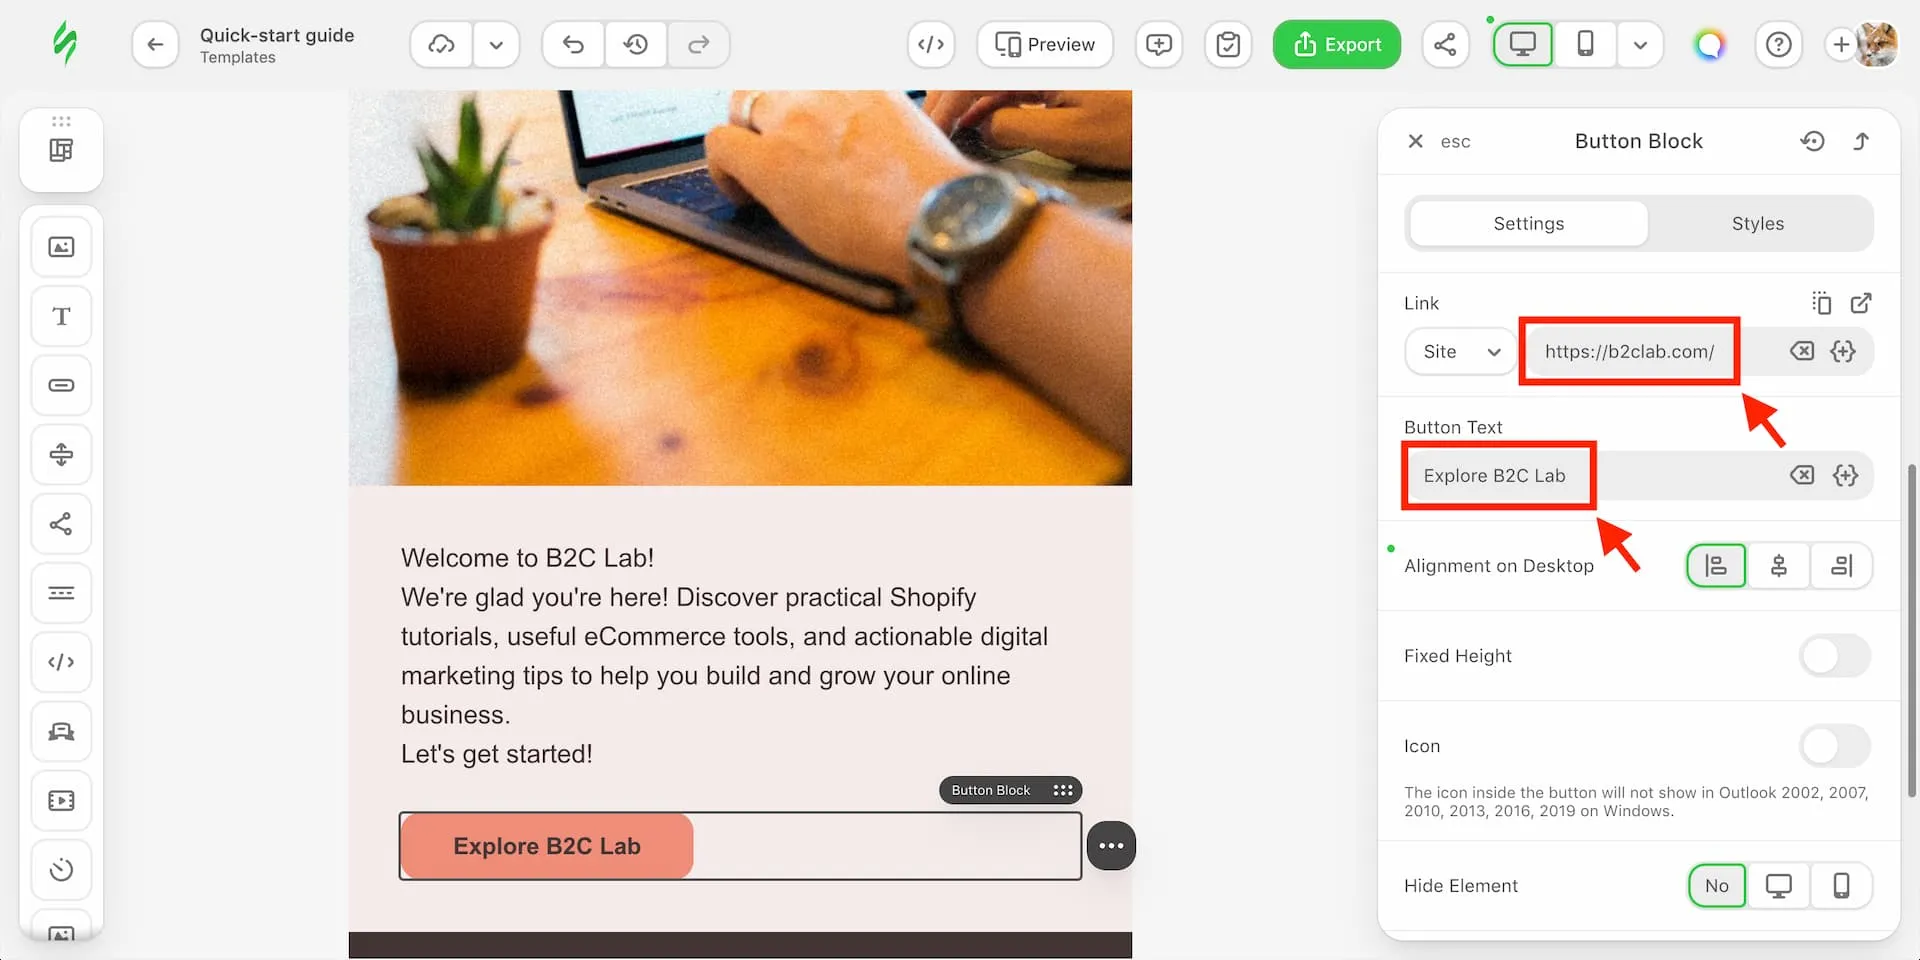
Changing the button text doesn’t automatically update its destination URL. Always verify that the button links to the correct page before sending your email.
Customize the Footer
The Footer usually contains your business information, contact details, and important links.
In our selected template, it includes company information and links such as Privacy Policy and Unsubscribe.
Click the relevant text blocks to replace the sample information with your own business details.
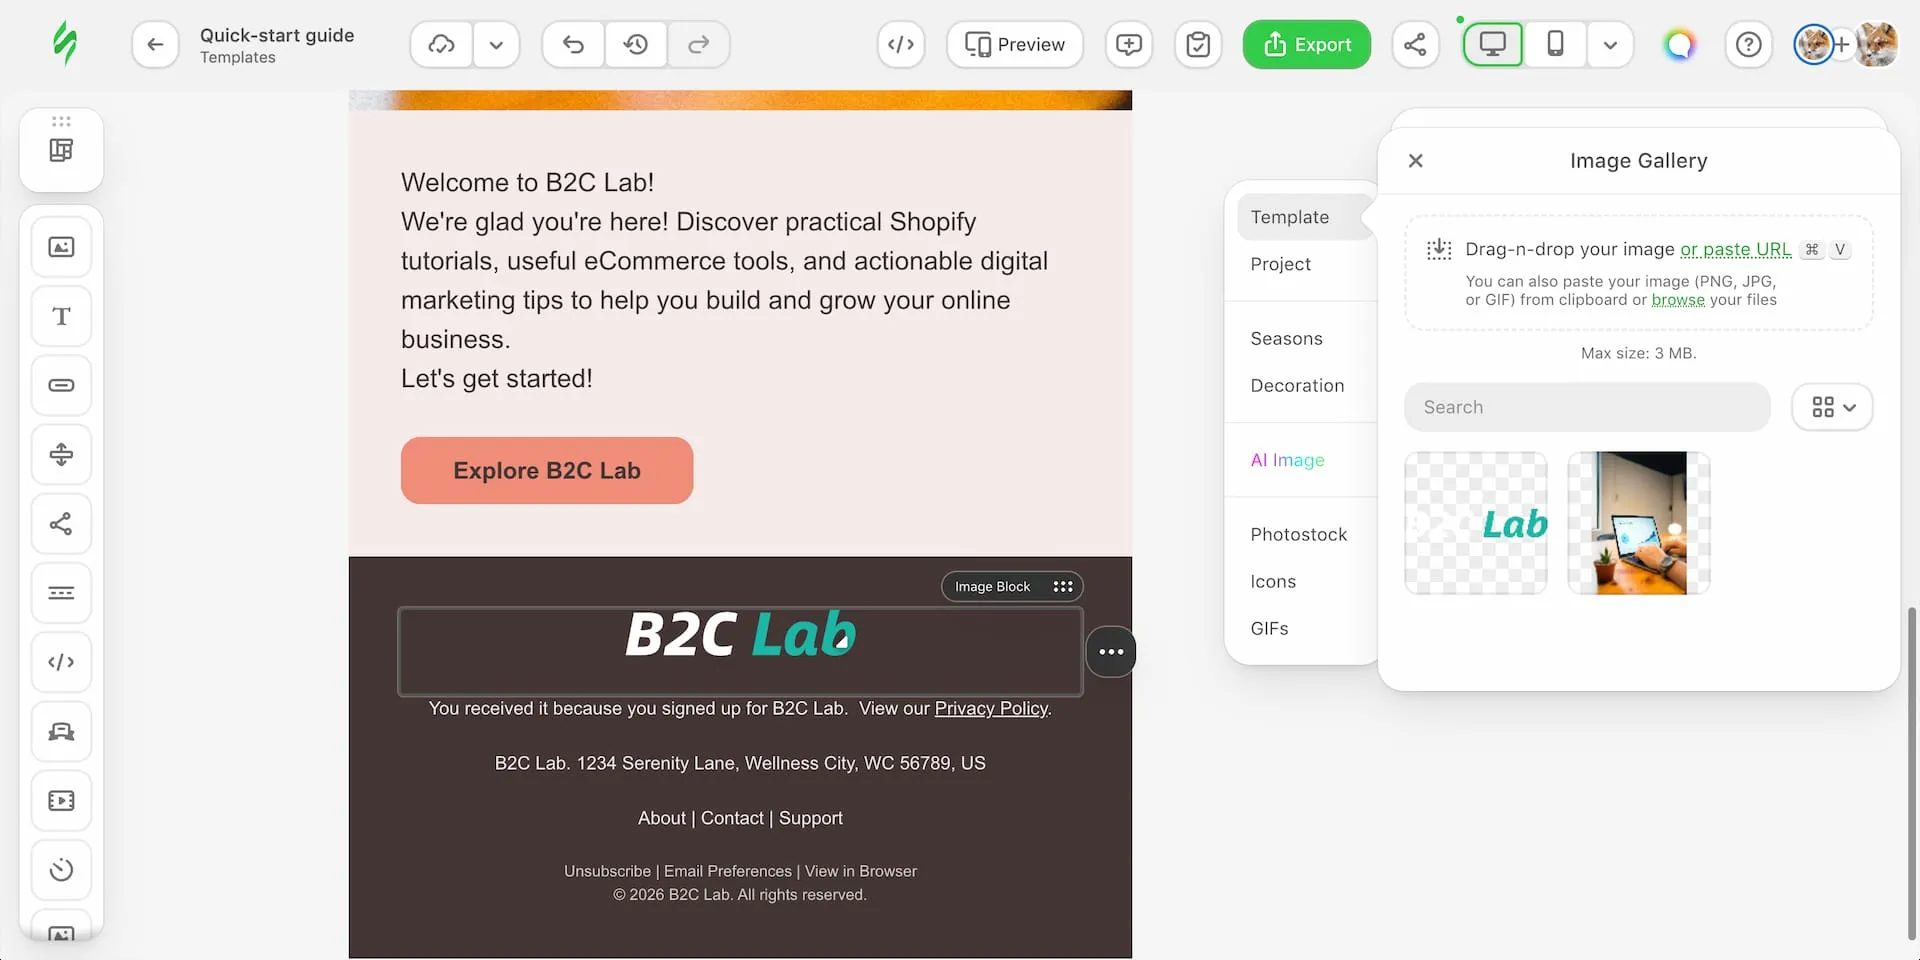
Pay particular attention to the following:
- Company information: Replace the sample business name and address with accurate details.
- Contact and policy links: Make sure they point to the correct pages.
- Unsubscribe link: A visible unsubscribe link doesn’t necessarily mean the function is ready to use. Check that it works with your email marketing platform before sending a campaign.
Some email marketing platforms automatically manage unsubscribe links and sender information. Before using your template in a real campaign, make sure all placeholder details have been replaced and the required links work correctly.
Step 5: Preview Your Email Template
Now that we’ve finished customizing the template, it’s time to check how the email looks on different devices.
Click Preview in the editor’s top toolbar to open Stripo’s preview mode.
The preview displays the email in desktop and mobile layouts side by side, making it easier to identify potential formatting issues.
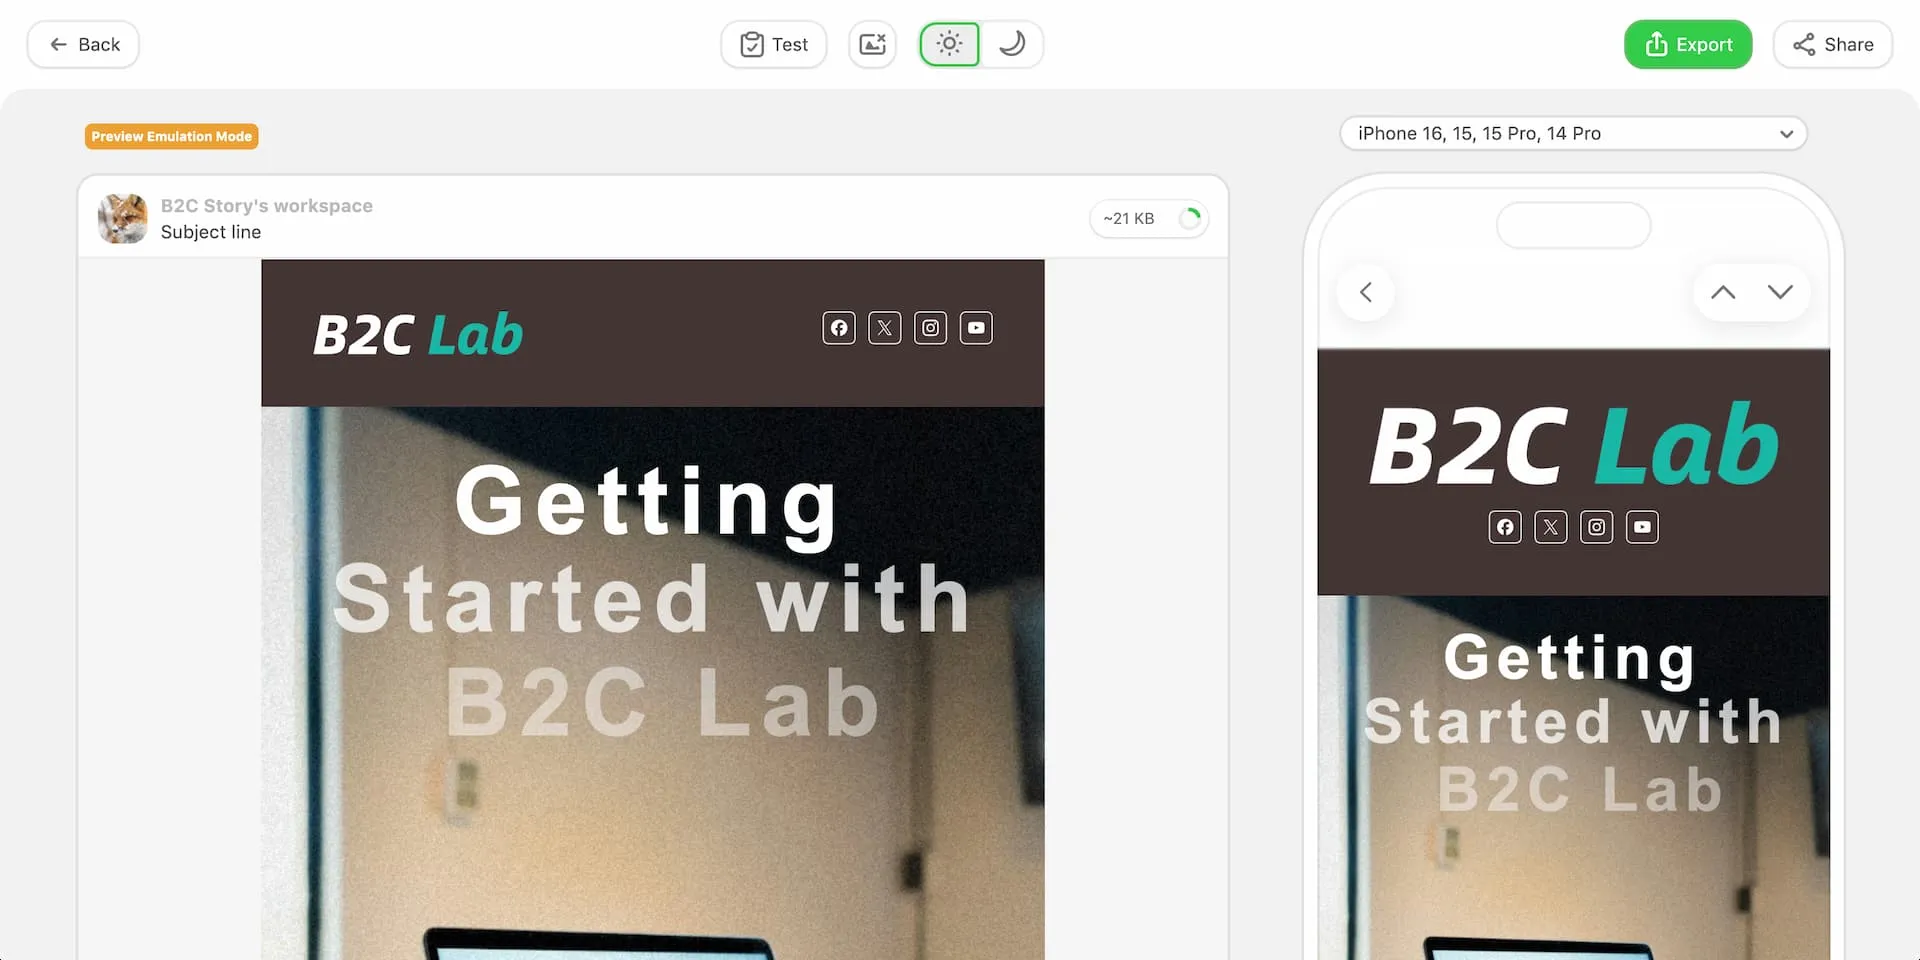
On the right, you can select different mobile device presets from the dropdown menu to see how the email may appear on various screen sizes.
For our B2C Lab example, we checked that:
- The logo and social media icons displayed correctly.
- The headline remained readable on both desktop and mobile.
- The main image fit the layout without unwanted cropping.
- The welcome message and CTA button were properly positioned.
We also noticed that the Header layout adjusted automatically on mobile, placing the social media icons below the logo.
Stripo’s preview mode also provides light and dark appearance options, which you can use to inspect how the design looks under different viewing conditions.
A successful preview doesn’t guarantee identical rendering in every email client. Before sending a real campaign, it’s still a good idea to send a test email and check it in services such as Gmail or Outlook.
Step 6: Export Your Email Template as HTML
Once you’re satisfied with the design, the next step is to export your email template.
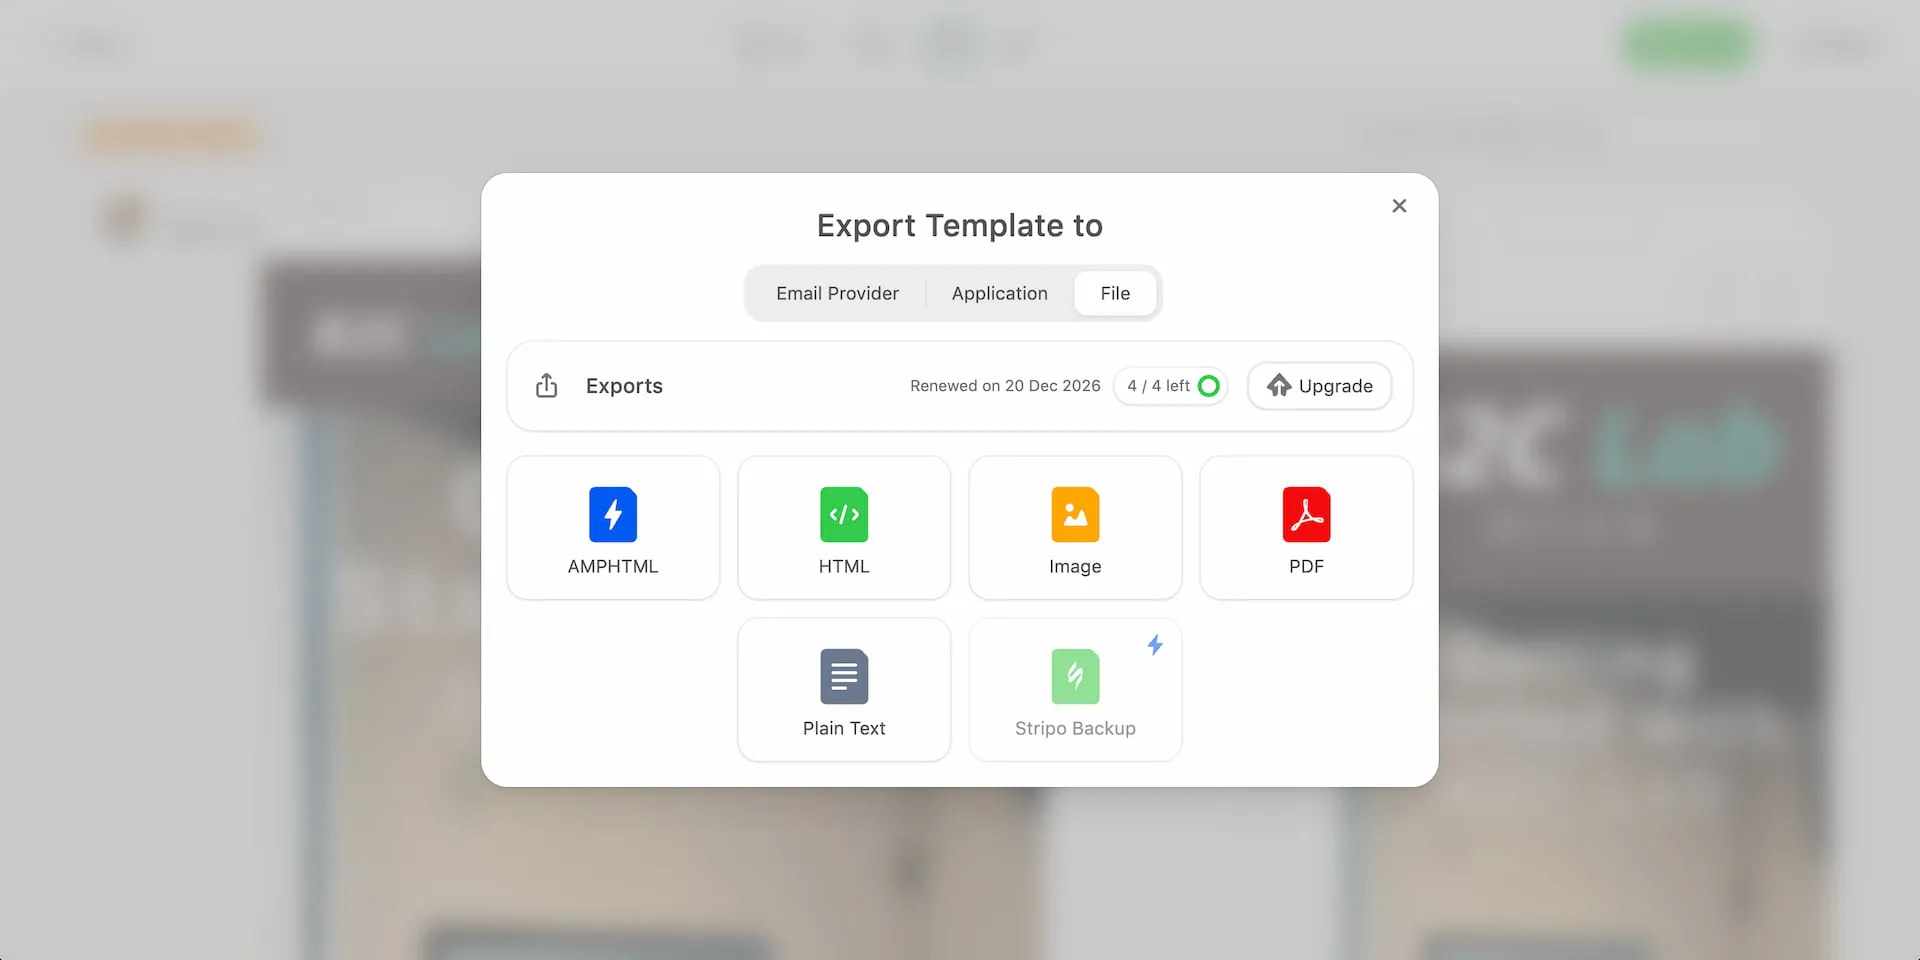
Stripo supports several export destinations, including email service providers, applications, and downloadable files.
For this tutorial, we’ll focus on exporting the template as an HTML file.
Choose the HTML Export Option
Click the green Export button in the top toolbar.
In the Export Template to window, you’ll see three categories:
- Email Provider: Export to supported email marketing services.
- Application: Export to supported applications.
- File: Download your template in formats such as HTML, AMPHTML, Image, PDF, or Plain Text.
For this tutorial, select File, then click HTML.
Download Your HTML Template
After clicking HTML, Stripo opens the Export Template to HTML window.
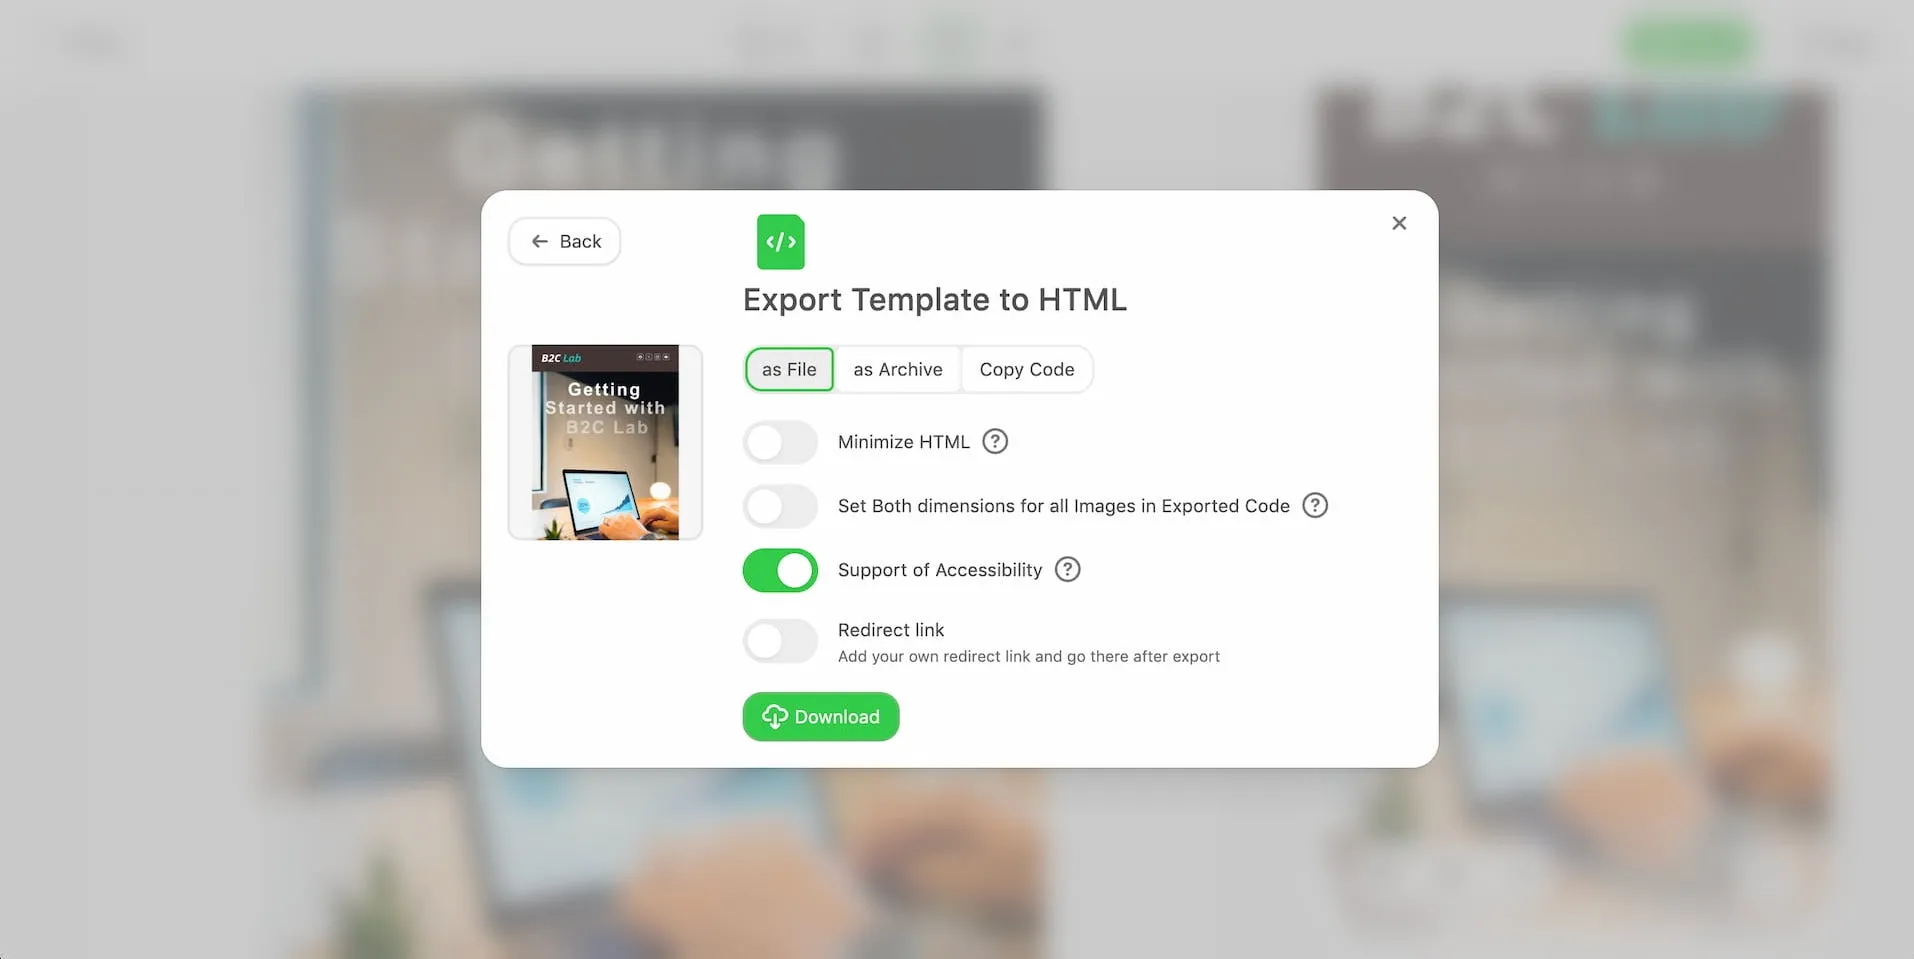
Here, you can choose from three export methods:
- as File: Download your email template as an HTML file.
- as Archive: Download the HTML along with separate image files.
- Copy Code: Copy the HTML code directly to your clipboard.
For this tutorial, we selected as File.
Stripo also provides several optional export settings:
- Minimize HTML: Reduces the HTML file size by removing unnecessary formatting.
- Set Both dimensions for all Images in Exported Code: Adds explicit image dimensions to the exported HTML.
- Support of Accessibility: Includes accessibility-related features in the exported code.
- Redirect link: Redirects you to a specified URL after the export is completed.
We kept the default settings, with Support of Accessibility enabled and the other options disabled.
Finally, click Download to save the HTML file to your computer.
The downloaded file contained our customized B2C Lab email, including its HTML structure, styling, and responsive layout rules.
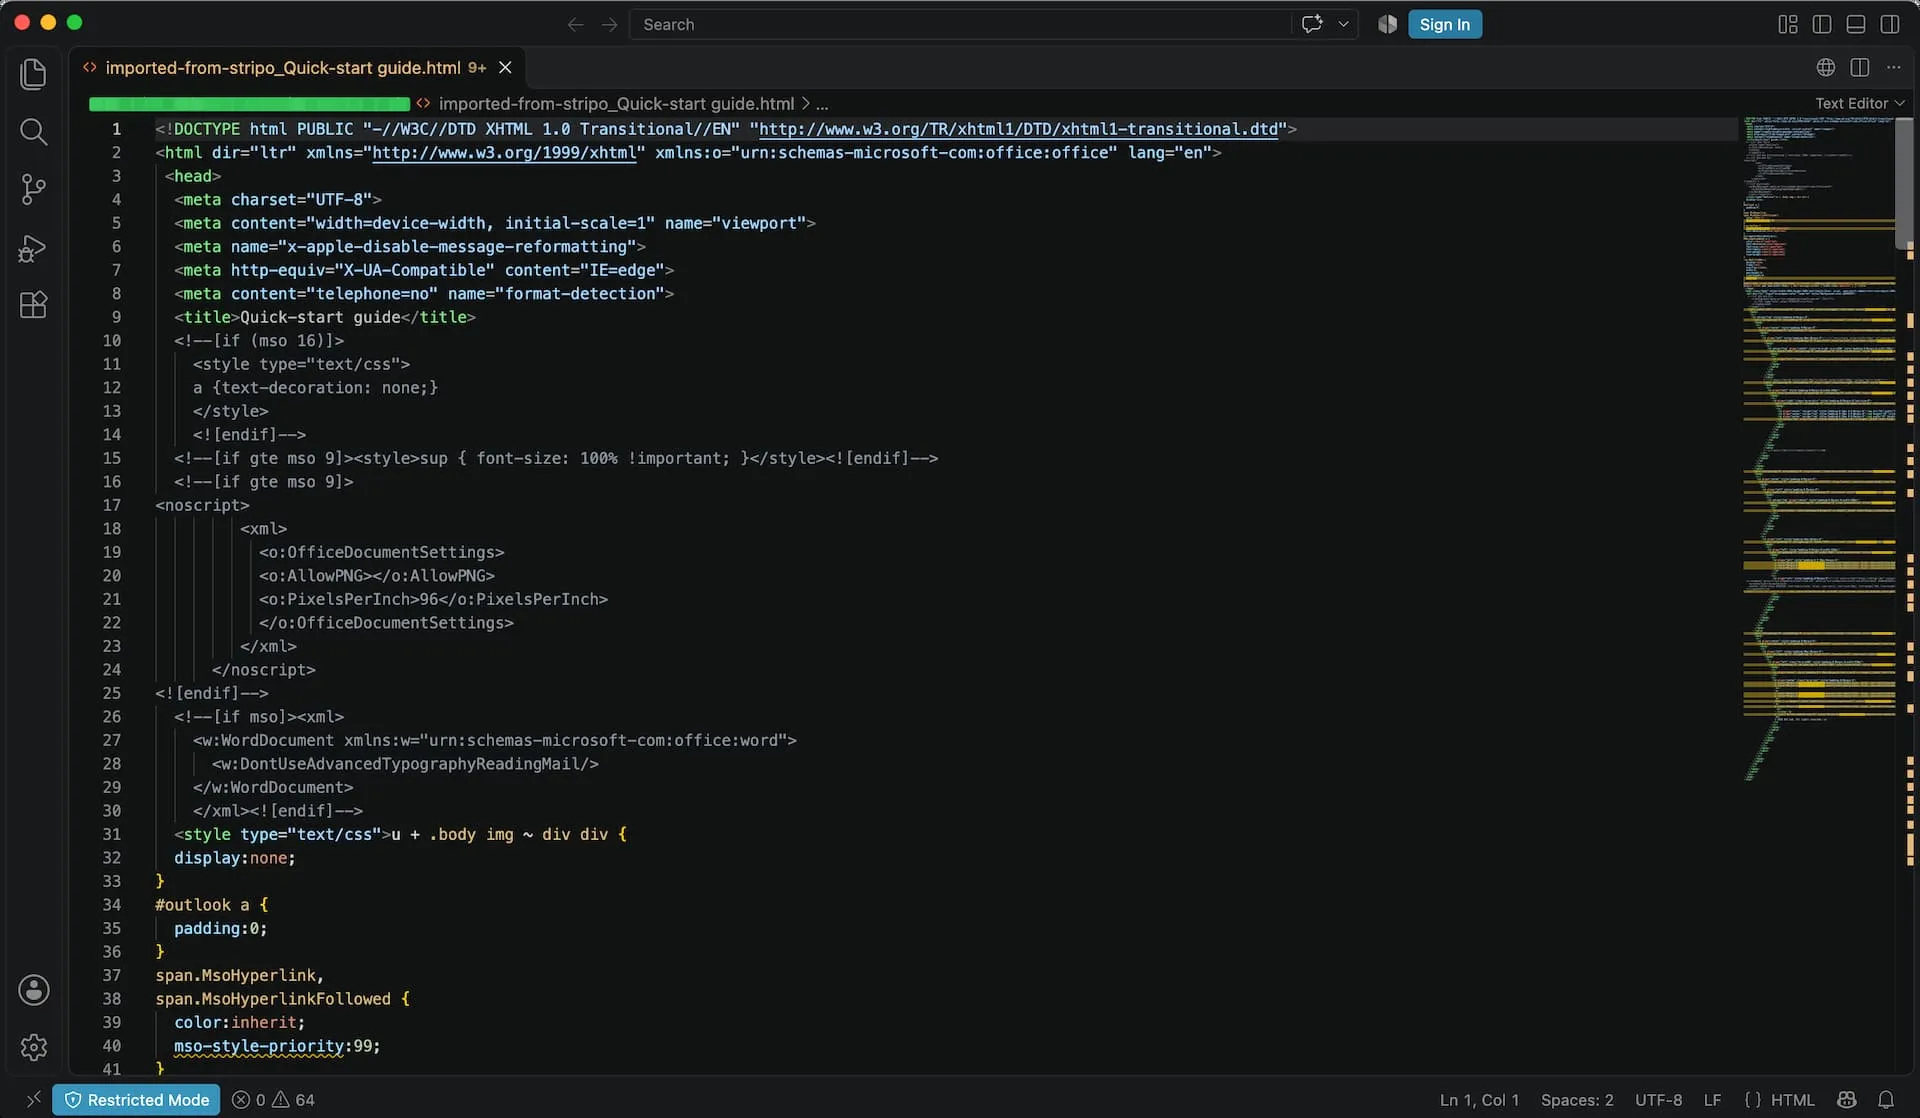
You don’t need to understand or edit the code to use the template. It can be imported into a compatible email marketing platform, provided it meets that platform’s HTML requirements.
Our exported HTML referenced images hosted on Stripo’s servers rather than embedding them directly in the file. If you prefer to manage the images separately, consider using as Archive.
For more details, see Stripo’s official HTML export documentation.
Keep an Eye on Your Export Allowance
Before downloading, our account showed 4 of 4 exports remaining, with the allowance scheduled to renew on December 20, 2026.
If you’re using the free plan, finish editing and previewing your template before exporting to avoid using your limited allowance unnecessarily.
What We Learned After Testing Stripo’s Free Plan
After working through the process, we found Stripo relatively easy to use, especially when starting with a pre-built template.
The drag-and-drop editor made basic customization straightforward, and the side-by-side desktop and mobile previews were particularly useful for spotting layout differences.
The main limitation is the free plan’s export allowance, which may become restrictive if you frequently revise and export email templates.
Frequently Asked Questions
Is Stripo Free to Use?
Yes. Stripo offers a free plan that allows you to create and customize email templates without a paid subscription.
However, the free plan includes limits on features such as stored templates, exports, and test emails.
You can check the latest details on Stripo’s pricing page.
Do I Need HTML or Coding Skills to Use Stripo?
No. Stripo provides a visual drag-and-drop editor that lets you customize email templates without writing code.
You can edit text, replace images, configure links, and adjust the layout directly in the editor.
Can Stripo Send Marketing Emails?
Stripo is primarily an email design platform.
Although it offers email testing features, regular marketing campaigns generally need to be delivered through a compatible email service provider.
Can I Use Stripo with Shopify?
Yes. You can use Stripo to design welcome emails, promotional messages, and other marketing email templates for your Shopify store.
The exported HTML can then be used with a compatible email marketing platform, subject to that platform’s HTML import requirements.
Can I Export Stripo Templates as HTML for Free?
Yes. HTML export is available on Stripo’s free plan, subject to its monthly export limit.
To download your template, select Export → File → HTML, choose as File, and click Download.
Final Thoughts
Stripo is a practical option for Shopify merchants who want to create customized email designs without building templates from scratch.
In this tutorial, we created a B2C Lab welcome email, previewed the finished design, and exported it as HTML. The next step is to put that template to use.
In our next tutorial, we’ll show how to import a Stripo-designed HTML email into Omnisend and use it with Shopify.
Support & Share
If this article helped you, please share or support!