





How to Set Up a Welcome Automation in Omnisend for Shopify
- 1How to Set Up Omnisend for Shopify: A Complete Beginner's Guide
- 2How to Create a Signup Form in Omnisend for Shopify
- 3How to Set Up a Welcome Automation in Omnisend for ShopifyThis article
This article contains affiliate links. If you sign up through these links, we may earn a commission at no extra cost to you.
In the previous tutorial How to Create a Signup Form in Omnisend for Shopify, we created a signup form in Omnisend to collect email subscribers from our Shopify store. But what happens after someone subscribes?
Instead of leaving new subscribers waiting, we can automatically send them a welcome email to thank them for joining, introduce our store, and even offer a special discount.
This is where Welcome Automation comes in.
With Omnisend, we can create an automated workflow that sends a welcome email whenever someone subscribes through our signup form. Once the workflow is active, Omnisend handles the process automatically.
In this tutorial, we’ll walk you through how to create a Welcome Automation in Omnisend, customize the email, configure a welcome discount, and test the workflow using our Shopify store.
If you haven’t installed Omnisend yet, follow the Omnisend setup guide for Shopify before continuing.
1. Create a Welcome Automation
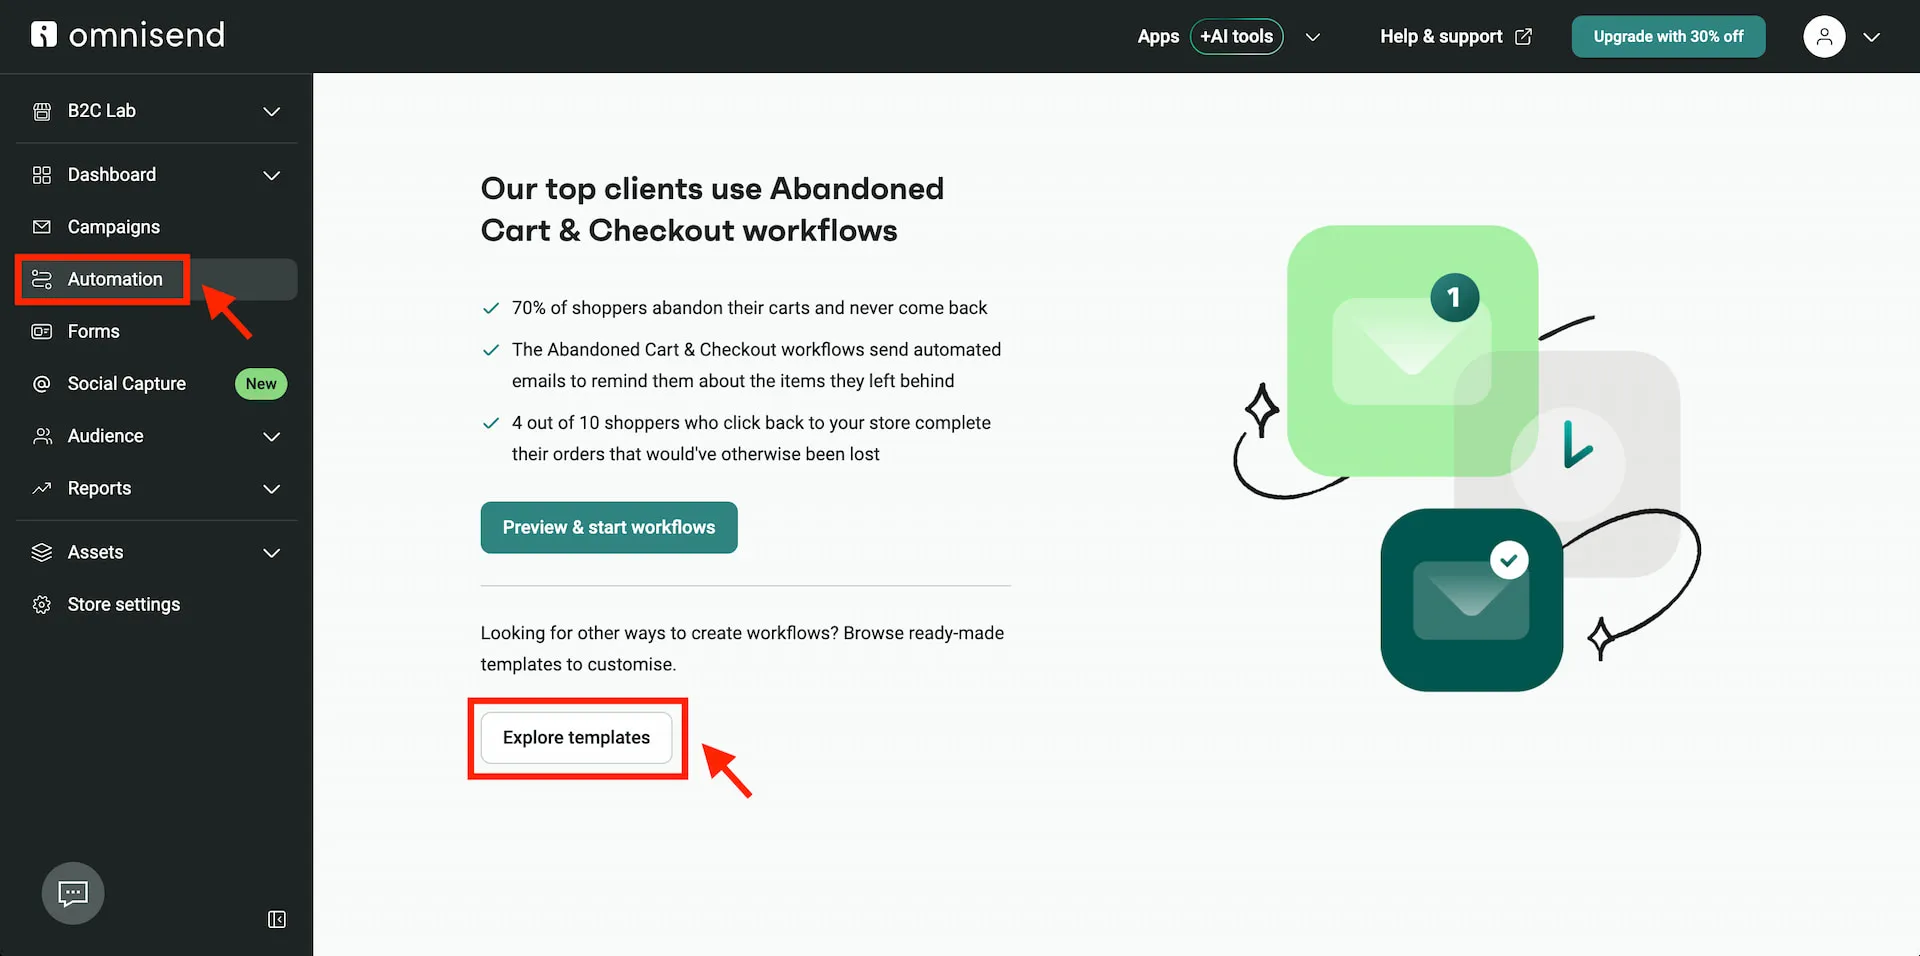
First, log in to your Omnisend dashboard and select Automation from the left sidebar.
If this is your first time opening the Automation section, Omnisend may display a page recommending abandoned cart and checkout workflows.
Since we’re creating a welcome email, click Explore templates to browse the available automation workflows.
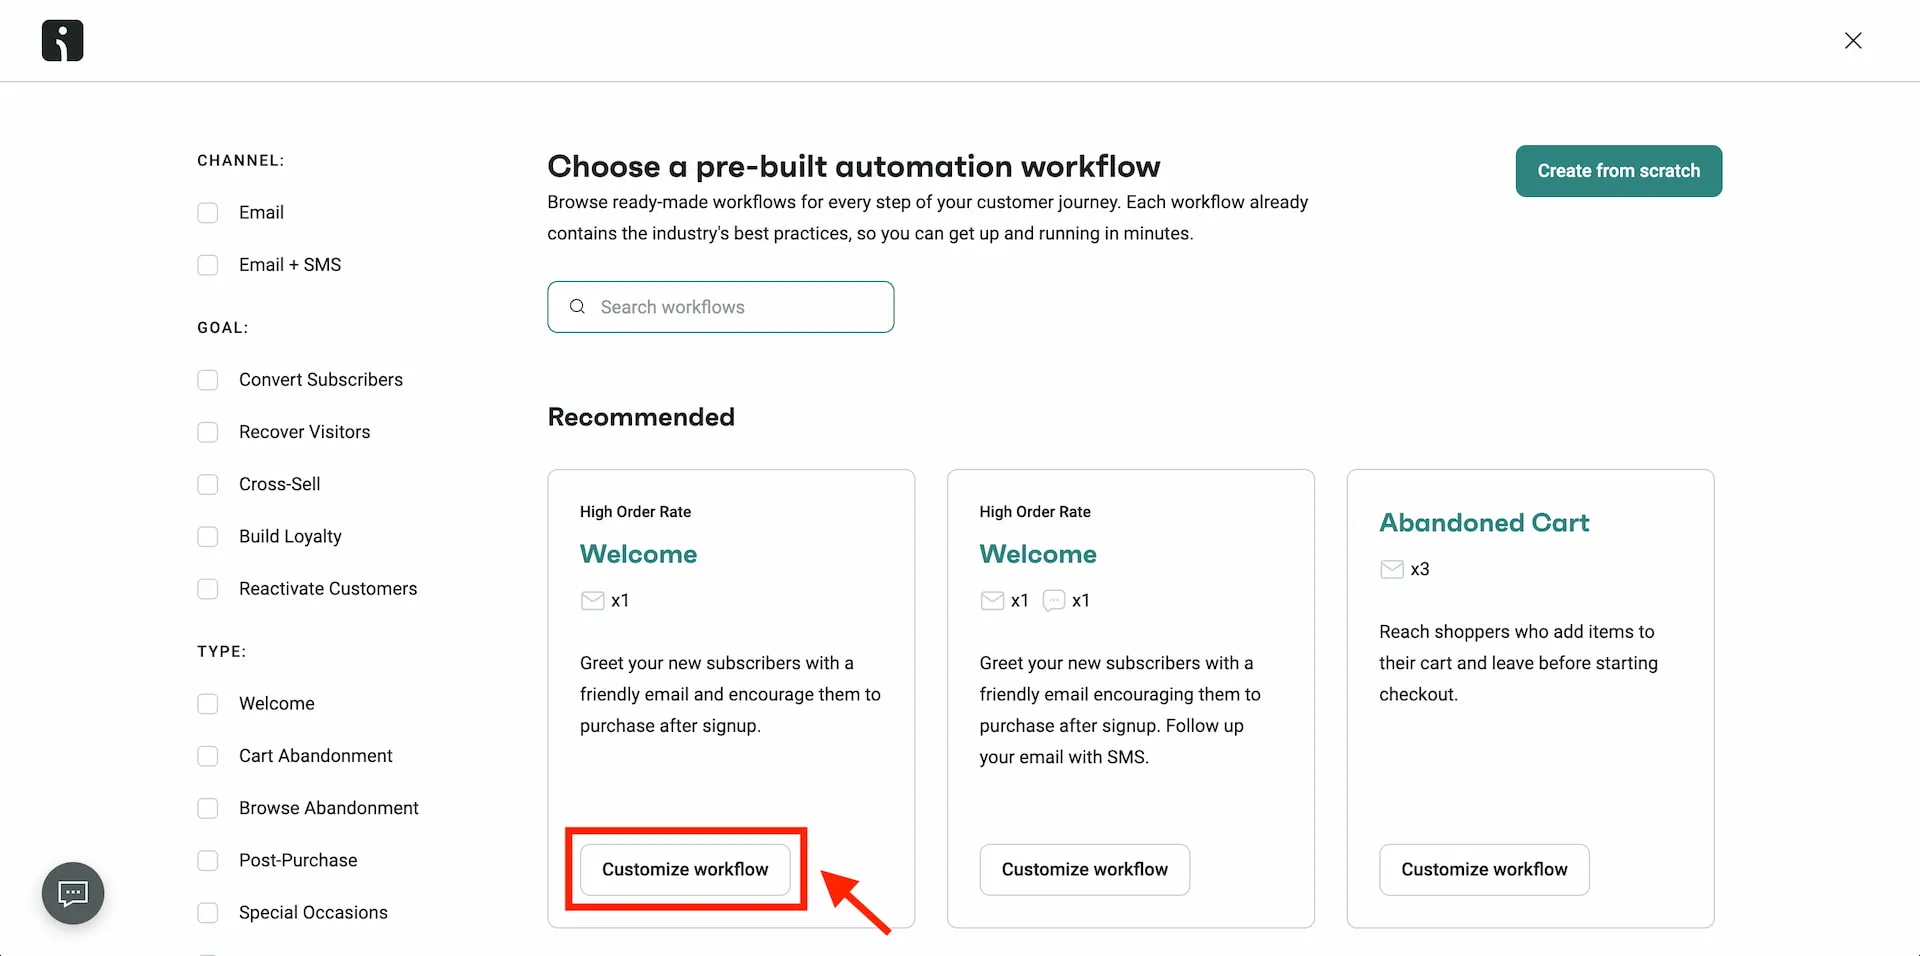
On the next page, you’ll find several pre-built automation templates for different stages of the customer journey.
Under Recommended, Omnisend offers two Welcome templates:
- Welcome (Email): Sends a welcome email to new subscribers.
- Welcome (Email + SMS): Combines a welcome email with a follow-up text message.
For this tutorial, we’ll use the first option, which contains a single welcome email. This is a simple starting point, and we can always expand the workflow later.
Click Customize workflow on the first Welcome template to open the automation editor.
2. Understand the Workflow Editor
The automation editor is divided into three main sections.
On the left, you’ll find the available messages and workflow actions, such as Email, SMS, Delay, Split, and A/B testing. These elements can be dragged into the workflow when needed.
In the center, Omnisend displays the automation workflow as a flowchart. Each step is connected to the next, making it easy to understand how contacts move through the automation.
On the right, you can configure the selected step, including its trigger conditions, delay, and email settings.
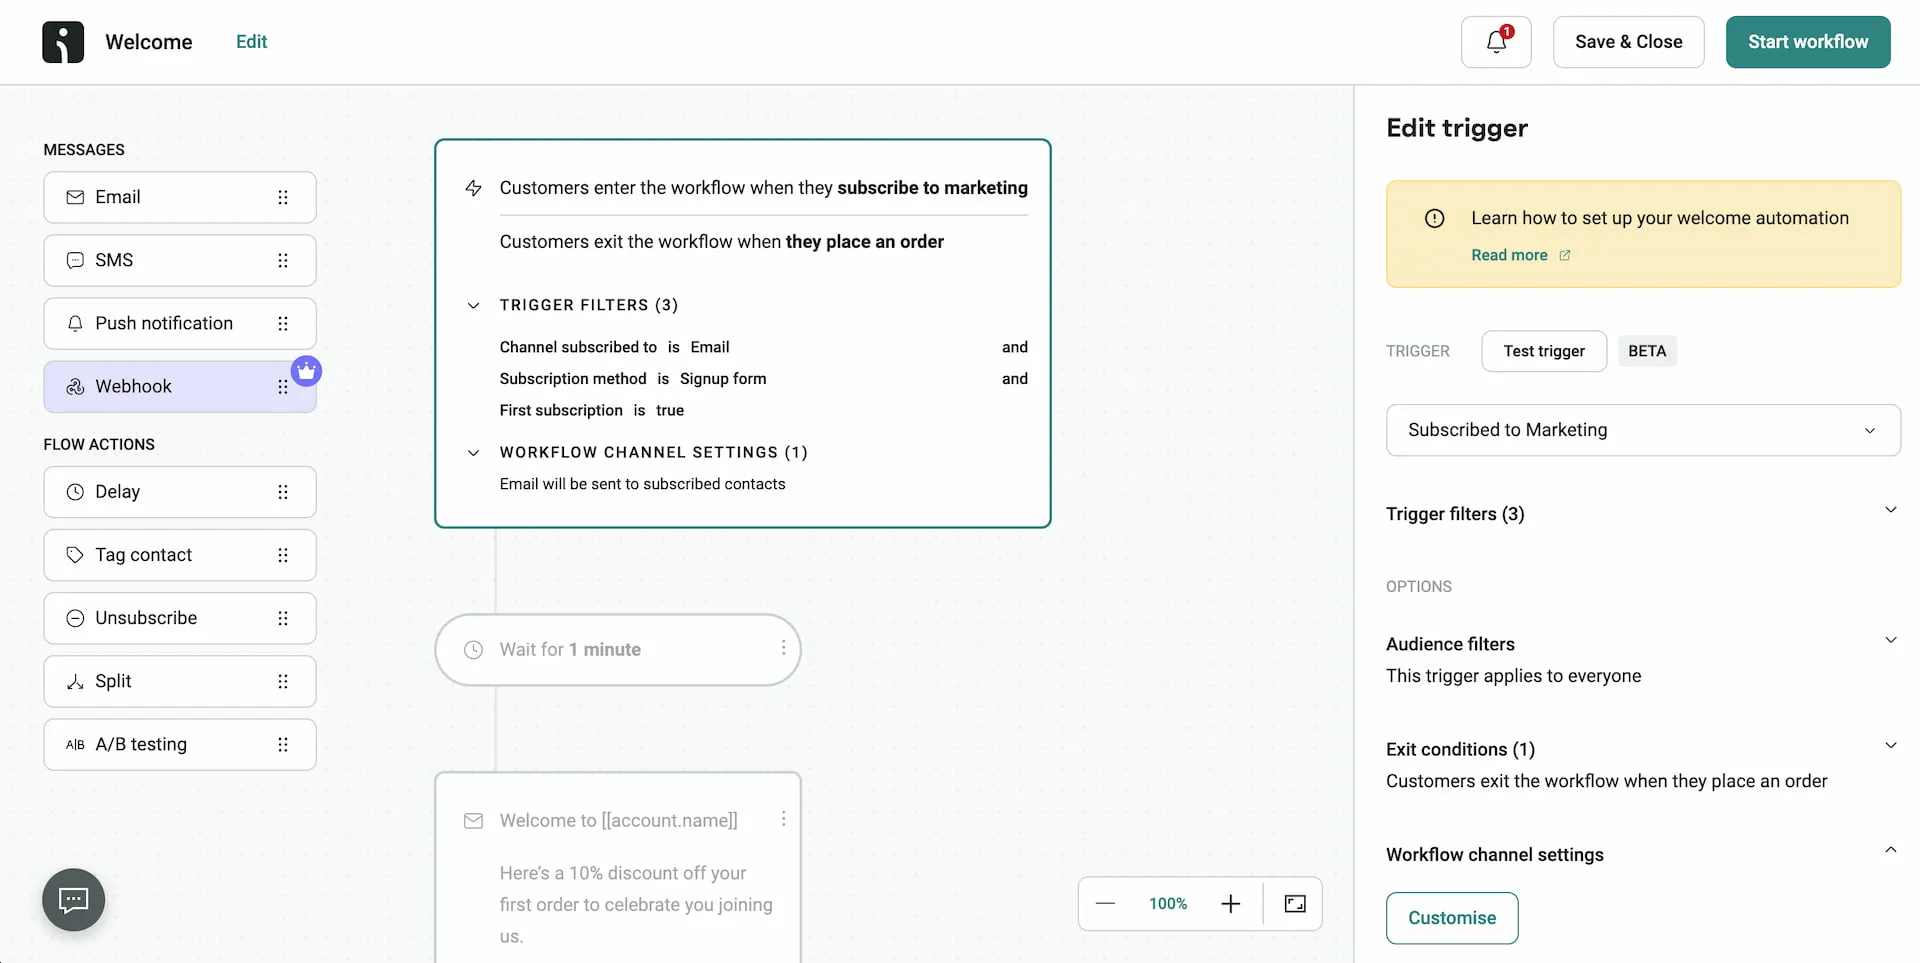
Our selected Welcome template already includes three main steps:
- Trigger: Starts the workflow when someone subscribes to marketing.
- Delay: Waits for one minute before proceeding.
- Email: Sends the welcome email to the subscriber.
It also includes an exit condition that removes contacts from the workflow when they place an order.
We don’t need to build everything from scratch. Most of the default settings are already suitable for a basic welcome automation, so let’s review them one by one.
3. Configure the Welcome Automation
3.1. Trigger: When Someone Subscribes
Click the first block in the workflow to open the Edit trigger panel.
The default trigger is Subscribed to Marketing, meaning the automation begins when a contact subscribes to receive marketing messages.
Under Trigger filters, Omnisend has already added three conditions:
- Channel subscribed to is Email
- Subscription method is Signup form
- First subscription is true
These conditions are connected using AND, meaning all three must be met before a contact can enter the workflow.
For example, when a new visitor subscribes to our mailing list through an Omnisend signup form, they can enter the Welcome Automation if they meet all three conditions.
However, someone who previously subscribed and later subscribes again won’t meet the First subscription is true condition.
This helps prevent returning subscribers from repeatedly receiving the same welcome email.
The default filters work well for our tutorial, so we’ll leave them unchanged.
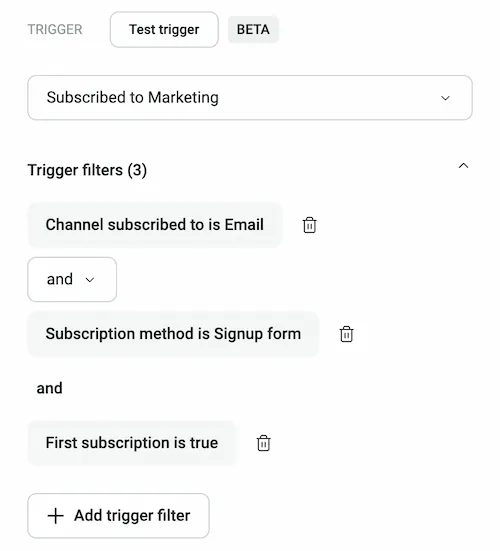
Note: The Signup form filter refers to the subscription method, not one specific signup form. If you have multiple Omnisend signup forms, contacts subscribing through those forms may enter the same workflow as long as they meet the other conditions.
3.2. Delay: When to Send the Welcome Email
Next, click the Wait for 1 minute block.
The Delay step determines how long Omnisend waits between the subscription event and sending the welcome email.
By default, the wait time is set to 1 minute.
You can change the number and time unit, or enable the option to send messages only on selected days of the week.
For a welcome email, we recommend keeping the default one-minute delay. New subscribers should receive their welcome message shortly after signing up, while their interest in the store is still fresh.
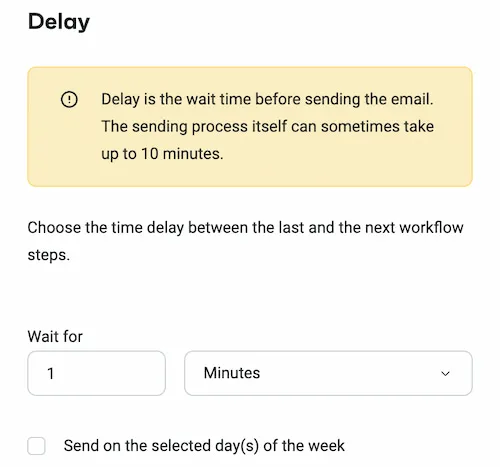
Note: The delay determines when the email is scheduled to send, not exactly when it will arrive. According to the notice in Omnisend’s workflow editor, the sending process can sometimes take up to 10 minutes.
3.3. Email: Customize the Welcome Message
Now click the Email block to open the Edit email panel.
This is where we’ll configure the email that new subscribers receive.
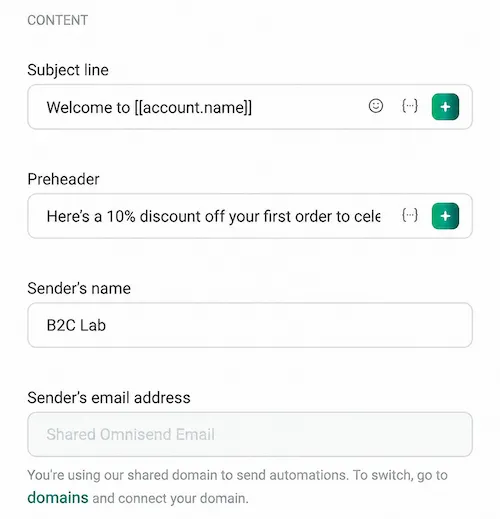
The main settings include:
- Subject line: The subject subscribers see in their inbox.
- Preheader: A short preview of the email content, often displayed next to or below the subject line.
- Sender’s name: The name recipients see as the sender.
- Sender’s email address: The email address or sending domain used to deliver the message.
By default, Omnisend uses the subject line:
Welcome to [[account.name]]
The [[account.name]] variable dynamically inserts the account name into the subject line.
For our test store, we used B2C Lab as the sender’s name and kept the welcome message focused on introducing the store and offering a discount.
If your account is using Omnisend’s shared sending domain, you’ll see Shared Omnisend Email under the sender’s email address. Omnisend also provides an option to connect your own sending domain.
Before launching a real campaign, it’s worth configuring an authenticated domain for your brand.
Once the basic settings are ready, scroll down and click Edit content to open the email builder.
Customize the Email Design
Omnisend provides a visual drag-and-drop editor, so you don’t need any coding knowledge to design your welcome email.
The left sidebar contains different content elements, the middle canvas displays your email, and the right panel lets you edit the selected element.
You can replace the default logo, modify the text, add images or buttons, and adjust the overall appearance to match your brand.
For this tutorial, we customized the default template with a B2C Lab logo, a simple navigation menu, a welcome message, and a 10% discount.
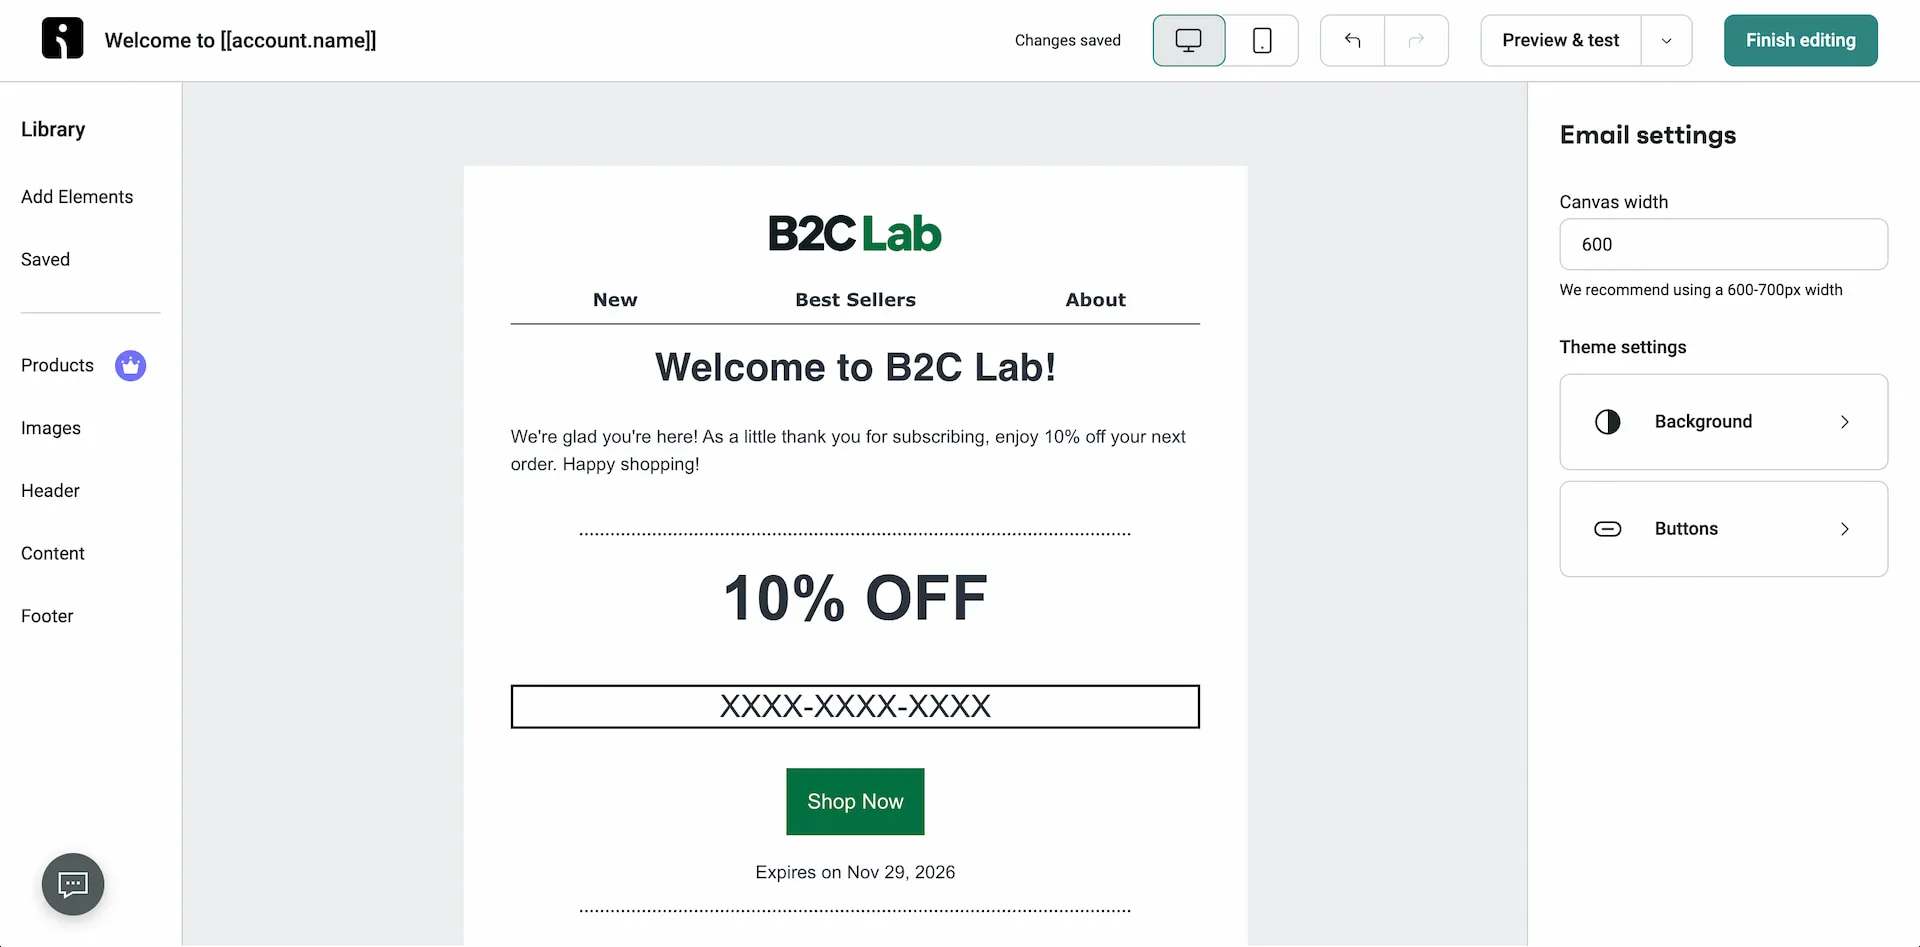
You don’t need to spend too much time creating a complicated design. A clear welcome message, a useful offer, and an easy-to-find call-to-action button are usually enough to get started.
Just make sure that any navigation links or buttons in your email point to valid pages in your Shopify store.
Configure the Welcome Discount
One useful feature of Omnisend is its built-in Discount element, which can automatically generate discount codes for emails sent through the workflow.
In the default Welcome template, the email already includes a 10% discount block.
Click the Discount element in the email preview, as highlighted below, to open its settings in the right-hand panel.
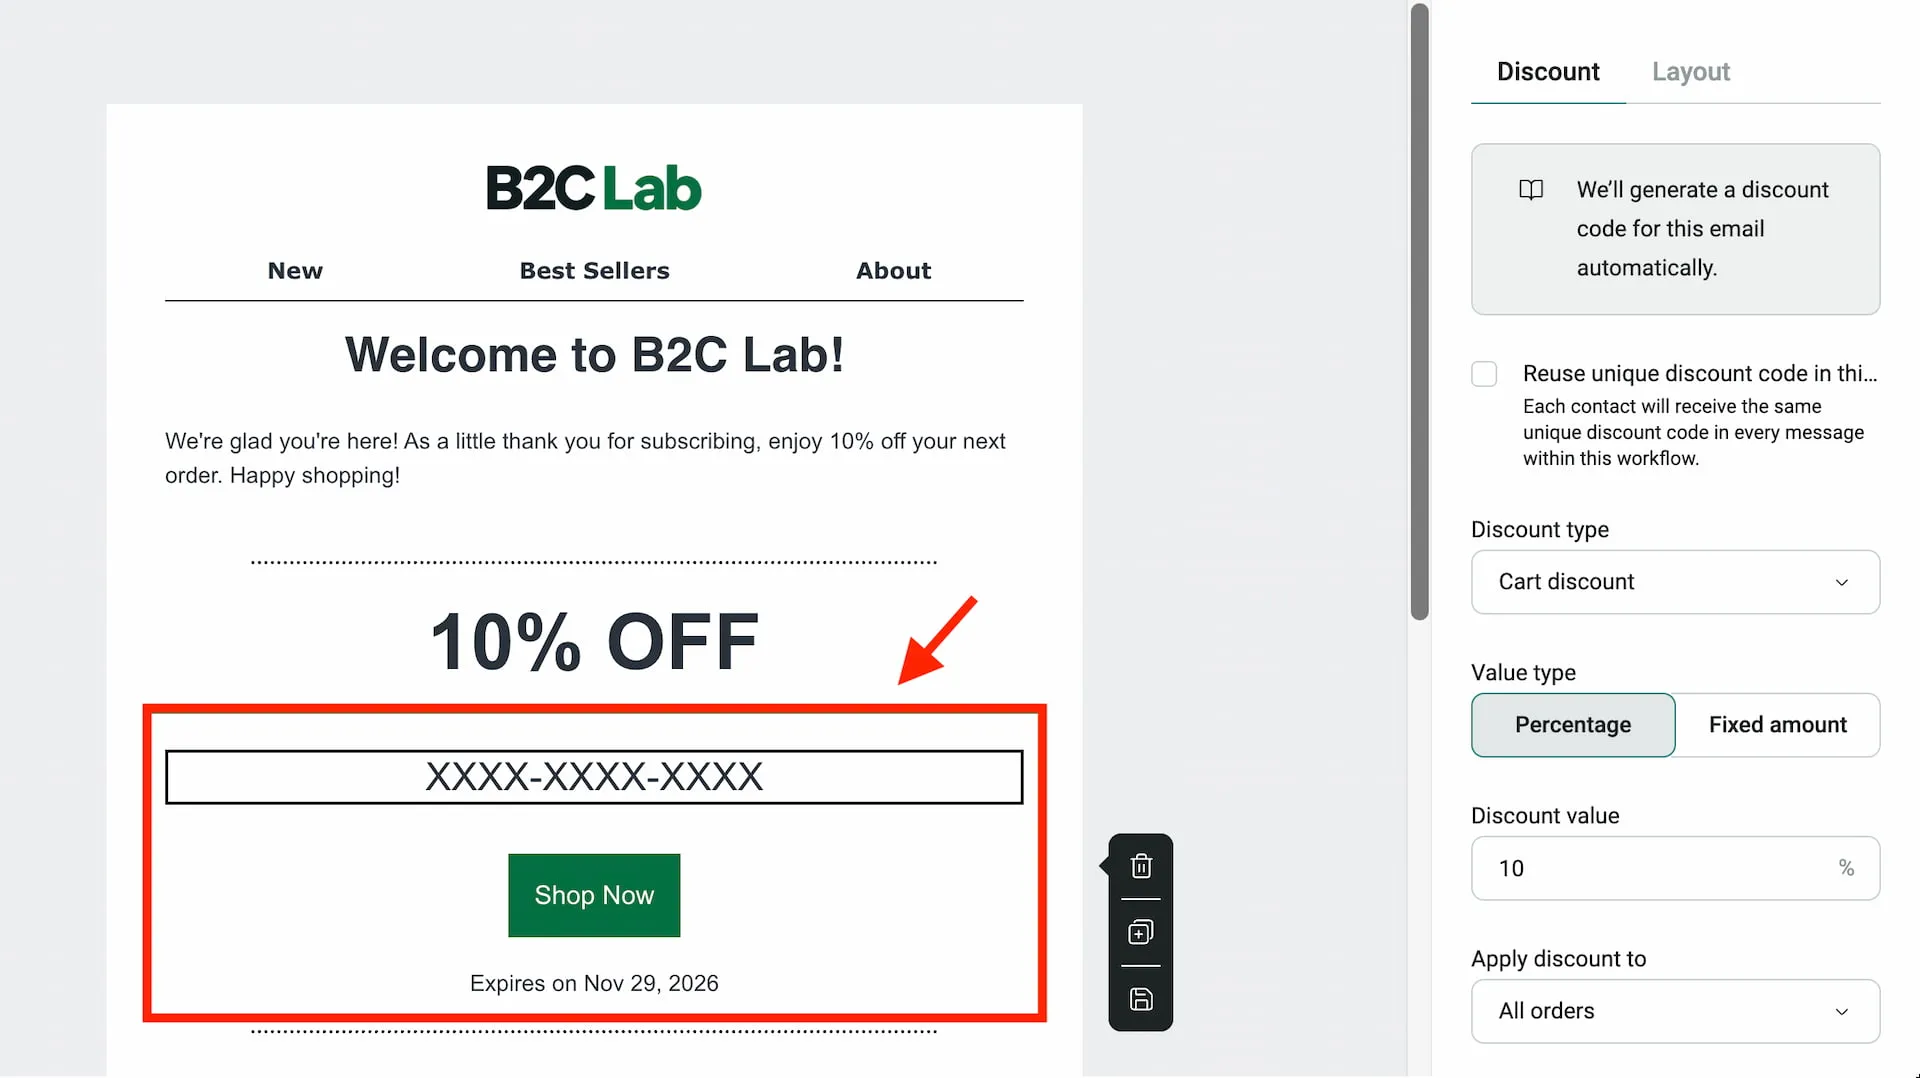
For this example, we’ll use the following configuration:
| Setting | Value |
|---|---|
| Discount type | Cart discount |
| Value type | Percentage |
| Discount value | 10% |
| Apply discount to | All orders |
| Discount expiry | 14 days |
Omnisend provides options for applying the discount to all orders, orders meeting a minimum price, or selected collections.
You can also configure whether the discount can be combined with other product, order, or shipping discounts.
For this tutorial, we’ll leave all three combination options unchecked.
Under Expiry, the default template sets the discount to expire after 14 days. You can adjust the number of days or turn off expiration if you don’t want to set a time limit.
The discount code appears as XXXX-XXXX-XXXX in the editor. This is a placeholder rather than an actual redeemable code.
Omnisend generates discount codes when the email is sent through the live automation.
Important: The All orders option does not mean the discount is restricted to a customer’s first order. If you advertise the offer as a first-order discount, make sure its actual Shopify discount rules support that promise. Otherwise, use more general wording such as “Enjoy 10% off your next order.”
After configuring the discount, review the remaining email content, including the call-to-action button and footer.
Make sure your email includes the required sender information and an unsubscribe link.
Once you’re happy with the design, it’s time to preview and test the email before returning to the workflow editor.
4. Preview and Test the Welcome Email
Before activating the workflow, it’s a good idea to preview the email and send a test copy to yourself.
In the email builder, click Preview & test at the top of the page.
Omnisend allows you to preview the email in desktop and mobile layouts. You can also check its appearance in dark mode.
Review the overall layout, text formatting, images, and buttons to make sure everything looks as expected.
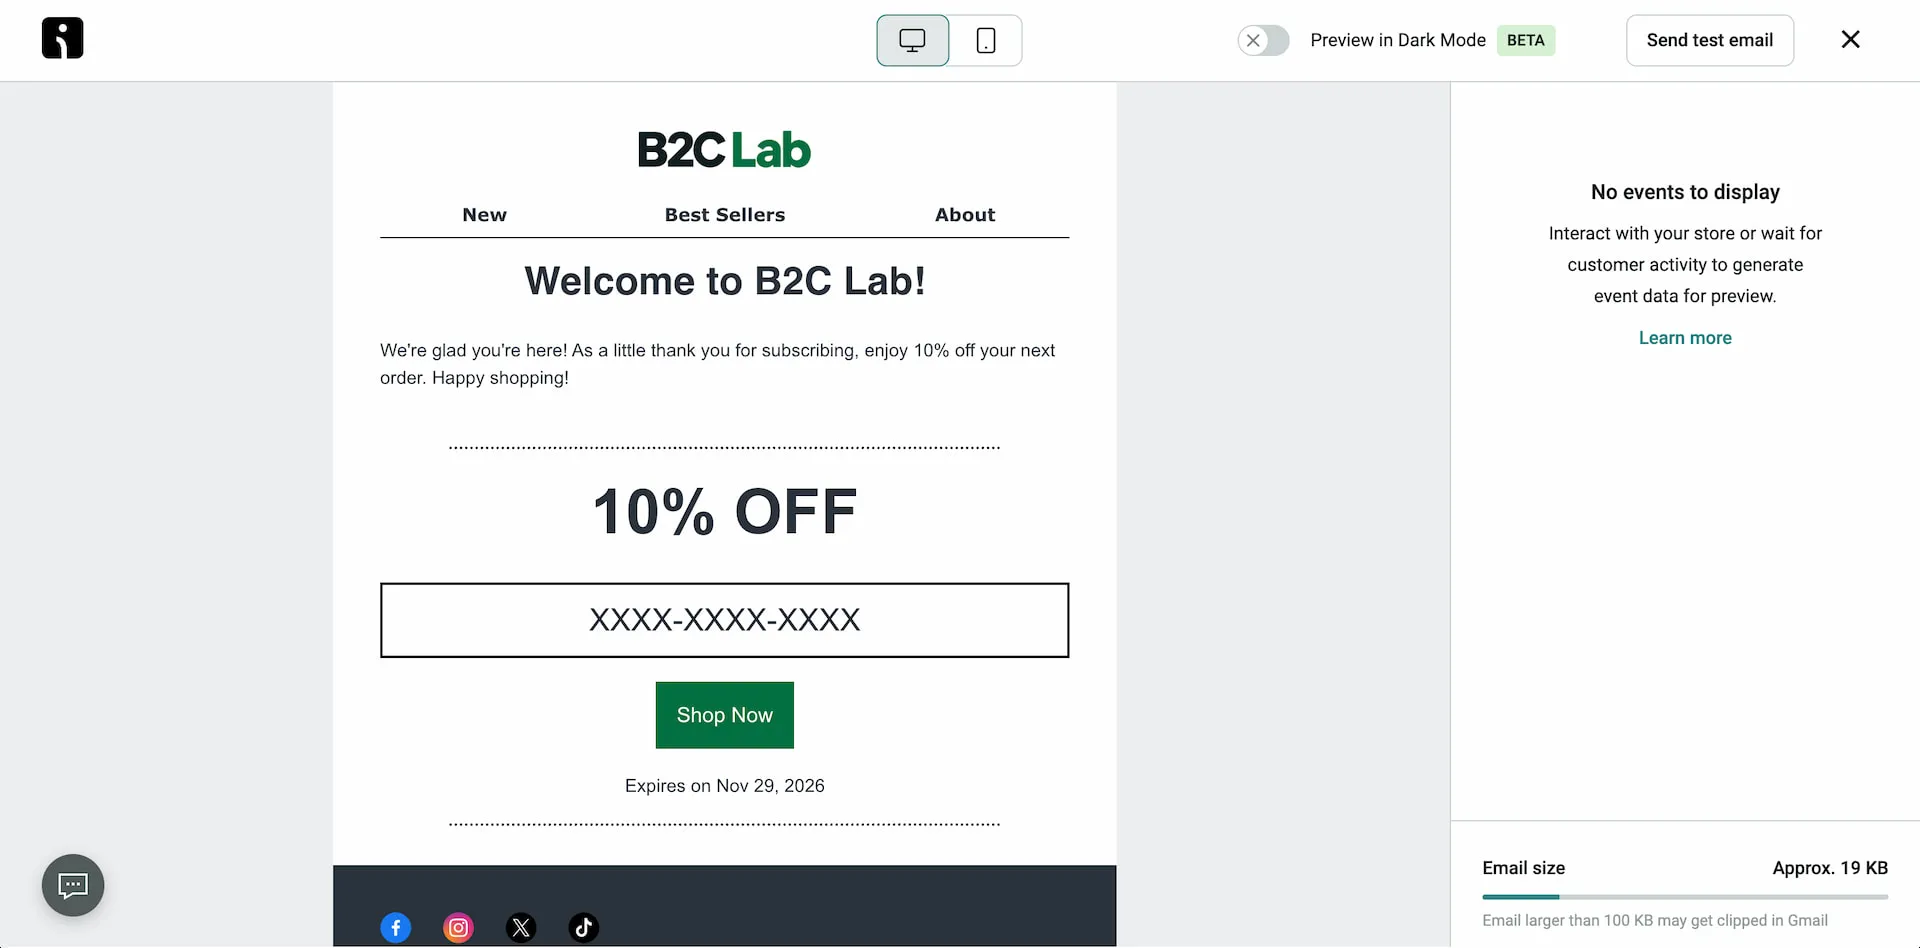
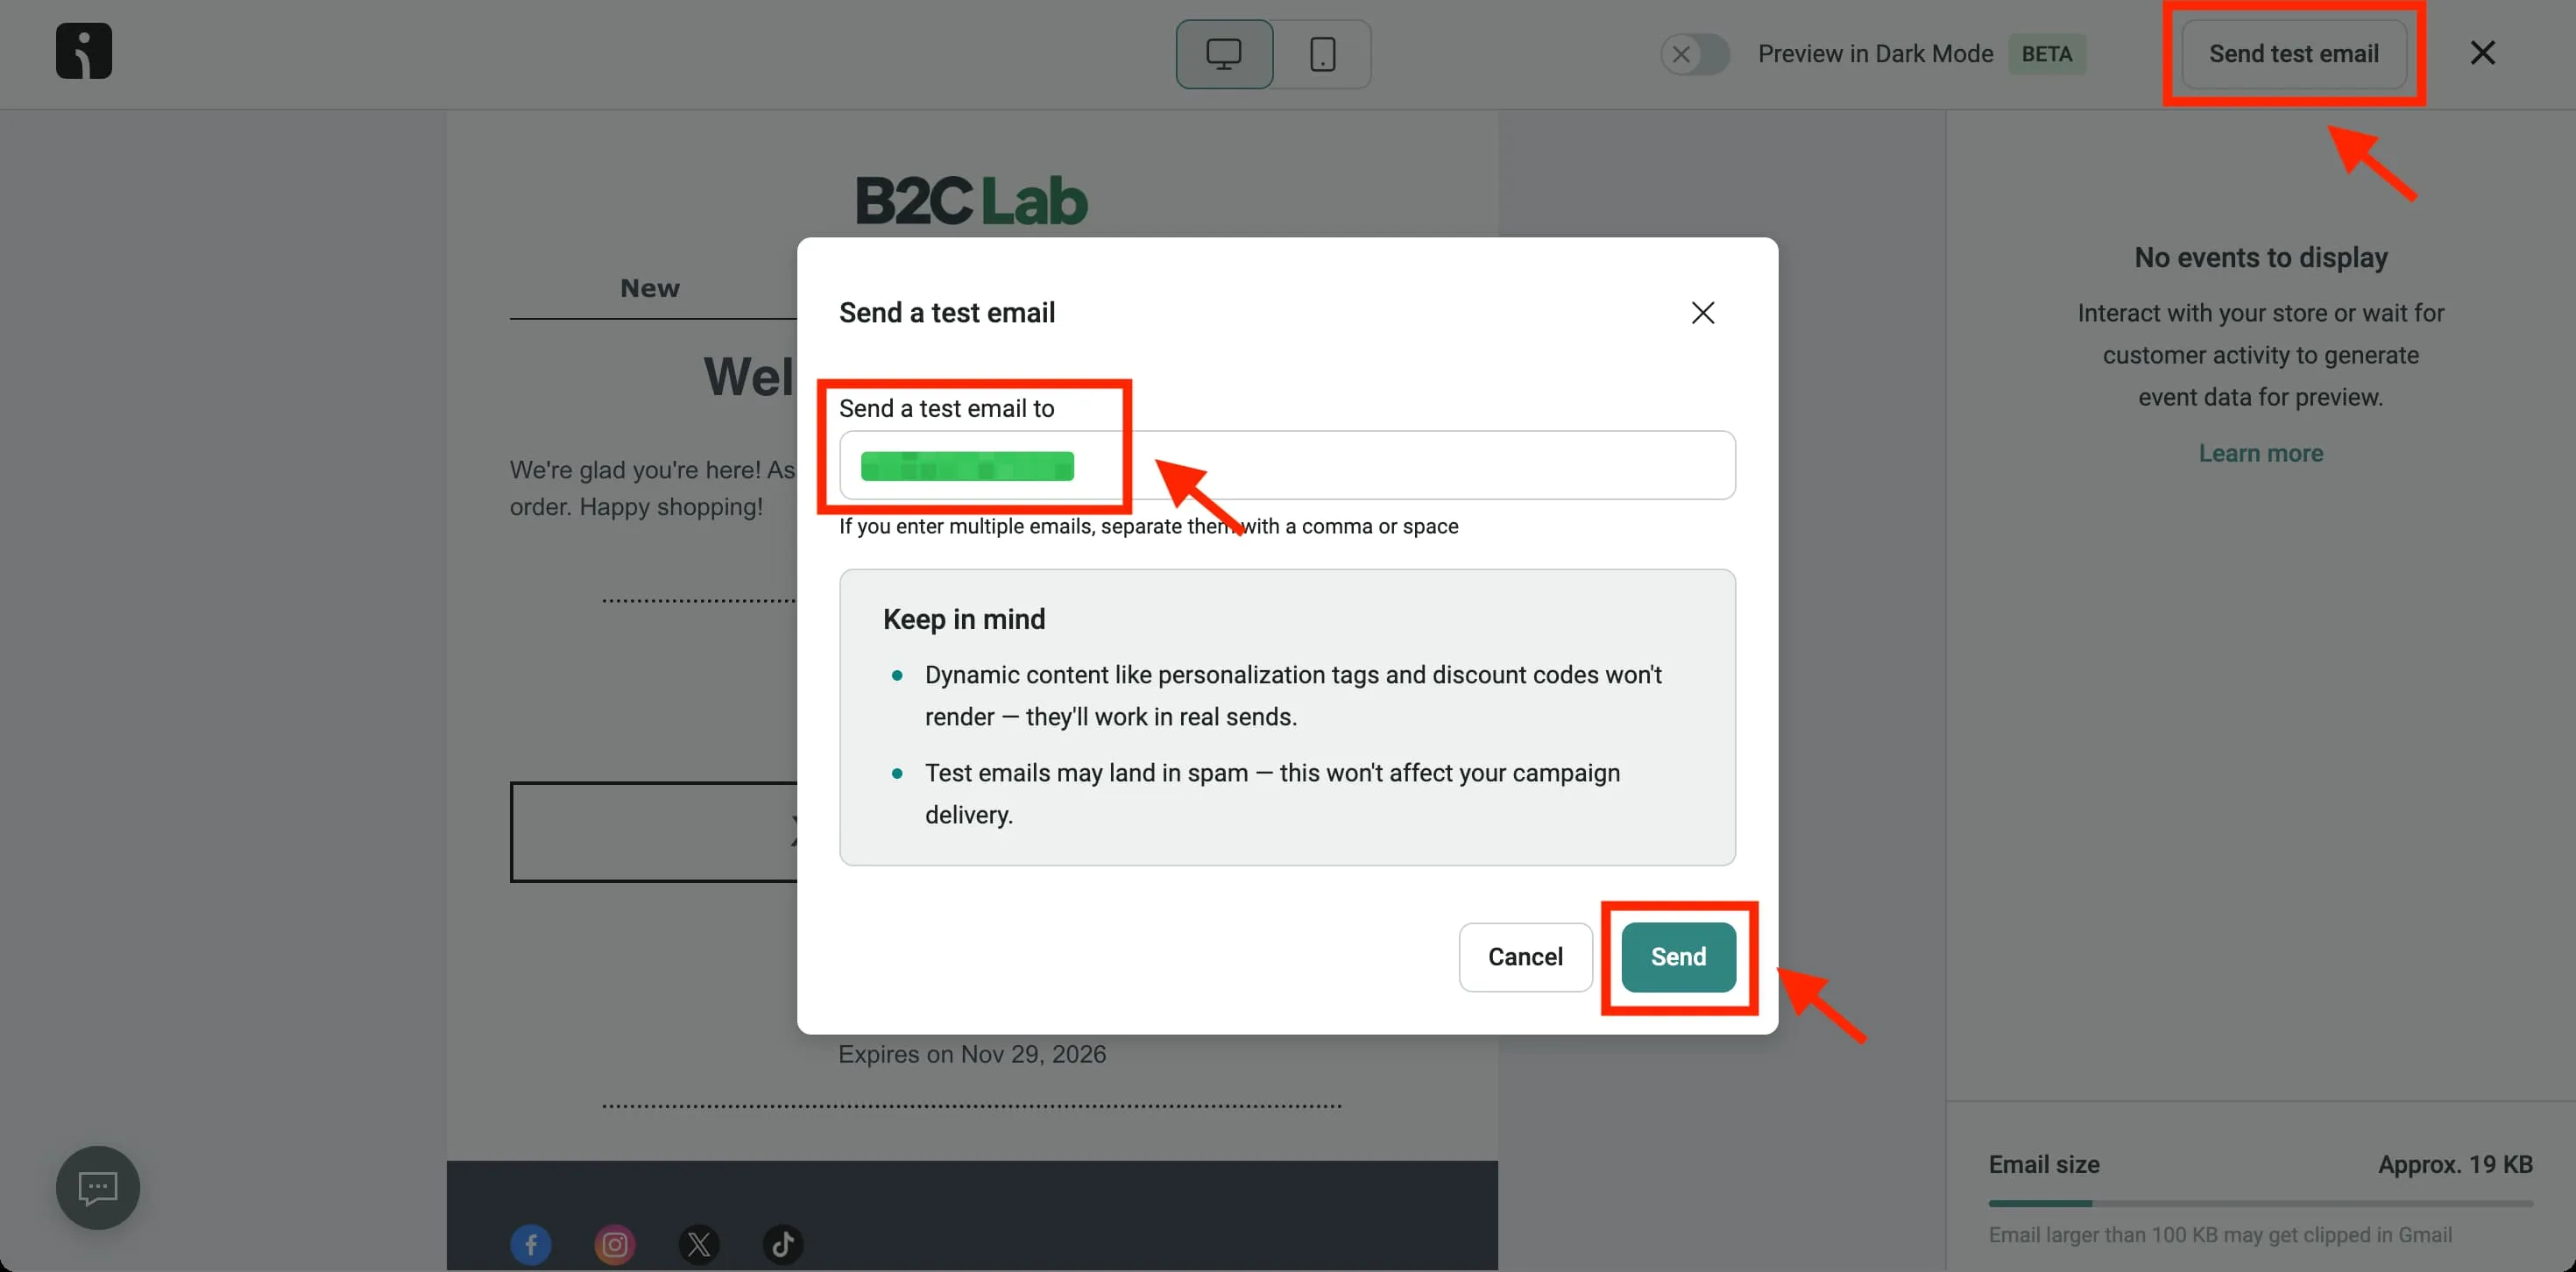
Next, click Send test email.
Enter the email address where you’d like to receive the test message, then click Send.
For this tutorial, we sent a test email to our Gmail inbox. The message arrived successfully, with the subject line prefixed by [preview].

Note: Test emails don’t render certain dynamic content, including personalization tags and generated discount codes.
For that reason, a test email is useful for checking delivery and design, but it doesn’t fully verify that the automation trigger or discount code generation works.
To test those features, we’ll need to activate the workflow and subscribe through the actual Shopify store.
Once you’ve finished previewing and testing the email, close the preview and click Finish editing to return to the workflow editor.
5. Start the Welcome Automation
Before activating the automation, take a final look at the workflow’s Exit conditions.
In our default template, contacts exit the workflow when they place an order.
This prevents the remaining steps from continuing once a customer has completed a purchase. For our single-email workflow, we’ll keep the default exit condition.
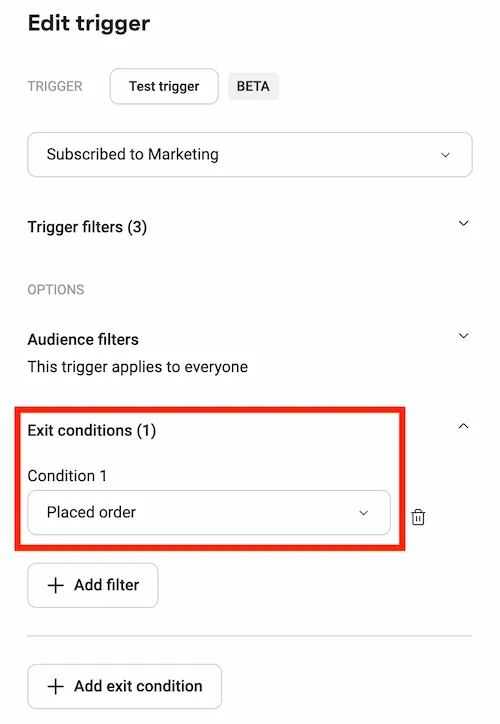
Now click Start workflow in the upper-right corner.
Once the workflow is successfully activated, Omnisend displays a confirmation page indicating that your automation is enabled.
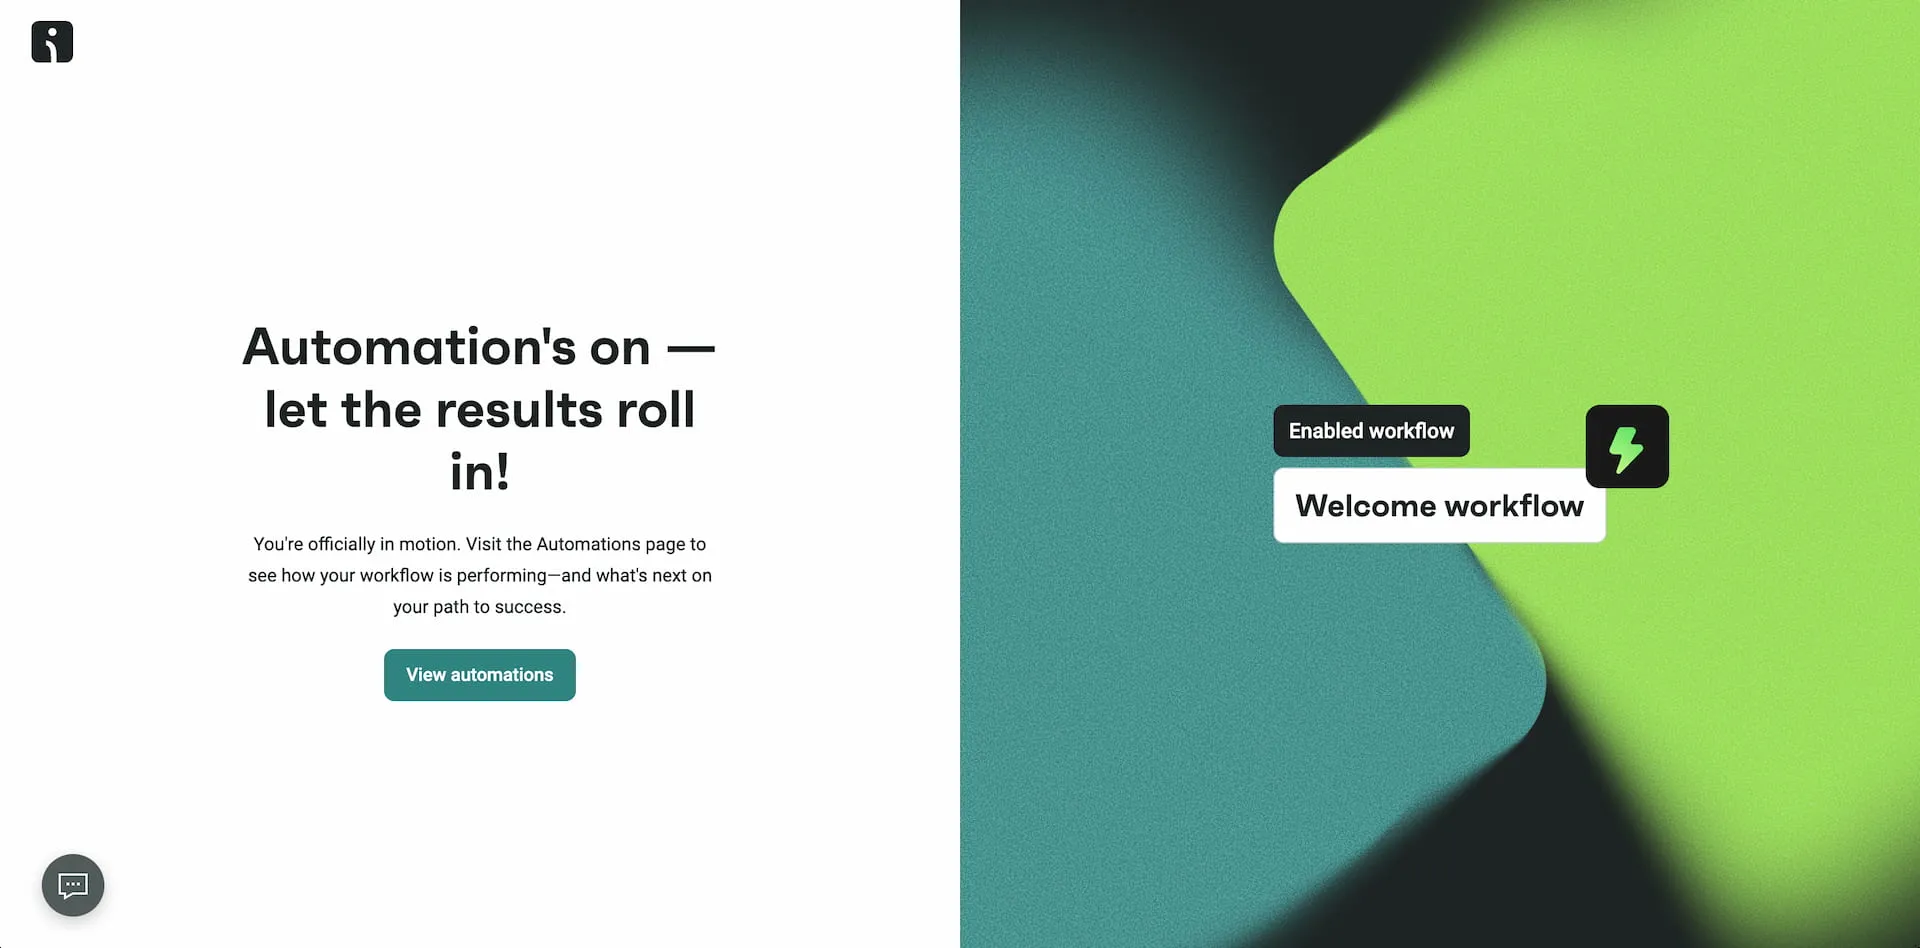
Click View automations to return to the Automation dashboard, where you can monitor your workflow’s performance.
That’s it! Our Welcome Automation is now active and ready to send welcome emails to qualifying new subscribers.
However, before relying on it for real customers, we should perform one final test.
6. Test the Automation with a Real Signup
Sending a test email verifies the email itself, but it doesn’t test the complete automation workflow.
To check that everything works together, we can simulate a new customer subscribing to our Shopify store.
First, open a new Incognito window in Chrome and visit your Shopify storefront.
If you’ve followed the previous tutorial How to Create a Signup Form in Omnisend for Shopify, your Omnisend signup form should appear according to its display settings.
Enter an email address that hasn’t previously subscribed to your store and submit the form.
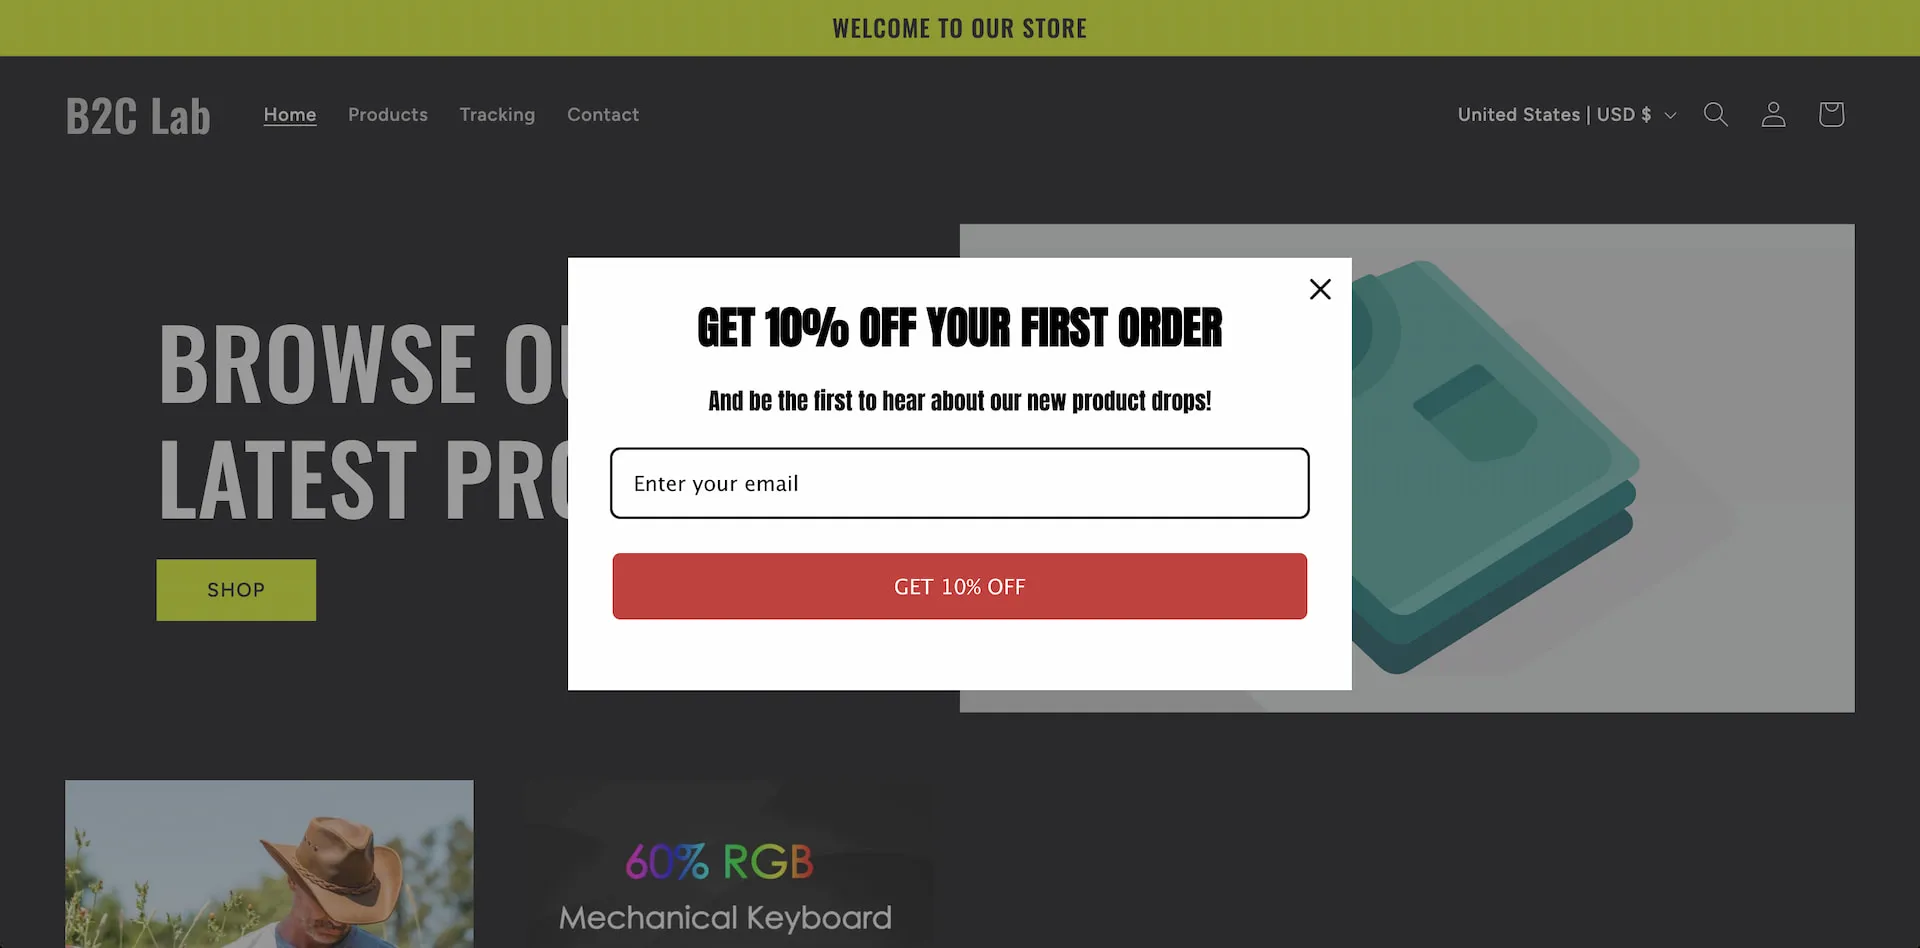
Then open the inbox associated with that email address.
With our workflow set to wait one minute, the welcome email should arrive shortly after the subscription, although delivery may take longer.
Once you receive the email, check the following:
- Sender and subject line: Confirm that the sender information and email subject are correct.
- Email content: Check that the text, images, and layout match your design.
- Links and buttons: Make sure every clickable element opens the correct page.
- Discount code: Verify that a real discount code appears and that its conditions work as intended in Shopify.
- Mobile display: Open the email on your phone and confirm that everything is readable and properly aligned.
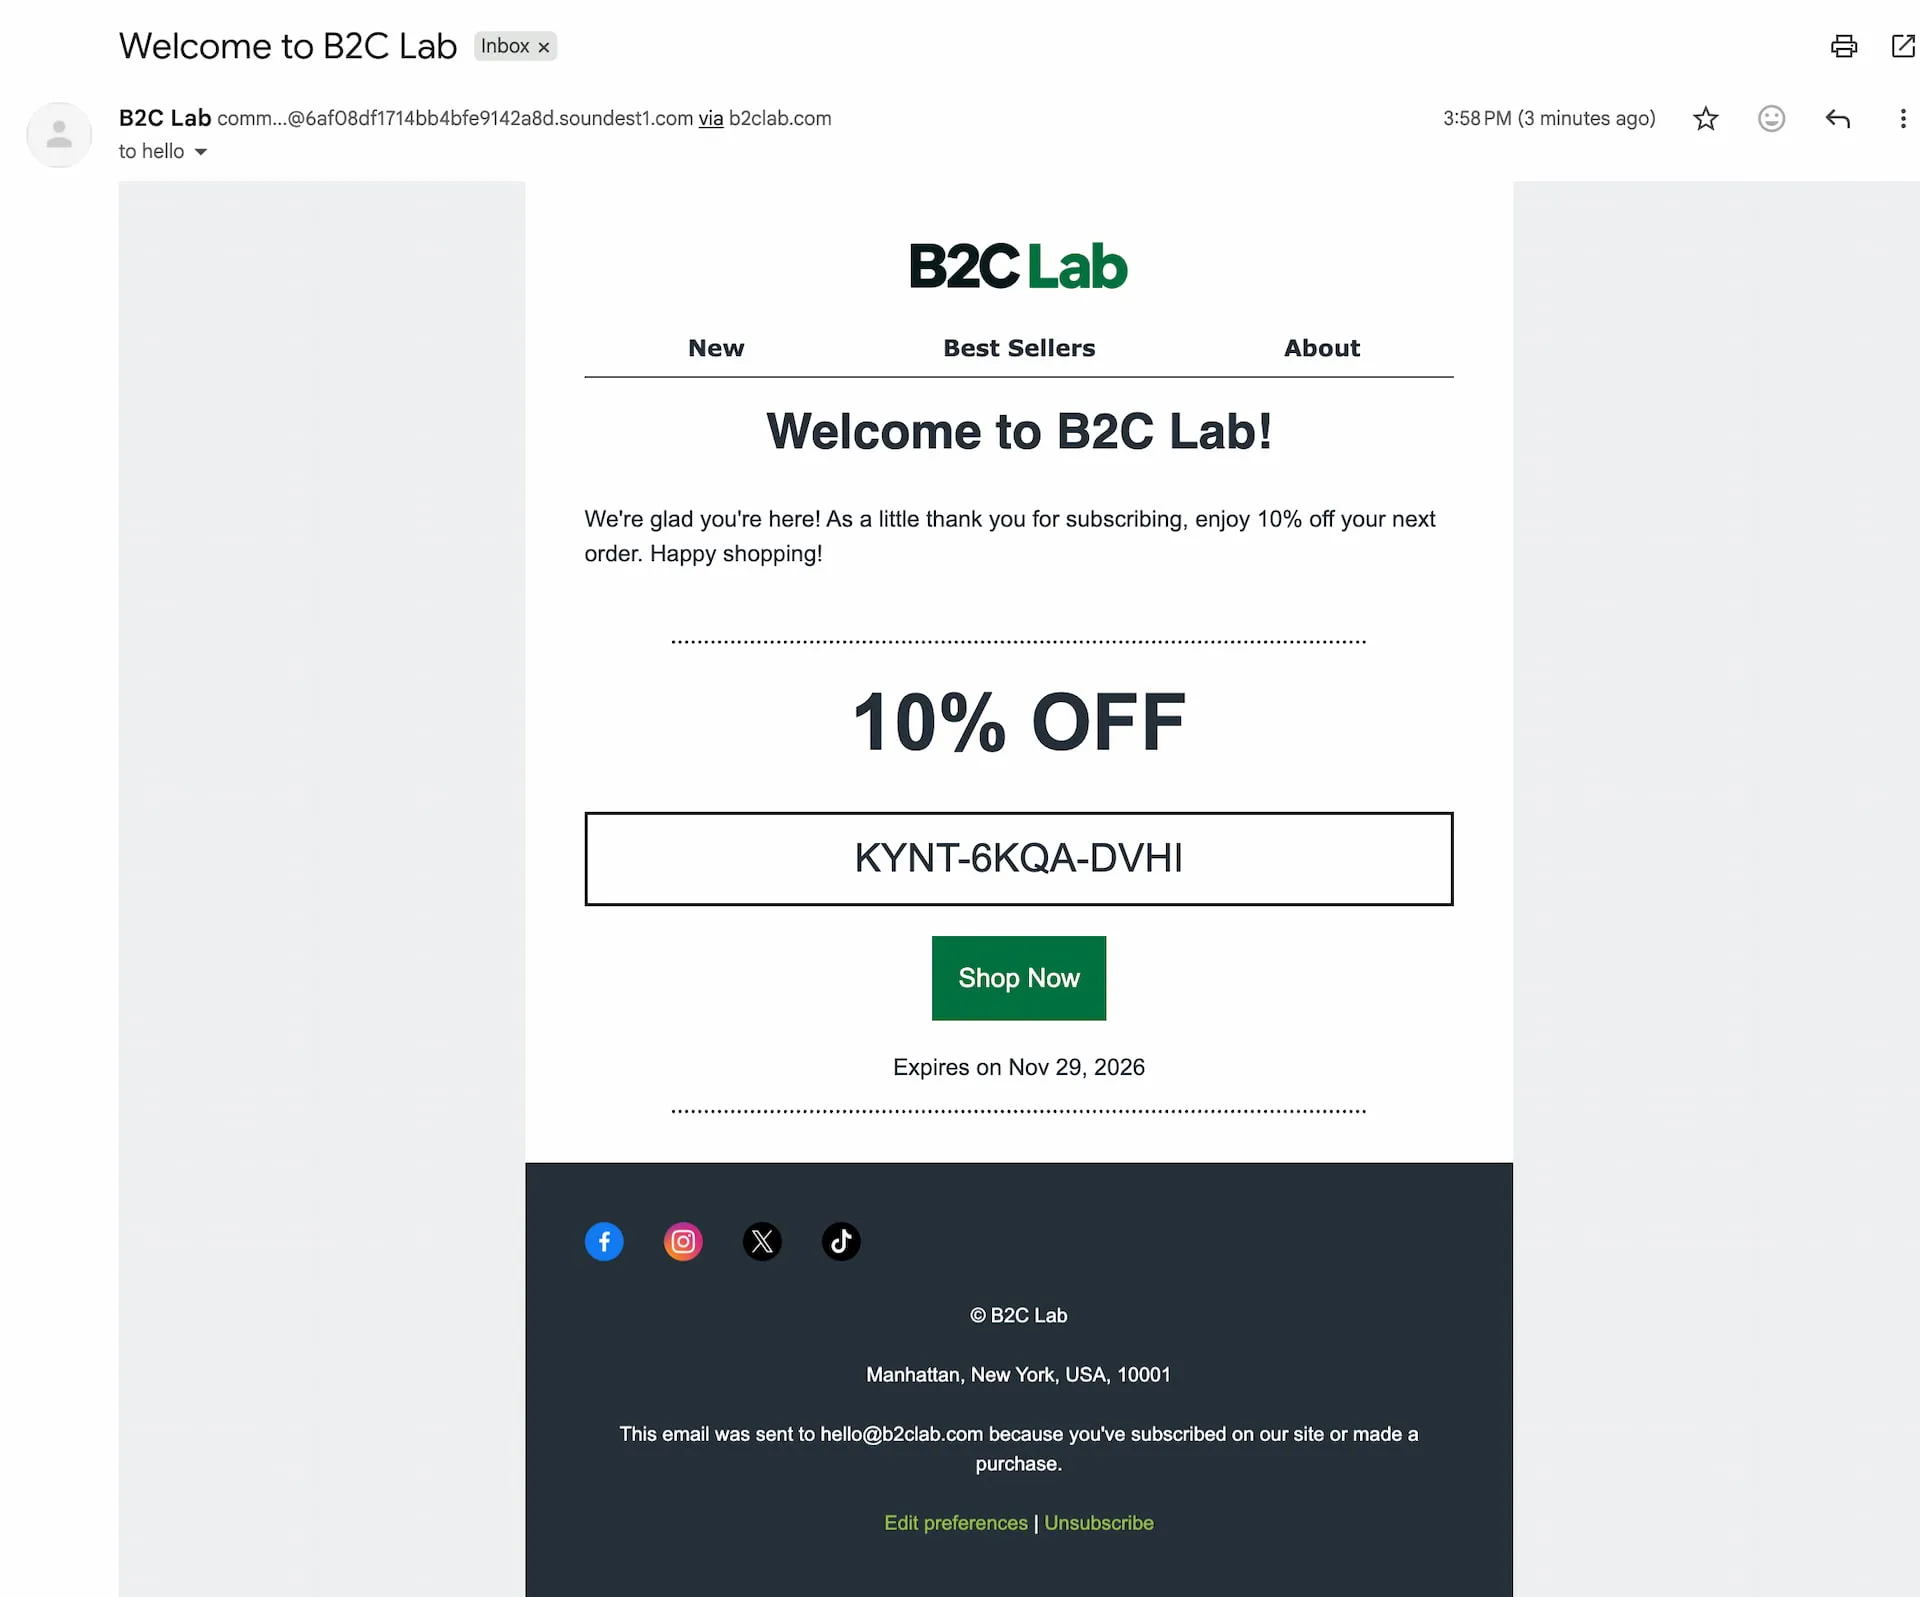
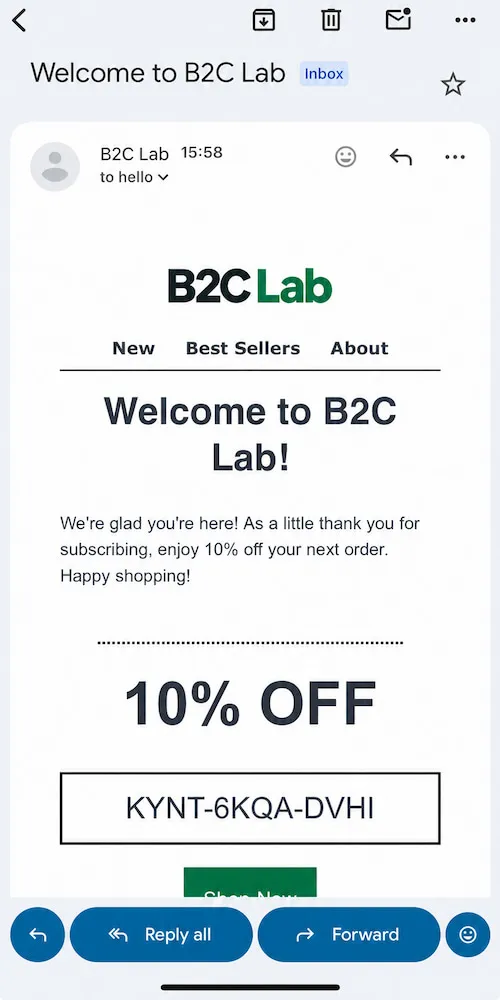
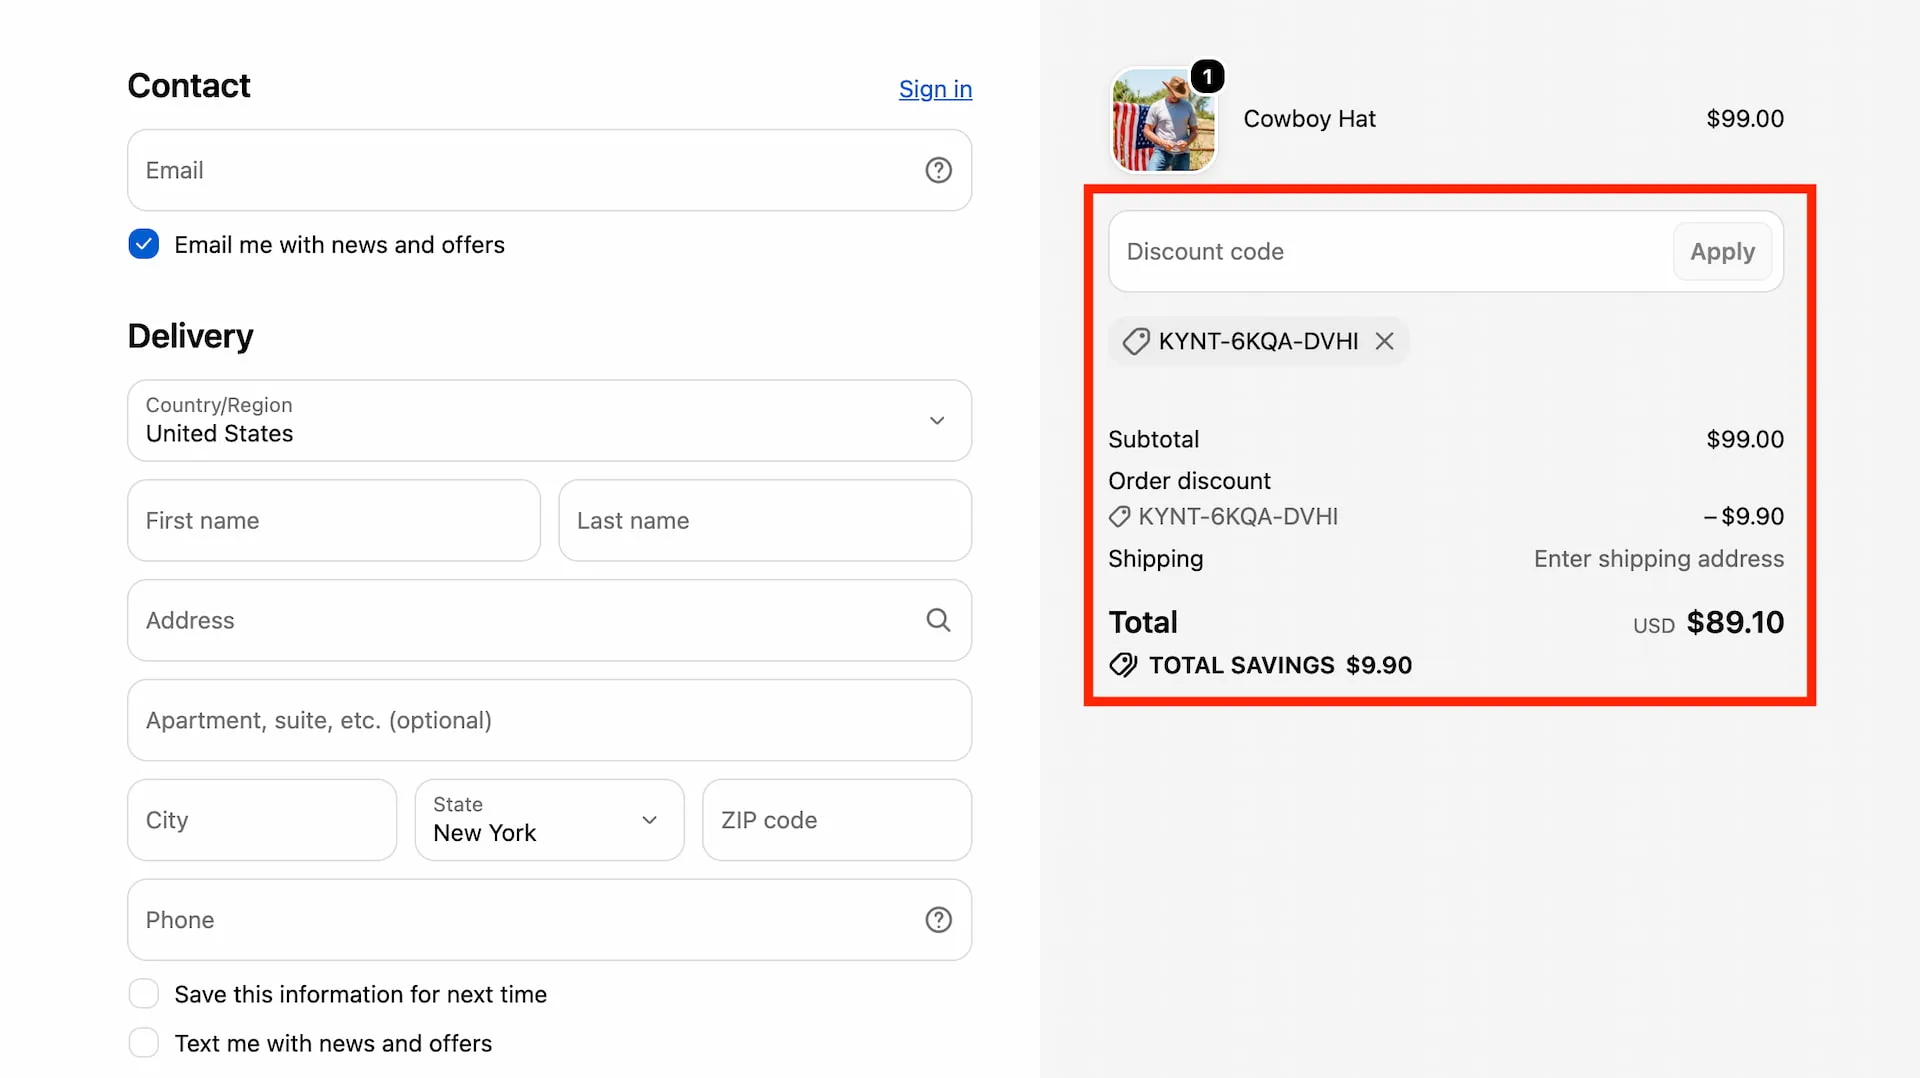
For the discount test, you can add a product to the Shopify cart and proceed to checkout to verify whether the generated code is accepted under the configured conditions. You don’t need to complete a paid order just to check whether a code is recognized.
To verify that the discount actually works, we also tested the generated code at Shopify Checkout. As shown below, the 10% discount was successfully applied to a $99.00 order, reducing the subtotal by $9.90 to $89.10 before shipping.
It’s also worth checking the discount records in your Shopify admin to understand how the generated codes are managed.
If the welcome email doesn’t arrive, first check the Spam and Promotions folders. Then verify that the workflow is active, the subscriber meets the trigger filters, and the contact has the appropriate email marketing subscription status.
Once these checks pass, your Welcome Automation is ready to welcome new subscribers automatically.
Frequently Asked Questions
What is a Welcome Automation in Omnisend?
A Welcome Automation is an automated workflow that sends messages when contacts meet specific subscription conditions. It can be used to welcome new subscribers, introduce your store, and share special offers without manually sending each email.
Can I send multiple welcome emails?
Yes. You can add more Email and Delay steps to build a welcome email series. For example, you could send an introductory email first, followed by a brand introduction or product recommendations a few days later.
For beginners, I recommend starting with one email and expanding the workflow once you’ve confirmed everything works.
Does Omnisend automatically generate discount codes?
Yes. The built-in Discount element in the automation email editor supports automatically generated discount codes.
You can configure the discount value, applicable orders or collections, expiration period, and combination settings. Be sure to test the generated code and its Shopify rules before offering it to customers.
Why isn’t the discount code showing in my test email?
Omnisend doesn’t render generated discount codes in standard test emails. The code placeholder in the editor or test email doesn’t necessarily indicate a problem.
To verify the actual discount code, test the live automation by subscribing through your Shopify store.
Why didn’t my welcome email send?
Check whether the workflow is active and whether the contact meets all the trigger conditions.
For the workflow used in this tutorial, the contact must be subscribed to email marketing through a signup form and meet the first-subscription condition.
Also check the delay settings, exit conditions, and the recipient’s Spam or Promotions folder.
Final Thoughts
A welcome email is one of the simplest ways to start building a relationship with new subscribers.
With Omnisend, we can automate the process instead of manually sending an email every time someone joins our mailing list.
In this tutorial, we created a Welcome Automation, reviewed its trigger conditions, configured the delay, customized the email, and set up a welcome discount. We also covered how to preview the message and test the complete workflow.
If you’re just getting started with email marketing for Shopify, a single welcome email is a good place to begin. Once it’s working, you can experiment with additional messages, different offers, and more advanced automation workflows.
In the previous tutorial How to Create a Signup Form in Omnisend for Shopify, we learned how to collect email subscribers using an Omnisend Signup Form. Now that we’ve connected signup forms with a welcome automation, we’ve completed the basic process of collecting subscribers and welcoming them automatically.
Coming next: We’ll explore how to create an Abandoned Cart Automation in Omnisend for Shopify, helping us follow up with shoppers who add products to their carts but leave without completing a purchase.
Support & Share
If this article helped you, please share or support!