





How to Create a Signup Form in Omnisend for Shopify
- 1How to Set Up Omnisend for Shopify: A Complete Beginner's Guide
- 2How to Create a Signup Form in Omnisend for ShopifyThis article
- 3How to Set Up a Welcome Automation in Omnisend for Shopify
This article contains affiliate links. If you sign up through these links, we may earn a commission at no extra cost to you.
In our previous guide, How to Set Up Omnisend for Shopify: A Complete Beginner’s Guide, we walked through installing Omnisend, connecting your Shopify store, and configuring your brand settings.
Now, it’s time to create your first signup form and start growing your email list.
Signup forms let visitors subscribe to your emails directly from your Shopify store. You can also offer a discount to encourage more visitors to sign up.
In this guide, we’ll show you how to create, customize, and enable a signup form in Omnisend, step by step.
Don’t have Omnisend yet? Get started for free and follow this tutorial to create your first signup form.
Step 1: Create a New Signup Form
First, log in to your Omnisend account. If you haven’t created an account yet, you can sign up for Omnisend for free.
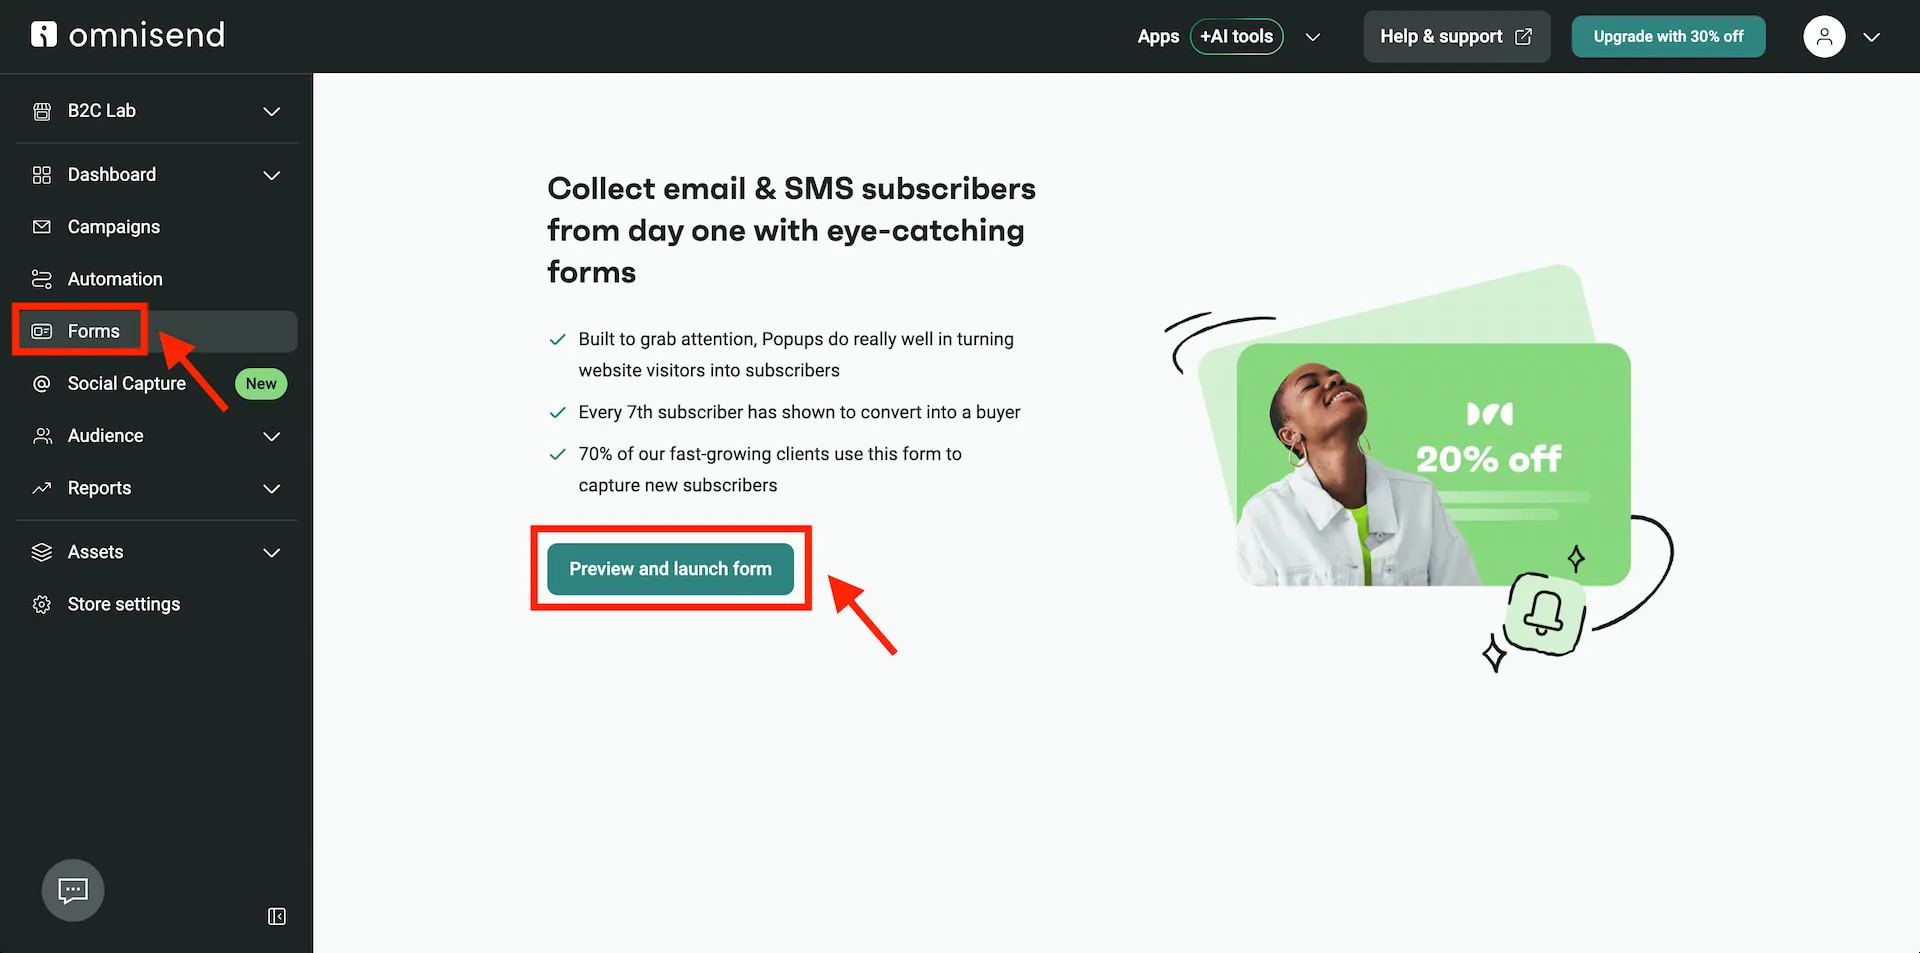
From your Omnisend dashboard, click Forms in the left sidebar.
If this is your first time creating a form, you may see a Preview and launch form button. Click it to open a ready-made signup form in the editor.
If you’ve already created a form, click Create form in the top-right corner of the Forms page. You can then choose from different form templates and types, including popups, flyouts, and embedded forms.
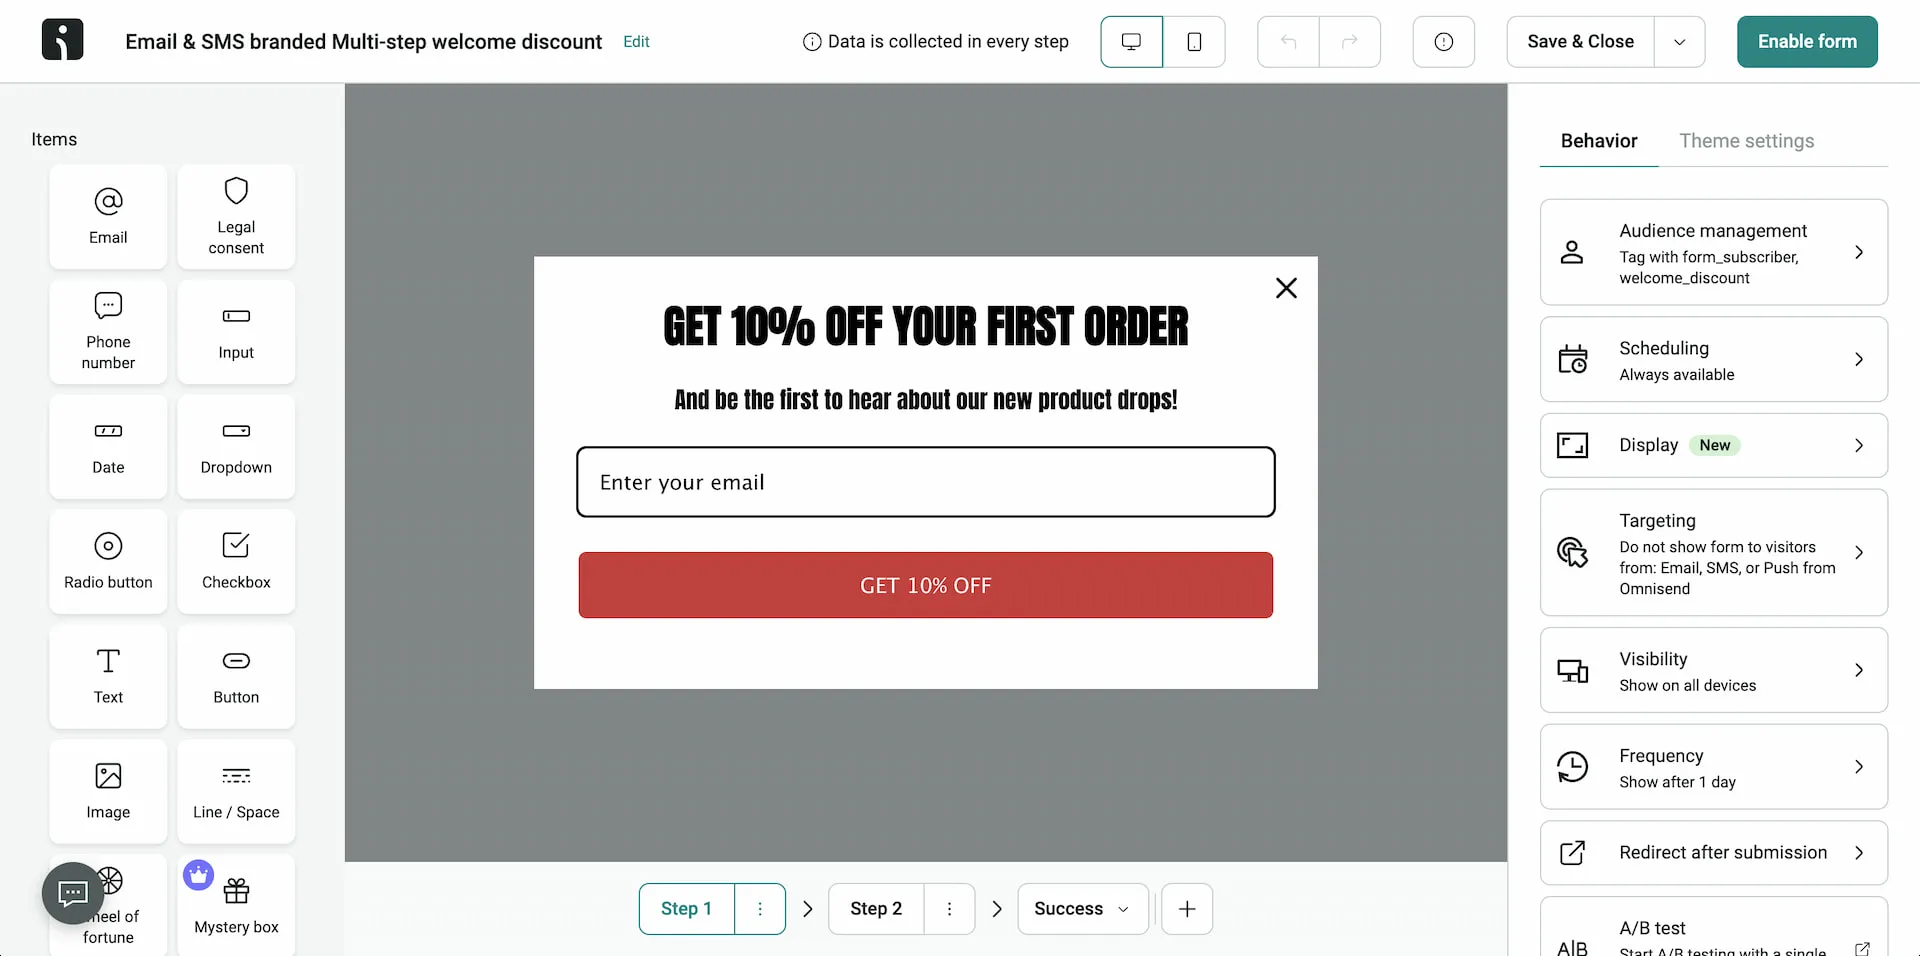
For this tutorial, we’ll use a popup form that offers a 10% discount to new subscribers.
Once you’ve opened the form editor, you can customize its content, design, and settings to match your Shopify store.
Step 2: Customize Your Signup Form
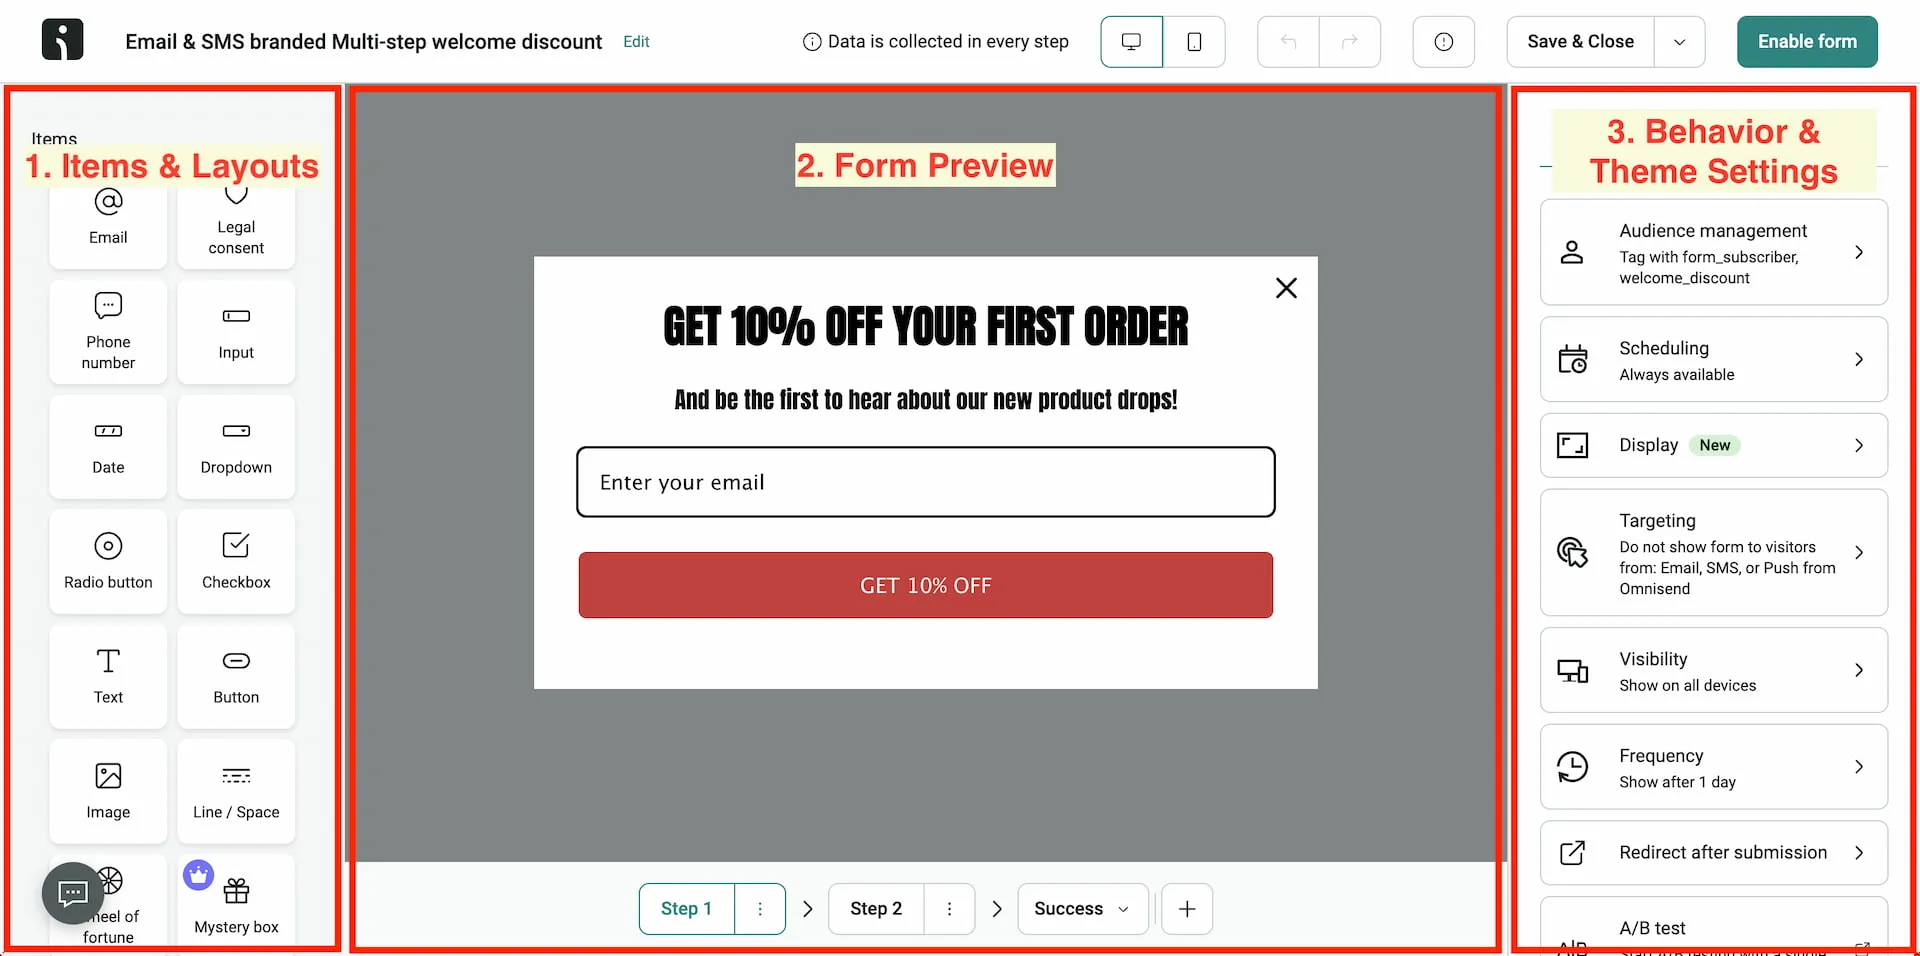
The Omnisend form editor lets you customize your signup form without writing code. It has three main areas:
- Items & Layouts (Left): Add elements and choose layouts for your form.
- Form Preview (Center): Preview your form and click elements to edit them.
- Behavior & Theme Settings (Right): Customize the form’s appearance and configure its behavior.
2.1 Add Items and Layouts
In the left panel, you can drag items such as Text, Email, Phone number, Image, and Button into your form.
You can also choose from different layouts, including one-column and multi-column layouts, to organize your content.
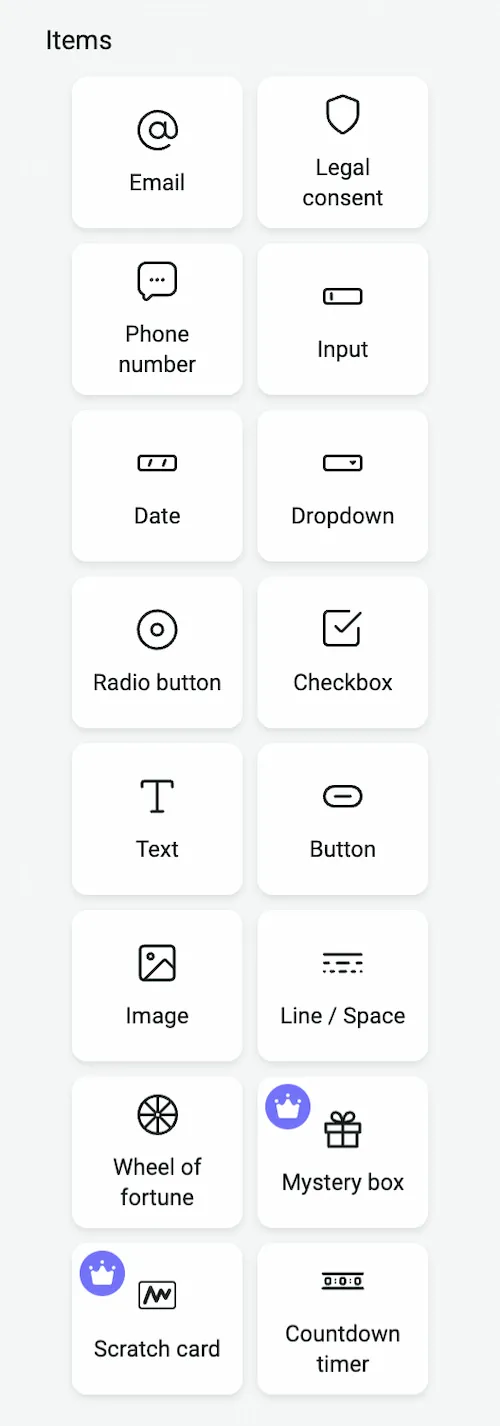
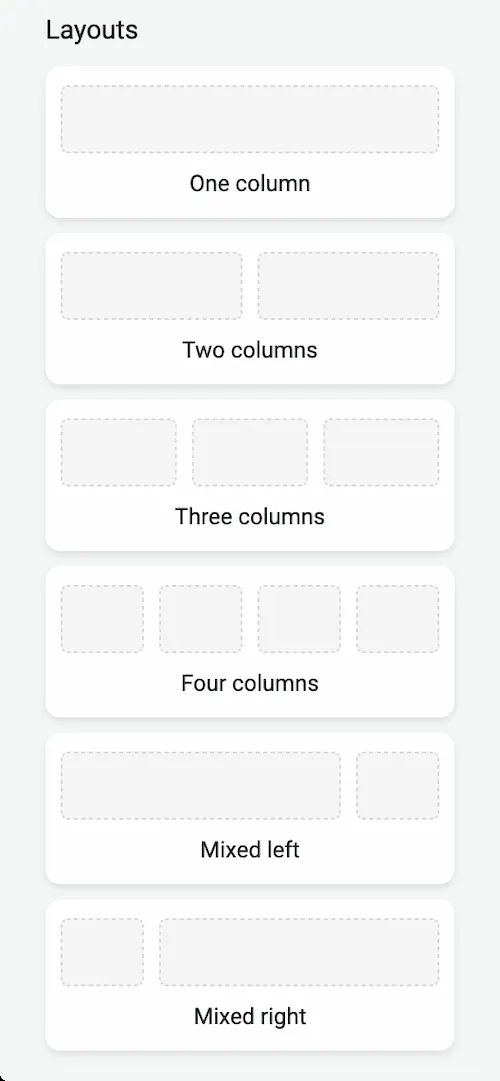
For a simple email signup form, you only need a headline, a short description, an email field, and a button.
2.2 Edit the Form Content
Click an element in the center preview to select it. You can edit the text directly by clicking on it.
When an element is selected, its settings will appear in the right panel. Here, you can customize options such as font, size, color, and other styling settings.
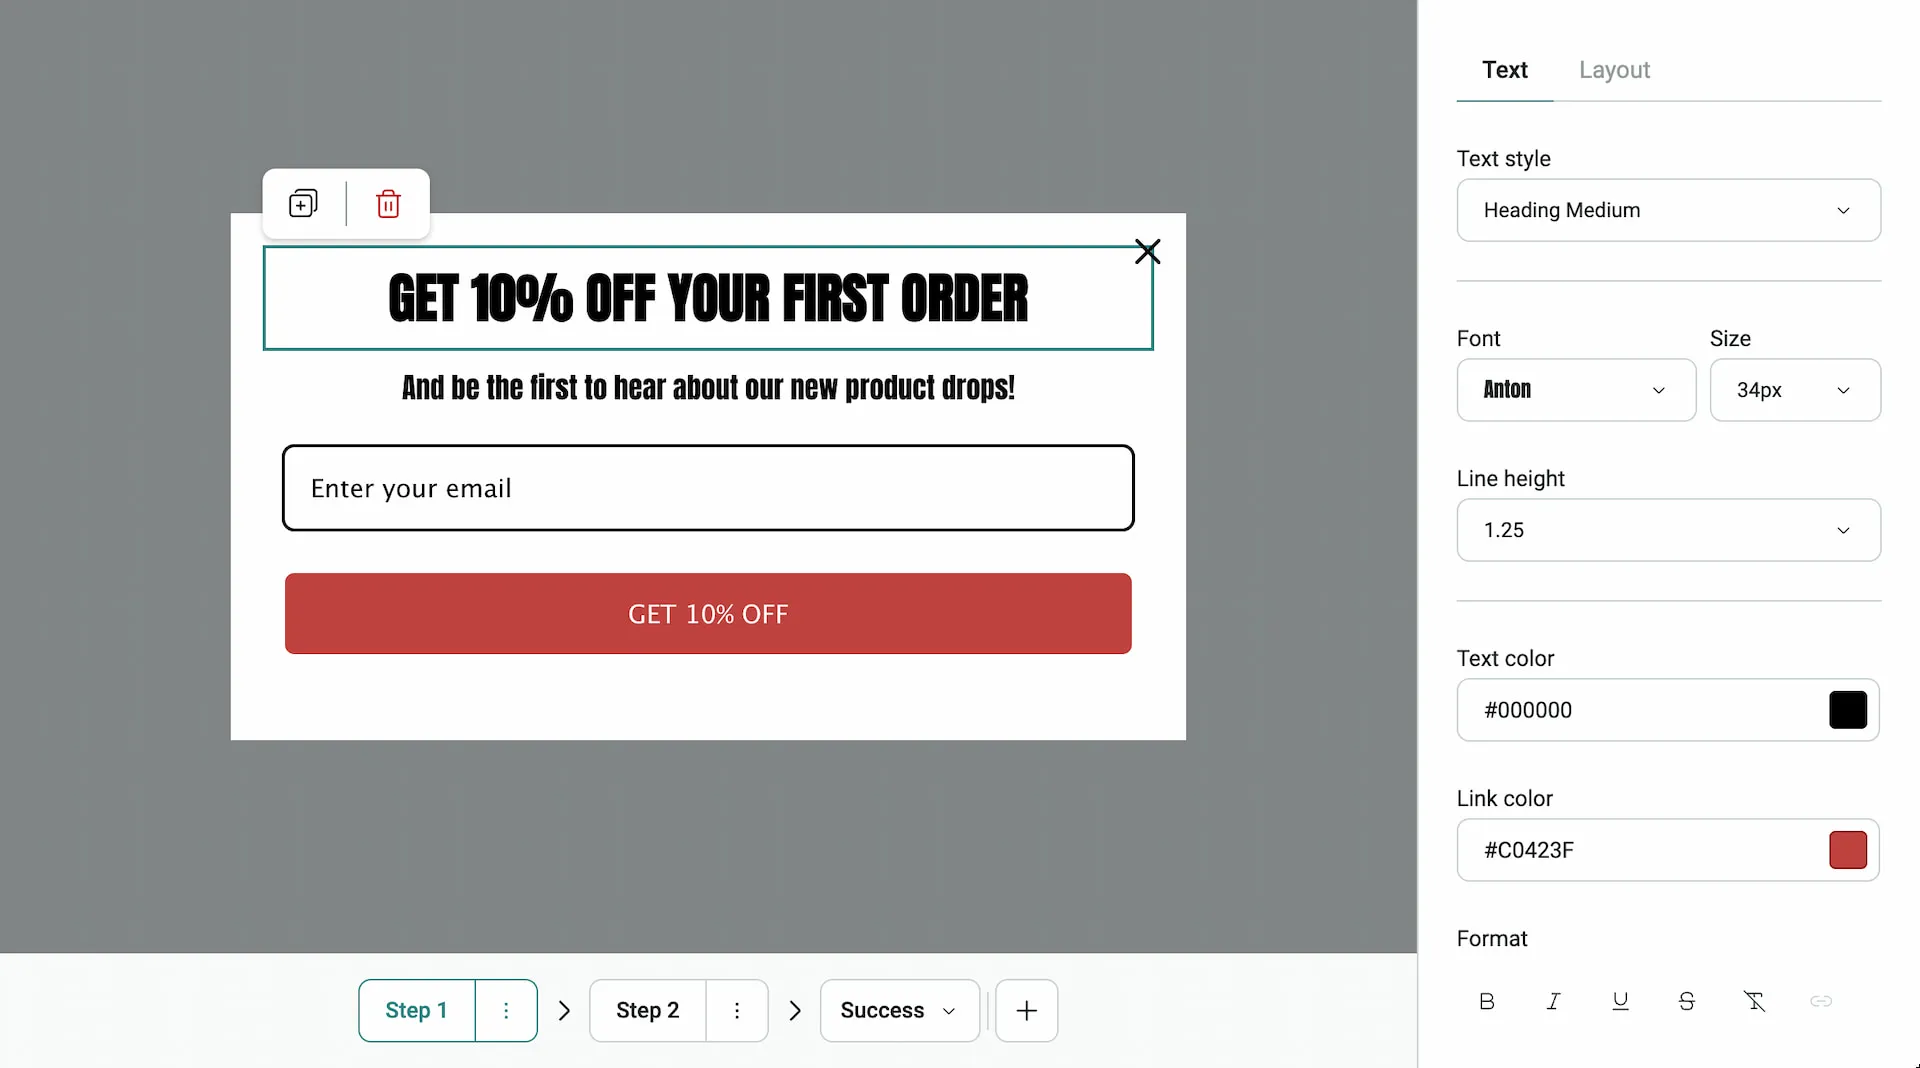
Keep your form content short and clear so visitors can easily understand what they’re signing up for.
Step 3: Customize the Form Design
The right panel includes two main tabs: Behavior and Theme settings. Behavior controls how your form works, while Theme settings controls its appearance.
Let’s start with the design. Click Theme settings to customize the look of your form.
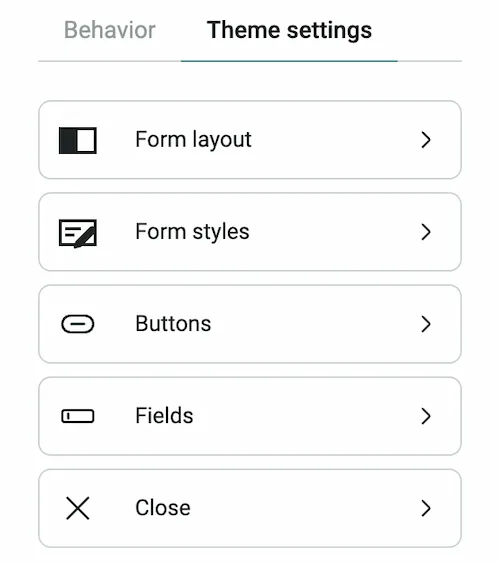
The available sections include:
- Form layout: Choose how your form appears on your store. You can change the display type (such as Popup), adjust the form width, choose a background image, and set the form’s position on the screen.
- Form styles: Adjust the form’s corner shape, border width, style, and color, as well as the overlay color behind the popup.
- Buttons: Change button styles and colors.
- Fields: Customize the appearance of input fields.
- Close: Adjust the close button’s appearance.
Try to use colors and styles that match your Shopify store to keep your branding consistent.
We’ll cover the Behavior settings later in Step 5.
Step 4: Configure Your Form Steps
Omnisend supports multi-step signup forms, allowing you to collect different information across multiple steps.
You can switch between steps using the navigation bar at the bottom of the editor.
For example, a multi-step form may include:
- Step 1 — Email: Collect visitors’ email addresses.
- Step 2 — Phone number: Optionally collect phone numbers for SMS marketing.
- Success: Display a confirmation message after signup.
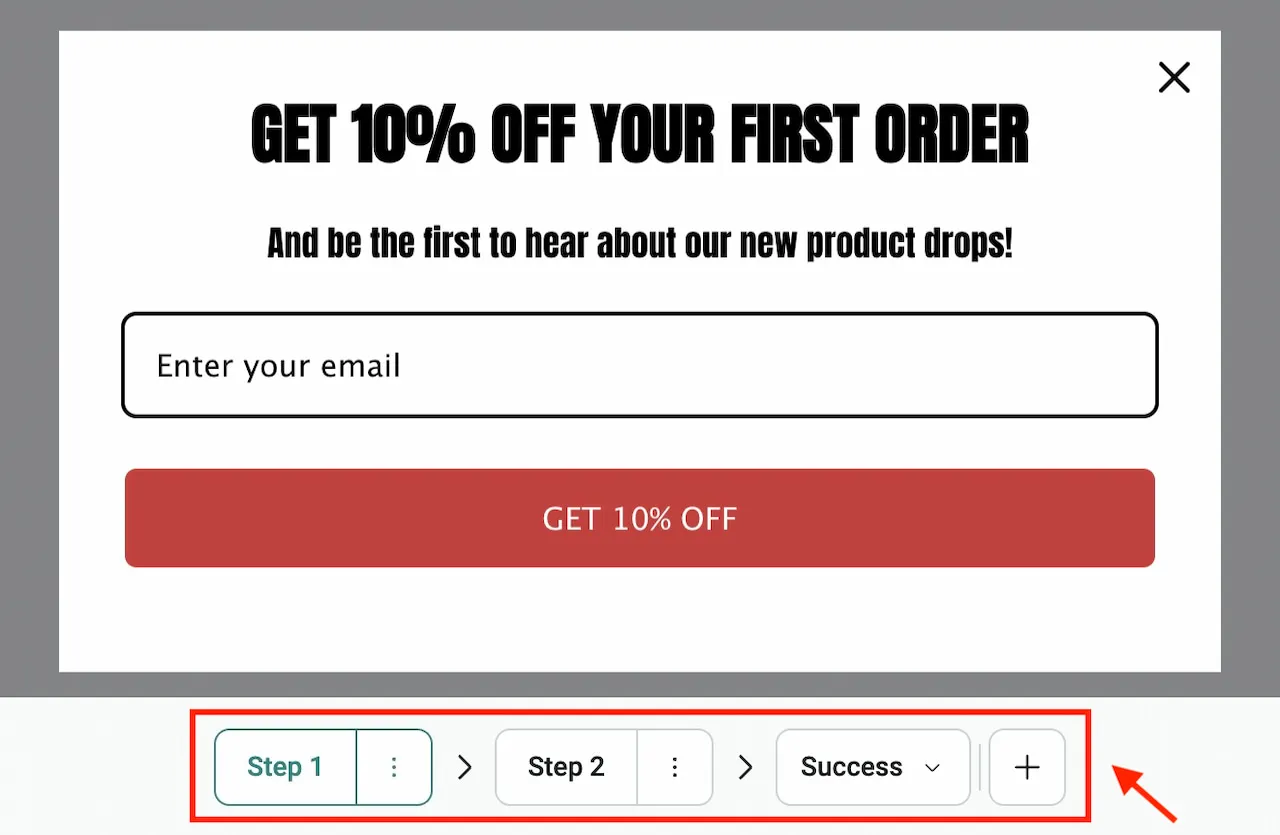
You can also click the + button to add more steps or a teaser. A teaser is a small, clickable button that allows visitors to open or reopen your signup form without interrupting their browsing.
4.1 Do You Need a Second Step?
No. If you only want email subscribers, you can remove the phone number step and keep the form simple.
To remove Step 2, click the three-dot menu next to it and select the delete option.
If you collect phone numbers for SMS marketing, make sure your form includes the required consent language and follows applicable rules.
4.2 Customize the Success Message
Click Success at the bottom of the editor to customize the message visitors see after signing up.
For example, you can change the message to:
Thanks for Signing Up!
Welcome to our newsletter! Check your inbox for your discount.
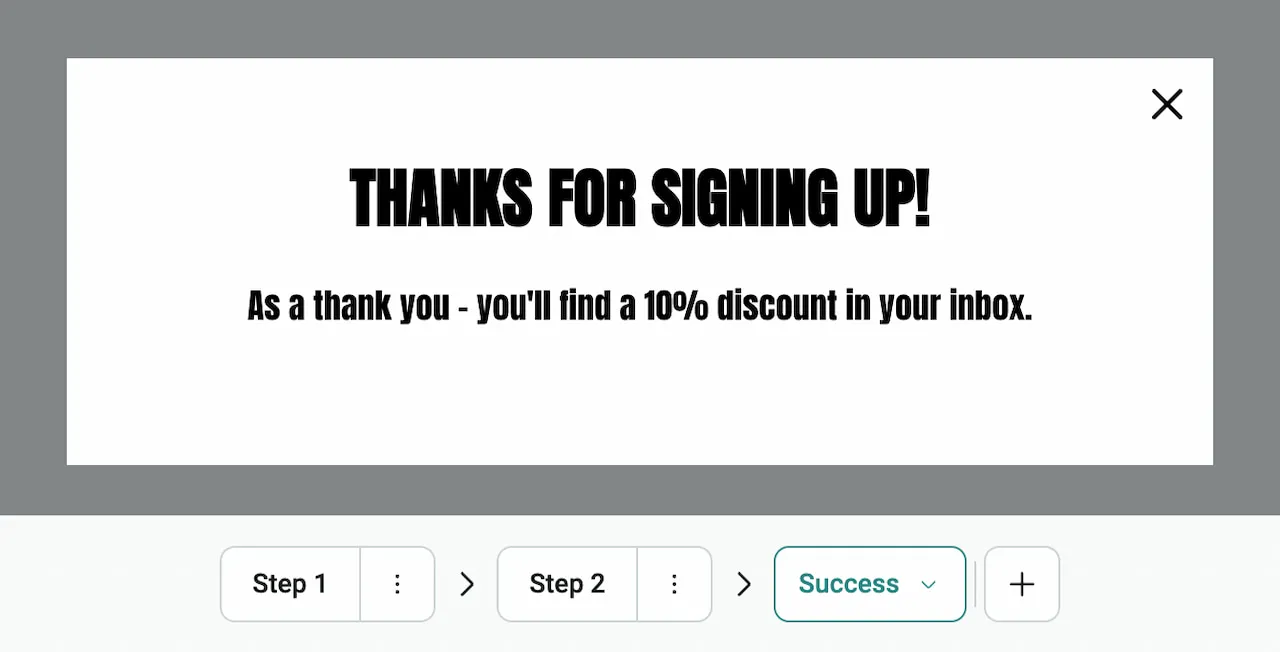
If you’re offering a discount by email, you’ll also need to set up an automation to deliver it. We’ll cover this in the next tutorial.
Step 5: Configure Form Behavior
Now that you’ve customized your form’s design and steps, it’s time to configure how it works.
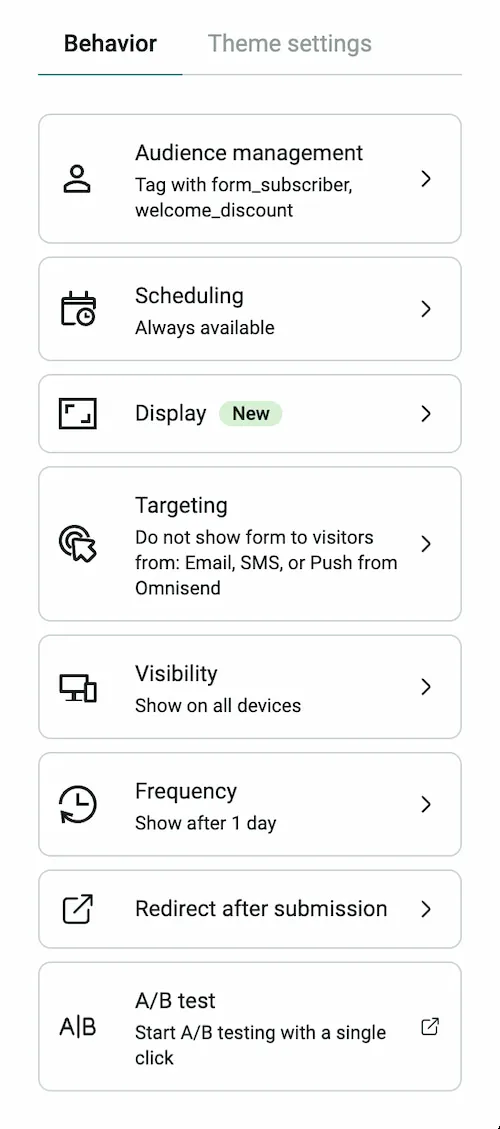
Click Behavior in the right panel to access the form’s audience management and display settings.
5.1 Audience Management
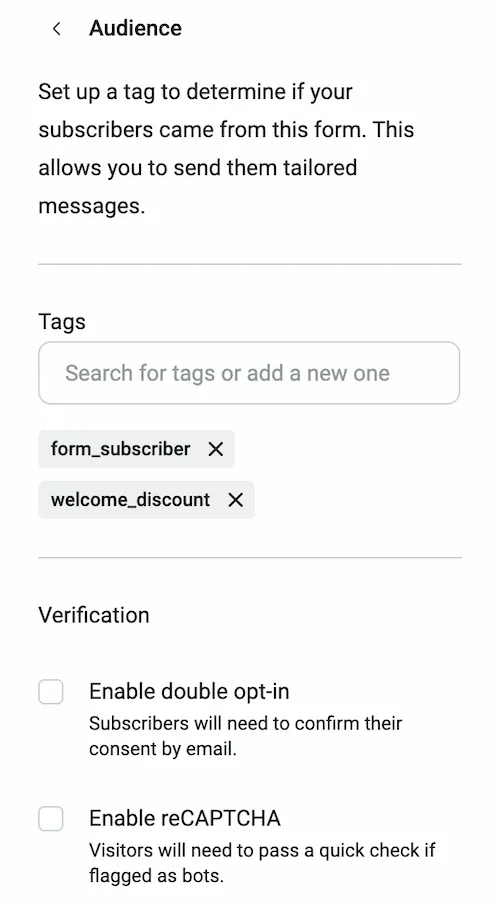
Click Audience management to organize and verify subscribers collected through your form.
You can configure the following options:
- Tags: Add tags to identify subscribers who signed up through this form, making it easier to segment your audience and send targeted messages.
- Double opt-in: Require subscribers to confirm their email subscription before they’re added as confirmed subscribers.
- reCAPTCHA: Help protect your form from bot submissions by adding a verification check when suspicious activity is detected.
5.2 Display and Targeting
The Behavior panel includes several settings that control when, where, and how often your signup form appears.
-
Scheduling: Set a start and end date to control when your form is active. If you don’t set a schedule, the form can remain available until you disable it.
-
Display: Choose when your form appears based on page visits, time spent on a page, scroll depth, or exit intent. You can also use a custom trigger. Some advanced options, such as personalized triggers, may require a paid plan.
-
Targeting: Control which visitors see your form using visitor, page, cart, location, and traffic source targeting. You can also use UTM parameters to target visitors from specific marketing campaigns.
-
Visibility: Choose whether your form appears on all devices, mobile devices only, or desktop devices only.
-
Frequency: Control how soon your form can appear again if a visitor doesn’t subscribe. For example, you can prevent the form from appearing again for one day after a visitor interacts with it.
For your first signup form, start with simple display rules. You can adjust the timing, targeting, and frequency later based on how visitors interact with your form.
5.3 Other Options
Omnisend also includes additional settings for controlling what happens after a visitor submits your form and testing different form designs.
-
Redirect after submission: Redirect visitors to a specific URL after they submit the form, such as a dedicated thank-you page.
-
A/B test: Compare two versions of your signup form to see which performs better. Clicking this option opens a separate A/B testing page where you can edit each version and configure the test.
These features are optional. You can publish your first signup form without configuring them.
Step 6: Preview and Enable Your Signup Form
Before publishing, click the desktop and mobile icons in the top toolbar to preview how your form looks on different screen sizes.
Review the headline, email field, button, success message, and display rules to make sure everything is set up correctly.
Once you’re ready, click Enable form in the top-right corner to publish your signup form.
Finally, open your Shopify store and test the signup process. If the form doesn’t appear, check its display, targeting, and frequency settings.
Conclusion
You’ve now created your first Omnisend signup form for your Shopify store.
You can use it to collect email subscribers, offer discounts, and start building an audience for your email marketing campaigns. As you learn what works for your visitors, you can adjust the design and display rules.
Ready to start collecting subscribers?
Frequently Asked Questions (FAQ)
Is Omnisend free to use for signup forms?
Omnisend offers a free plan that includes signup forms, subject to plan limits. Check its current pricing page for details.
Can I create an Omnisend signup form without coding?
Yes. Omnisend has a drag-and-drop form editor, so you can add fields, edit text, and customize the design without coding.
Do I need to collect phone numbers?
No. You can create a form that only collects email addresses. Adding a phone number step is optional.
Why isn’t my signup form showing on Shopify?
Make sure the form is enabled. Then review its scheduling, display, targeting, visibility, and frequency settings. Try testing in a fresh browser session as well.
Can I edit my signup form after publishing it?
Yes. You can return to the Omnisend form editor to update the content, design, or settings. Save your changes when you’re done.
What’s Next?
Now that you’ve created a signup form, the next step is to welcome your subscribers automatically.
In our next guide, How to Set Up a Welcome Automation in Omnisend for Shopify, we’ll show you how to create a welcome email that introduces your brand and delivers an offer to new subscribers.
Support & Share
If this article helped you, please share or support!